The China Cabinet Flip Project is Complete! | ORC, Week 03

We are now three weeks in to the One Room Challenge and with almost all of the sub-projects involved in our dining room makeover only started, I feel like I have made very little progress overall. But thankfully I have done my fair share of furniture flips over the past year and so the display cabinet project on my list felt pretty approachable and doable, which is exactly why I decided to tackle it right away. Does anyone else take on the easy things first just so they can feel the satisfaction of having something checked off the to-do list? It turned out even better than I imagined and am excited to show you how I updated an outdated china cabinet to be the modern-traditional display cabinet of my dreams!
Before I go any further, let me give you a little context. One of my favourite just-for-fun hobbies is mixing fun cocktails at home and so I have accumulated a decent little glass and barware collection over the past few years. I really wanted to incorporate a beautiful display cabinet into the design of our dining room that could store and display some of these special items. My criteria was that I wanted a piece that had doors and could close (to save me from endless dusting), made a statement (in either style, colour, or both), and didn’t break the bank (remember that I don’t have any existing dining room furniture so it adds up to buy all new pieces). I knew that DIY was the right route to take with this one and I had just the piece to do it with.

I found this pine china cabinet on my local buy-and-sell last fall (yes, it’s been sitting in my garage for a year now). It cost me $100 CAD for the unit, which was a great price considering the fact that it was in nearly perfect condition. Although a traditional china cabinet design offers tons of storage, the idea of a clunky bottom unit with a glass-doored top unit just felt a little dated and heavy to me. I wanted to update the design so that it made a statement and demanded attention based on the style, not just the sheer size. I loved the simplicity of the shape and interior panelling detail, but knew that it could be so much more with a little bit of love and effort.

Before
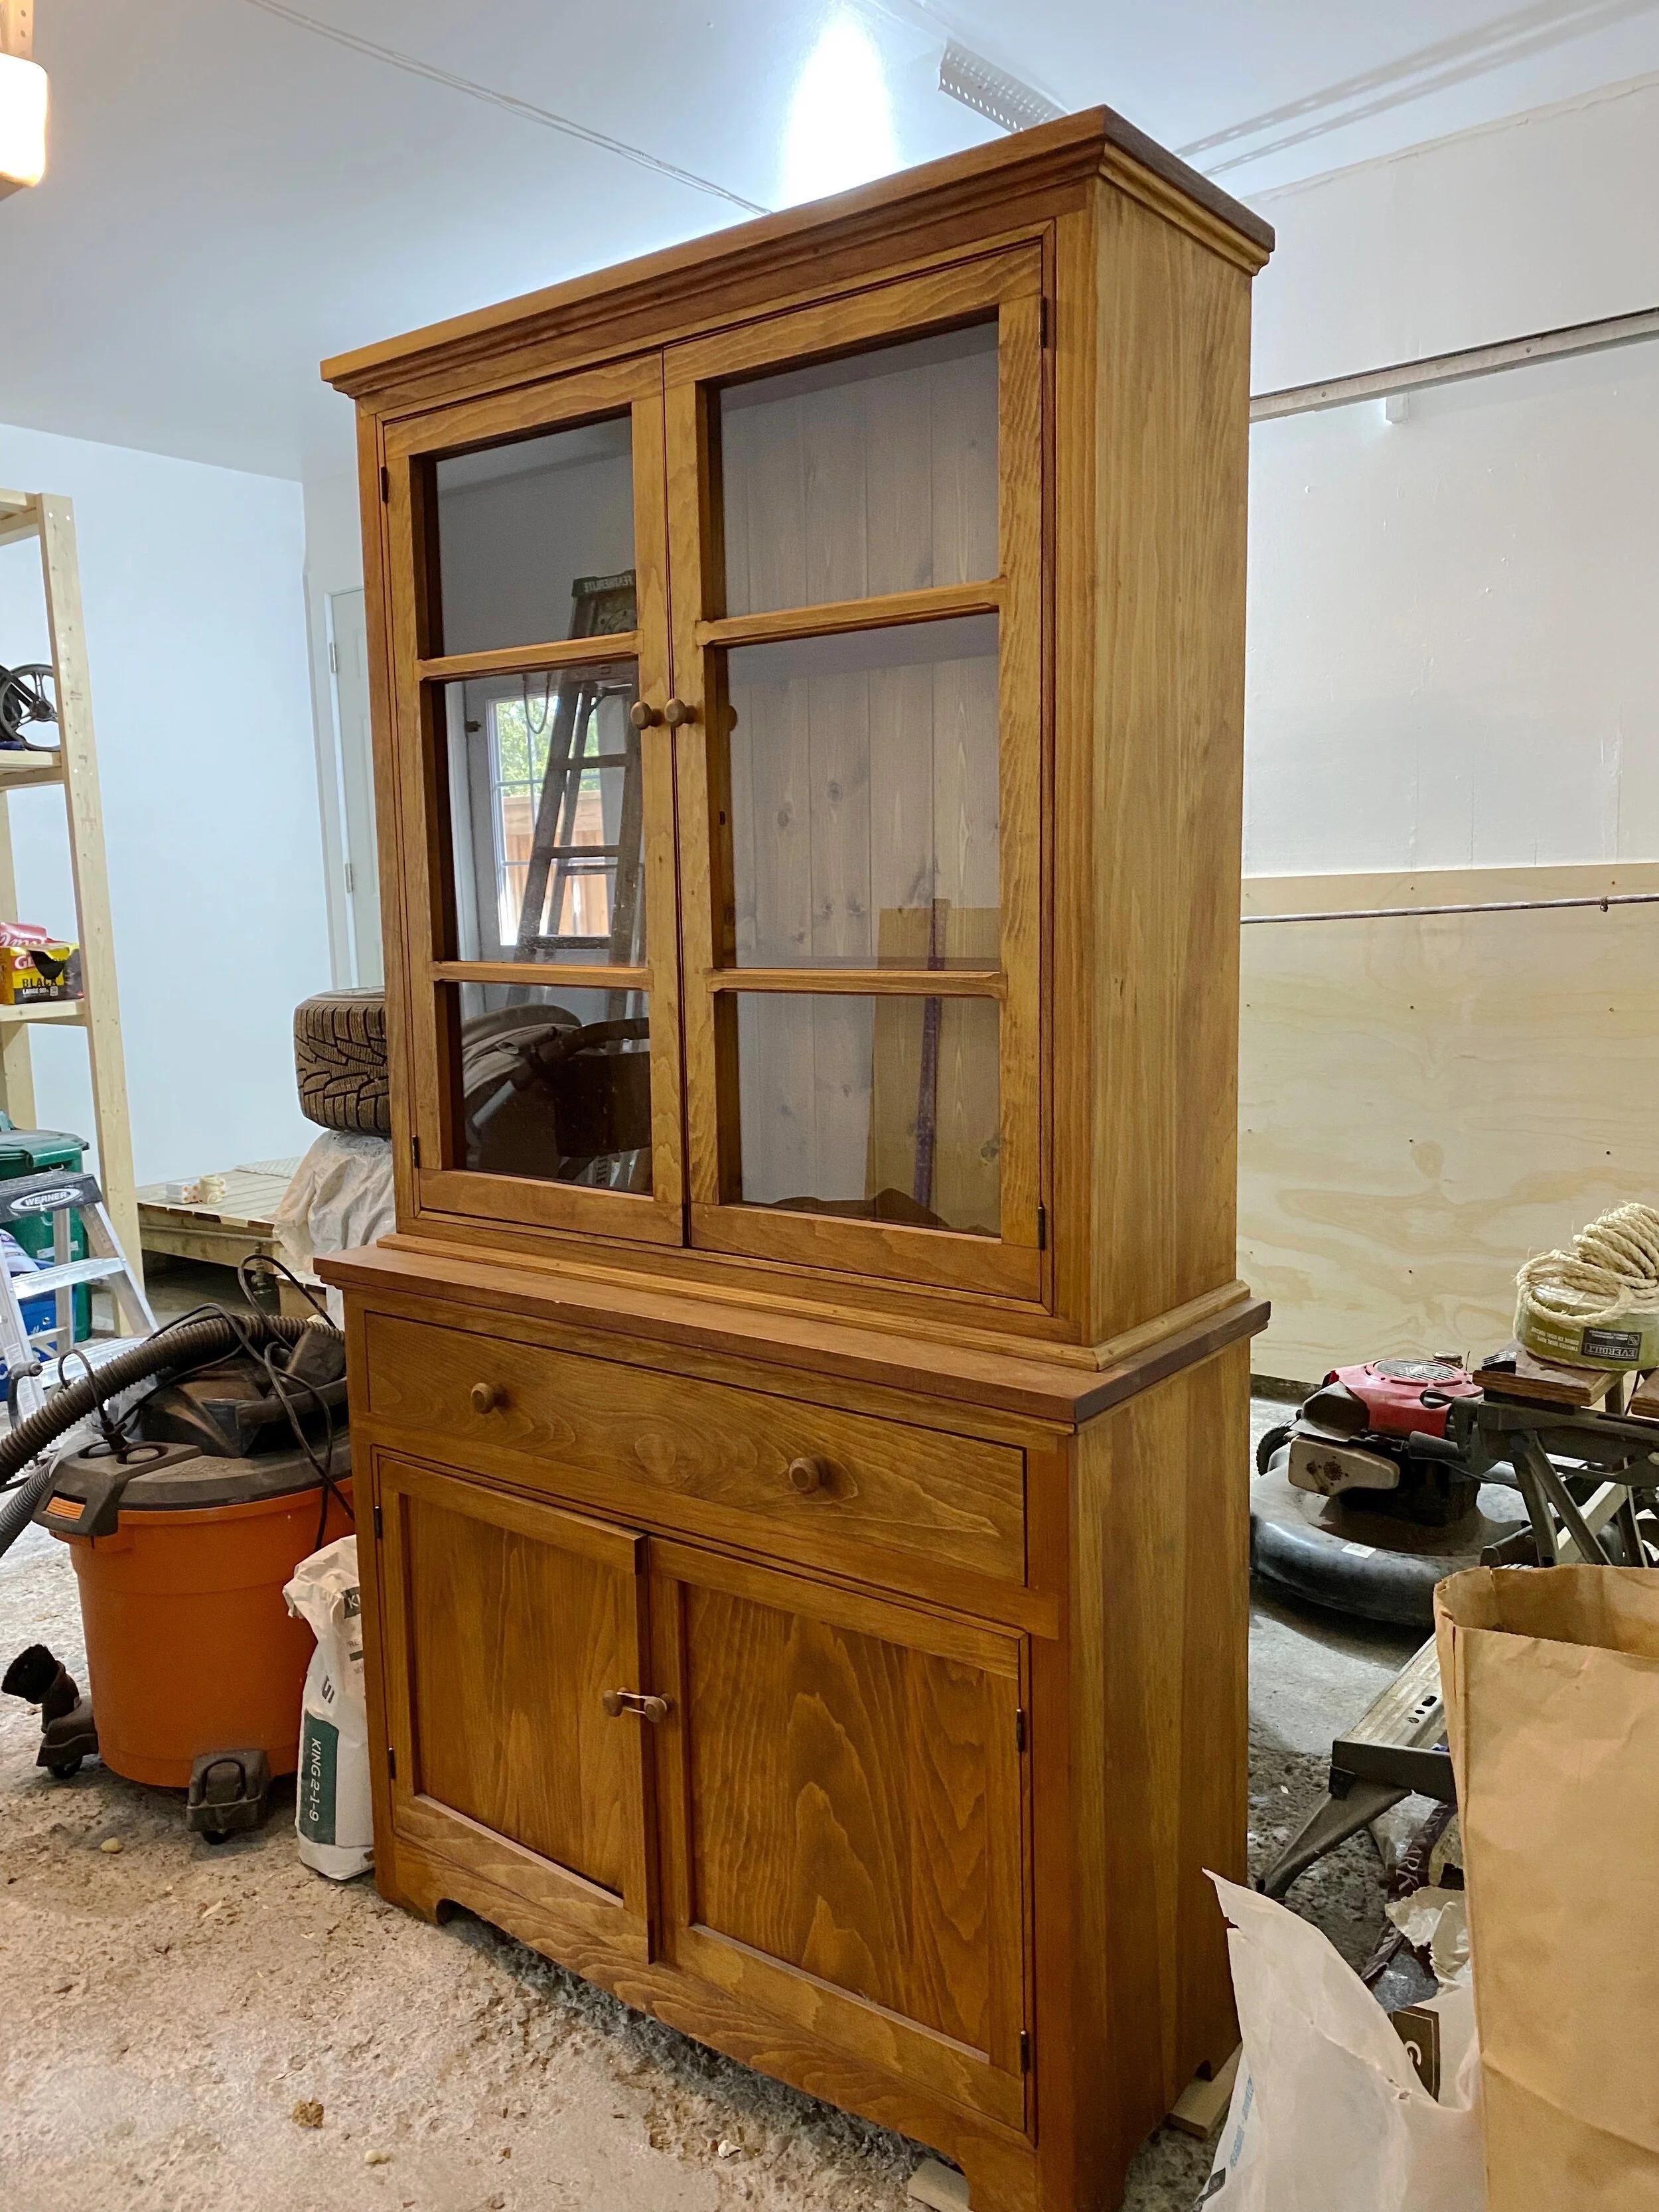
Before
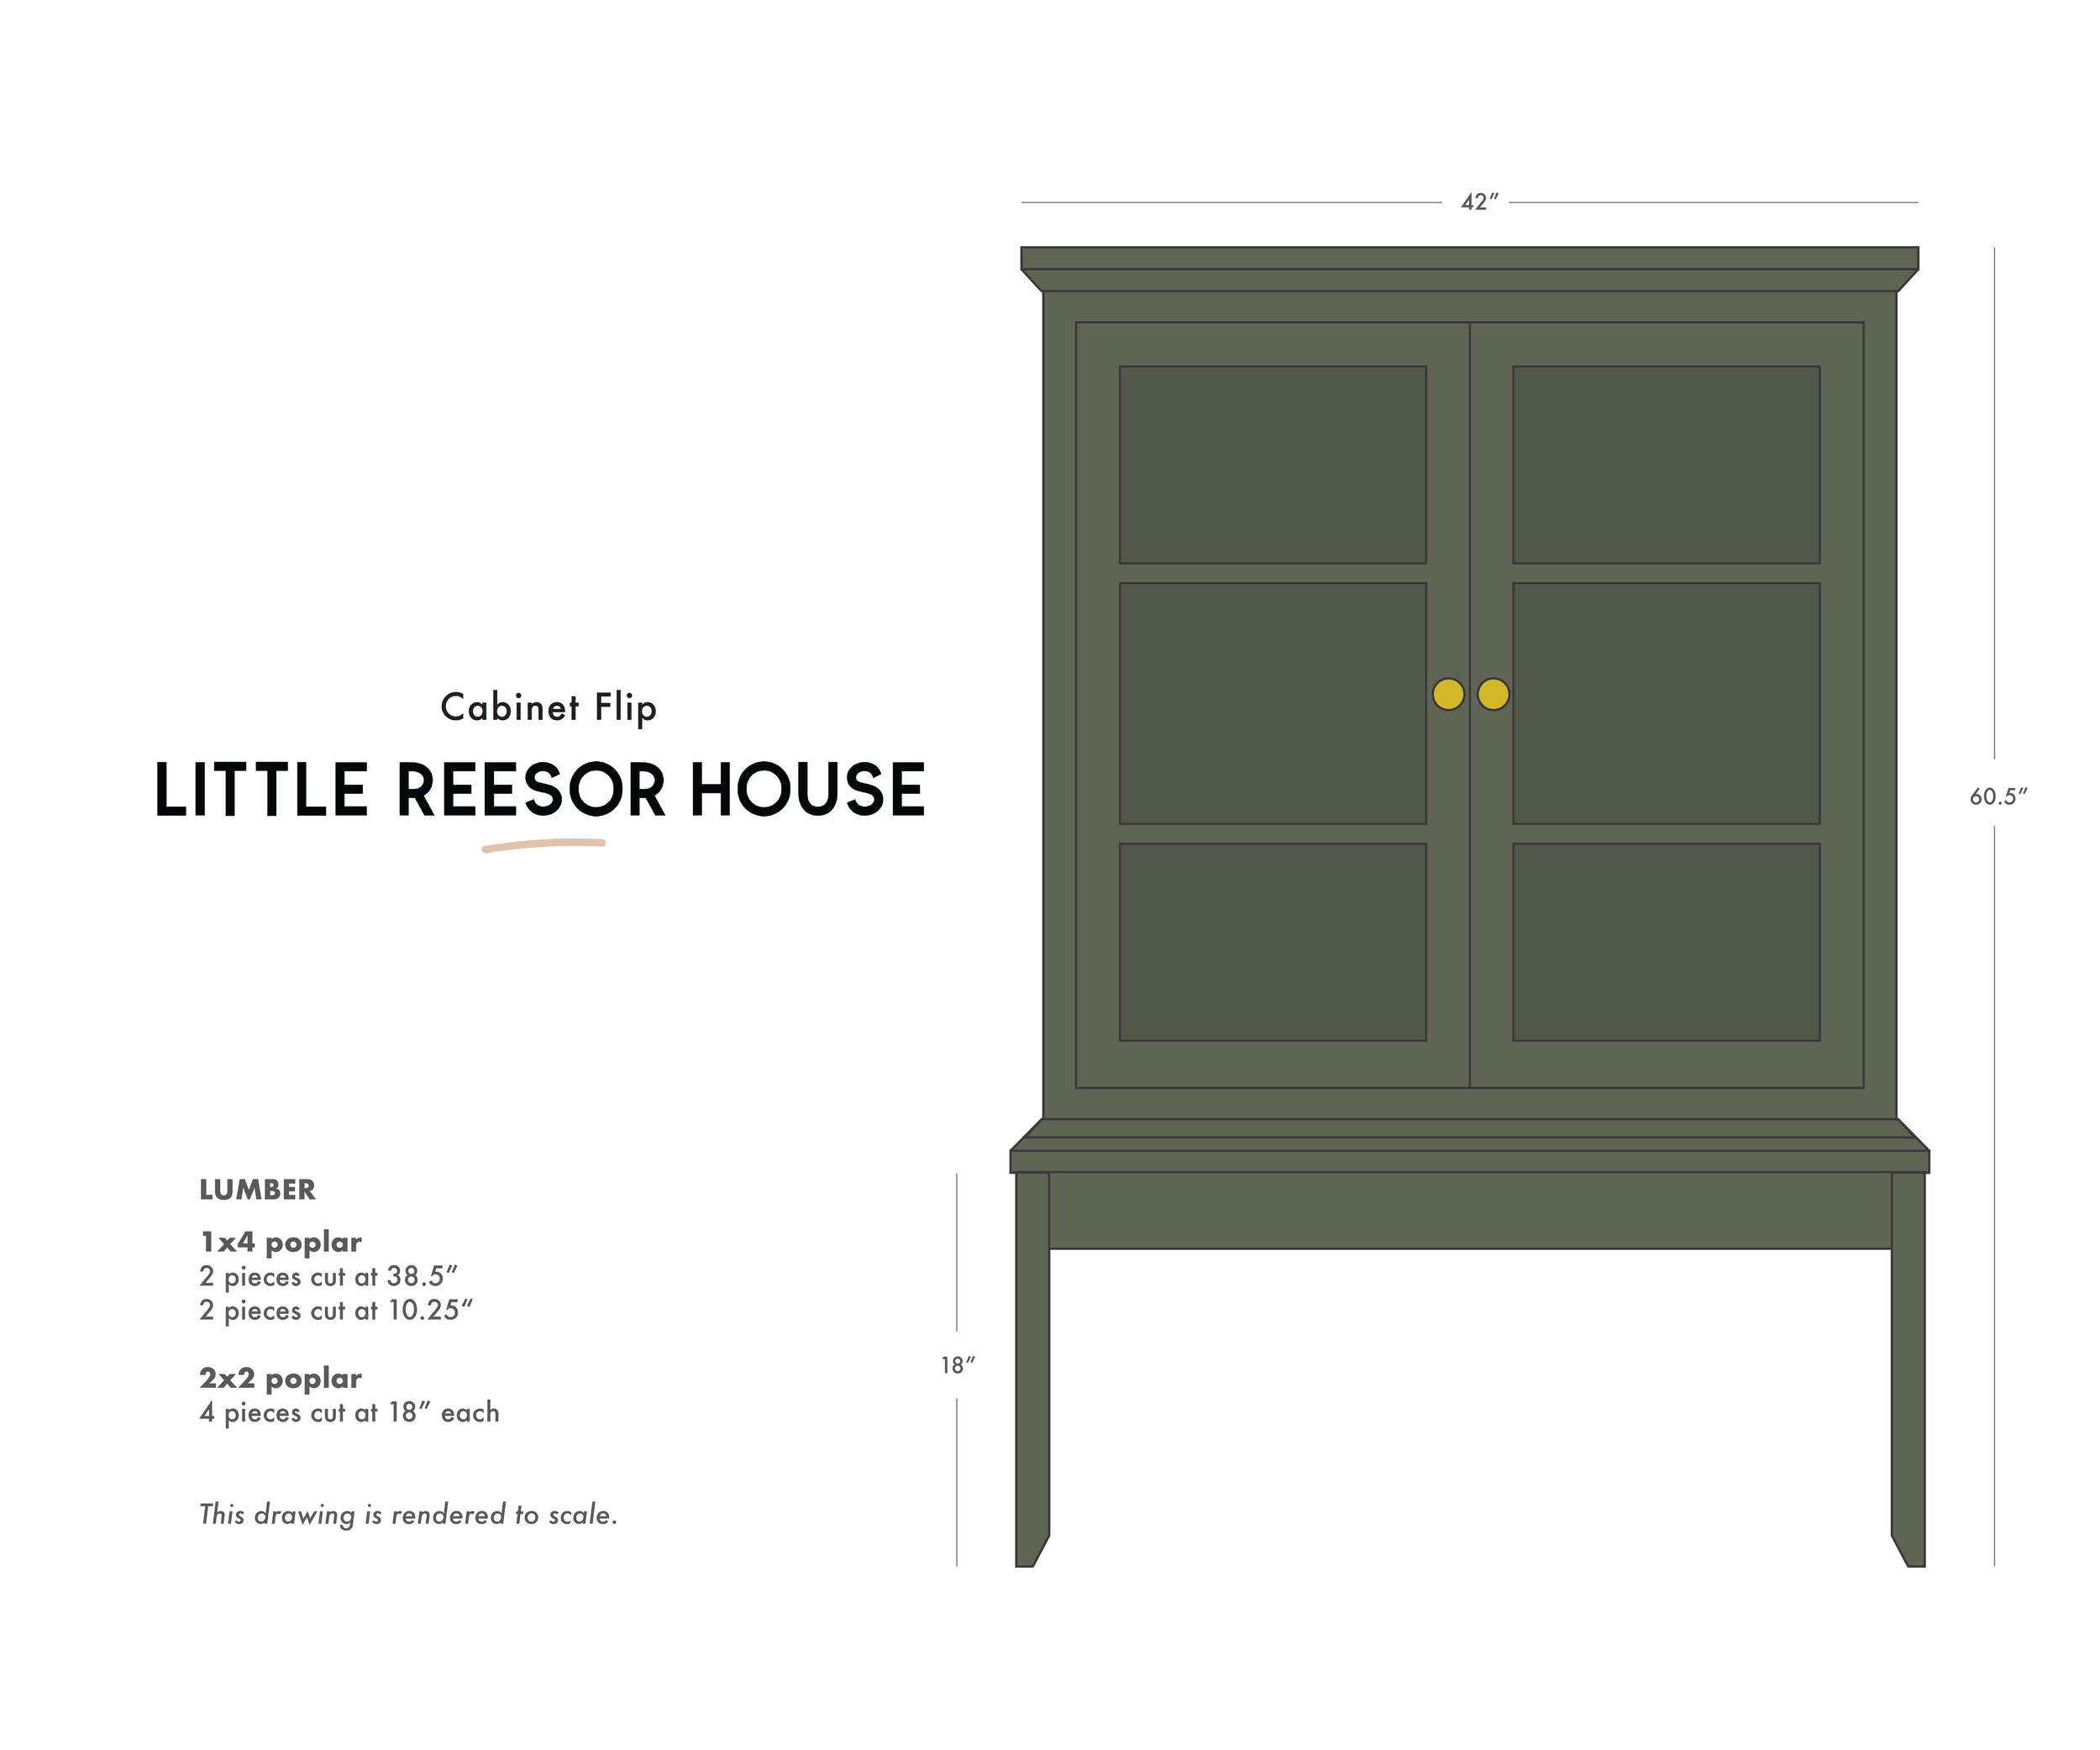
The Display Cabinet Design
The top and the bottom portions of the china cabinet separated to make it easier to move, so I decided to only use the top portion for this project and save the bottom half for a future DIY. I measured the top unit and drew up a plan to capture exactly what I was going for. I decided that I would use poplar to build a simple base that the top unit could sit on top of so that the doors would function well and the overall unit would have more height. Once the base unit was built, I wanted to paint the entire thing (cabinet, interior, and base) a beautiful deep olive green tone. My overall dining room design is fairly light and neutral, so I felt that a deep contrasting pop of colour would bring a lot of warmth to the space. I wasn’t completely settled on the hardware by this point, but I had a few options in mind and figured I would make the call once the cabinet was nearly complete.
Building the Base
In this post, I’m going to more so show you the progress I have made rather than a full tutorial about how to flip a china cabinet. If you want to see a more detailed look at how I did this, you can watch the video I made that outlines the entire DIY process. But just to give you an idea about how I approached it, I first built the base using pieces of 2x2” and 1x4” poplar. My cabinet was fairly light (I could lift it by myself) and I was planning on painting the base, so I opted to use poplar because it’s more affordable than a hardwood, like red oak, and has very few knots, which makes it ideal for painted finishes. I used the 2x2” pieces as the legs and the 1x4” pieces as the skirting that held the base together. I followed the DIY Wife furniture base tutorial for the general design, but customized the measurements to my own cabinet size.
I considered leaving the squared-off leg pieces as they were, but as a more traditional stylistic detail, I decide to go ahead and cut a small angled piece off the bottom of each leg. I think this helped to add some interest and detail to the bottom portion of the cabinet. I assembled the base together using pocket holes created with a Kreg jig, which made the entire thing look really sharp and clean without any screw holes to fill and patch before painting. I decided to keep the base separate from the cabinet while I painted each, but at this point, I pre-drilled pocket holes to be able to easily attach it to the cabinet at the end of the project.

Painting the Cabinet
With the base built, I went ahead and painted both the base and the cabinet. In every good paint project, the majority of the work is spent in the prep before you actually put the brush in the paint. I filled in a few holes and scratches, sanded those spots smooth with the surface, and gave the entire piece, inside and out, a quick scuff sand and wipe down. Scuff sanding is such an important step in painting projects because it helps add a little bit of roughness to the surface so that the primer has some grit to grab onto. Because this piece had an existing stain finish that I would be painting over, I opted to use a shellac-based primer to trap in any wood tannins that could potentially bleed through my final paint finish. I personally like to use Zinnser BIN Shellac-Based Primer for furniture projects - it’s smelly and a pain to clean, but you just can’t beat how well it works on wood furniture. I brushed the primer into the corners and the cracks and used a roller to apply it evenly to the remaining surfaces. I allowed the primer to dry for a day or two and then used a fine grit sandpaper to smooth out any brushstrokes.
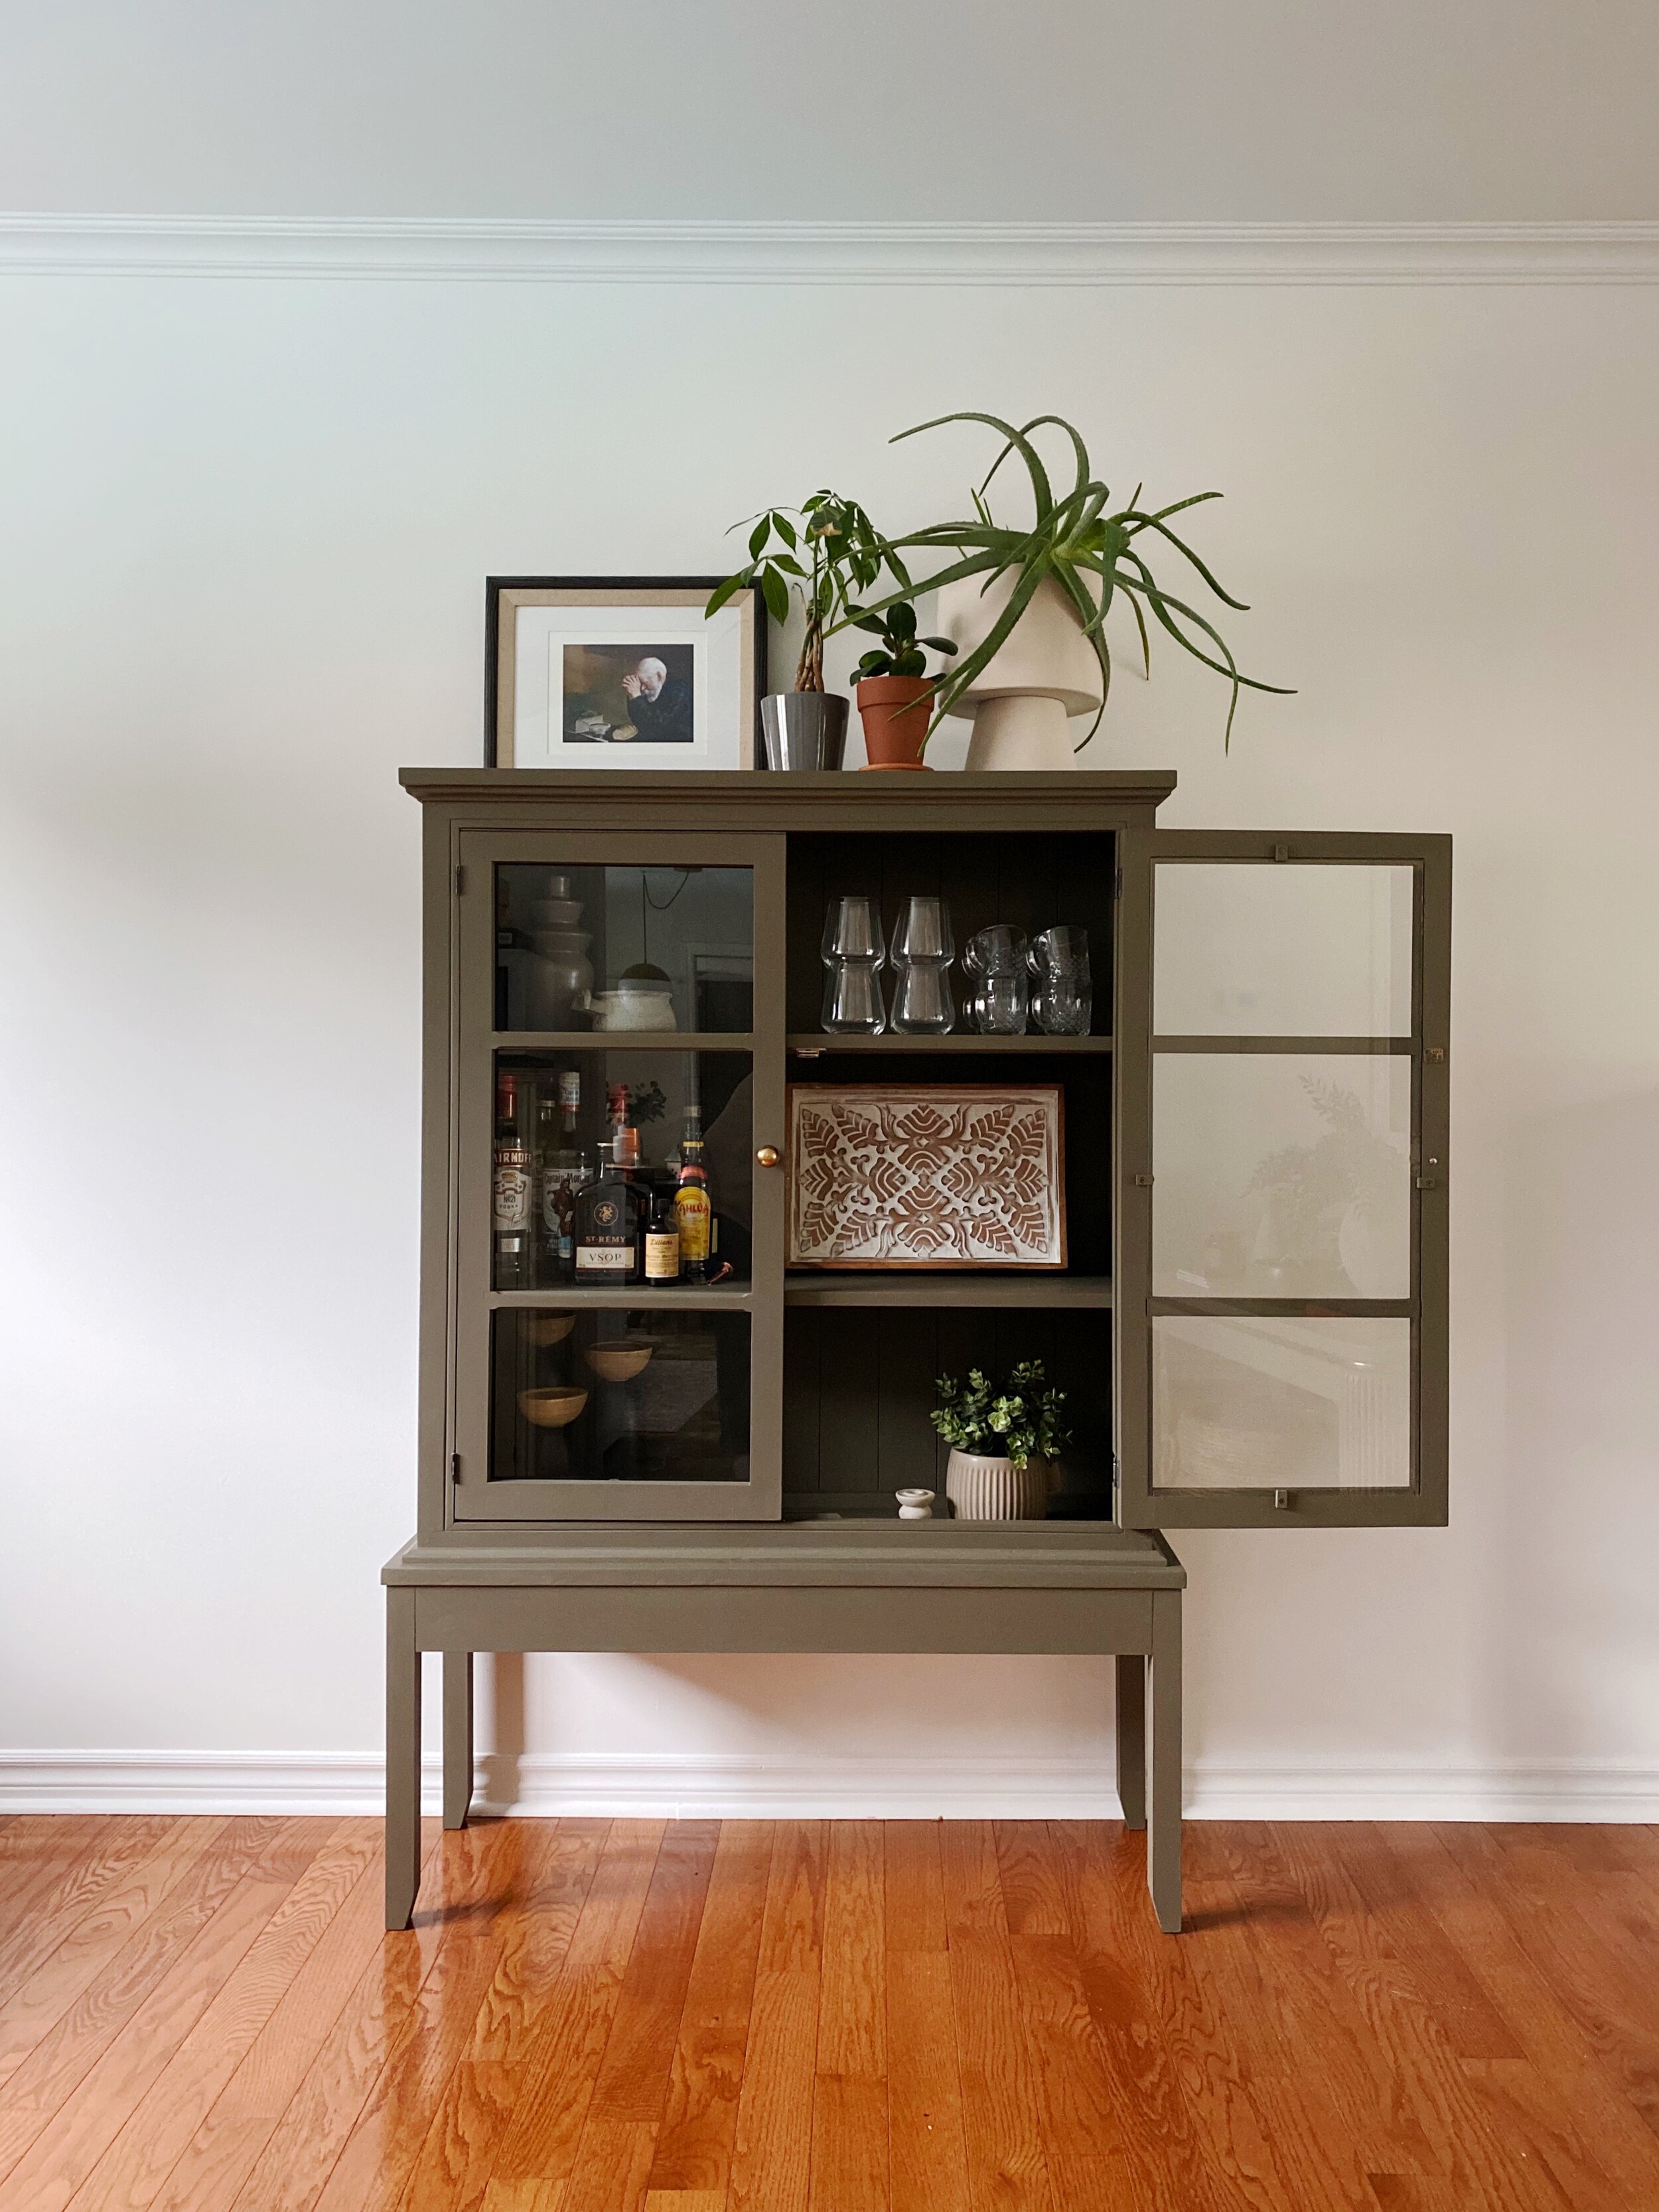
I mentioned that I wanted to use a deep olive green coloured paint on this piece. The paint I settled on was House & Canvas Chalk Paint in the colour Underground. This paint colour is so pretty! Like the primer, I brushed it into the corners and the cracks of the cabinet and applied it to the remaining surfaces with a smooth roller. It ended up taking three coats of paint to get the deep, rich coverage I was after.


See the depth of tone in the bottom waxed portion vs. the top portion where it hasn’t been applied yet.
There are many topcoat options out there, but I decided to go with a wax topcoat on this painted piece. I brushed on Annie Sloan Clear Chalk Paint Wax and then buffed it out using a clean lint-free cloth. This cabinet is not a high-traffic piece of furniture and will very rarely need to be wiped down, so a wax felt like an obvious choice as a finish. I love that the wax finish really helps to accentuate and deepen the dark tone of the paint, but isn’t glossy or shiny. It gives a really smooth and natural feeling to the piece.
The Finishing Touches
With the paint and wax topcoat fully cured, I attached the base to the cabinet unit. The only thing left to do was figure out which hardware I wanted to use for the knobs. I had a few existing options in my collection I could pull from. The cabinet had such good bones that I felt there were many different options that could work, each pushing the overall style in one direction or another. The black and brass bar knobs felt eclectic and interesting. The jute knot knobs felt natural and earthy. The gold ball knobs felt classy and clean. Each were beautiful in their own right.
I went with the gold ball knobs. They were just so classic and sophisticated. And paired with the shape and style of the cabinet, they felt understated and perfect. The only problem was that I didn’t love how shiny and yellow the finish was.


I used a touch of Rub ‘N Buff in Antique Gold to add some wear and dimension to the knobs. I simply buffed it on using a clean rag and allowed it to dry before attaching them to the front of the cabinet doors. You can see a comparison of the finish in the photo below. It was a subtle change, but gave the knobs a little bit of age and character.

With that, the cabinet makeover was complete! I couldn’t help but style it up and add some of my favourite decor pieces that I plan to use in the completed dining room space. I unpacked our bar and lined up a few of our drink glasses. I also incorporated a few new pieces, like the big gorgeous planter holding my thriving aloe plant, a sentimental Eric Enstrom print, and some thrifted pillar holders. I’m sure the styling will change and adapt as we continue to pull this space together, but I love being able to at least see a glimmer of my final vision come to life in our dining space. I’m grateful that one little corner in this room already feels more like it’s ours.


Completing this cabinet project has given me the encouragement I need to keep going on this challenge. I’m already having visions of our family gathering around our dining table at Christmas, so I know that I need to just keep pushing through the unknown of the other parts of this makeover to get to the final feeling of peace and comfort that I’m after in this space. Next week I will be back here sharing about my progress on the built-in bench. It definitely won’t be finished like this cabinet, but I’m hopeful that it will be well underway and headed in the right direction.
And of course, if you, like me, love being inspired by what other people are doing, be sure to check out what some of the other guest participants of the ORC are up to this week too. There will be no shortage of beautiful and inspiring projects to peek in on!