Main Floor Renovation: Floor Plans, Design Inspiration, and Samples

This may end up being a little lengthy, but there is a lot to cover and bring you up to speed on. The main floor renovation that we have officially started in our new home actually covers quite a few significant spaces, so it’s hard to give all the required detail in one written post. But I thought I would at least get the ball rolling on bringing you up to speed on my planning process and how we even went about organizing the renovation before any demo even began.
Before getting started, it’s important for me to note that this is the first space I planned out in our home and it certainly is a very significant one. Although that feels very intimidating, one thing I found very helpful was to create a whole home mood board that can guide some of my choices as I continue to work on our home over time. Along with that, I also spent some time reflecting on what some of our family values are and how we intend to use the space. Let’s get to it!

From the dining room looking to the kitchen

From the laundry room looking through the kitchen to the dining room
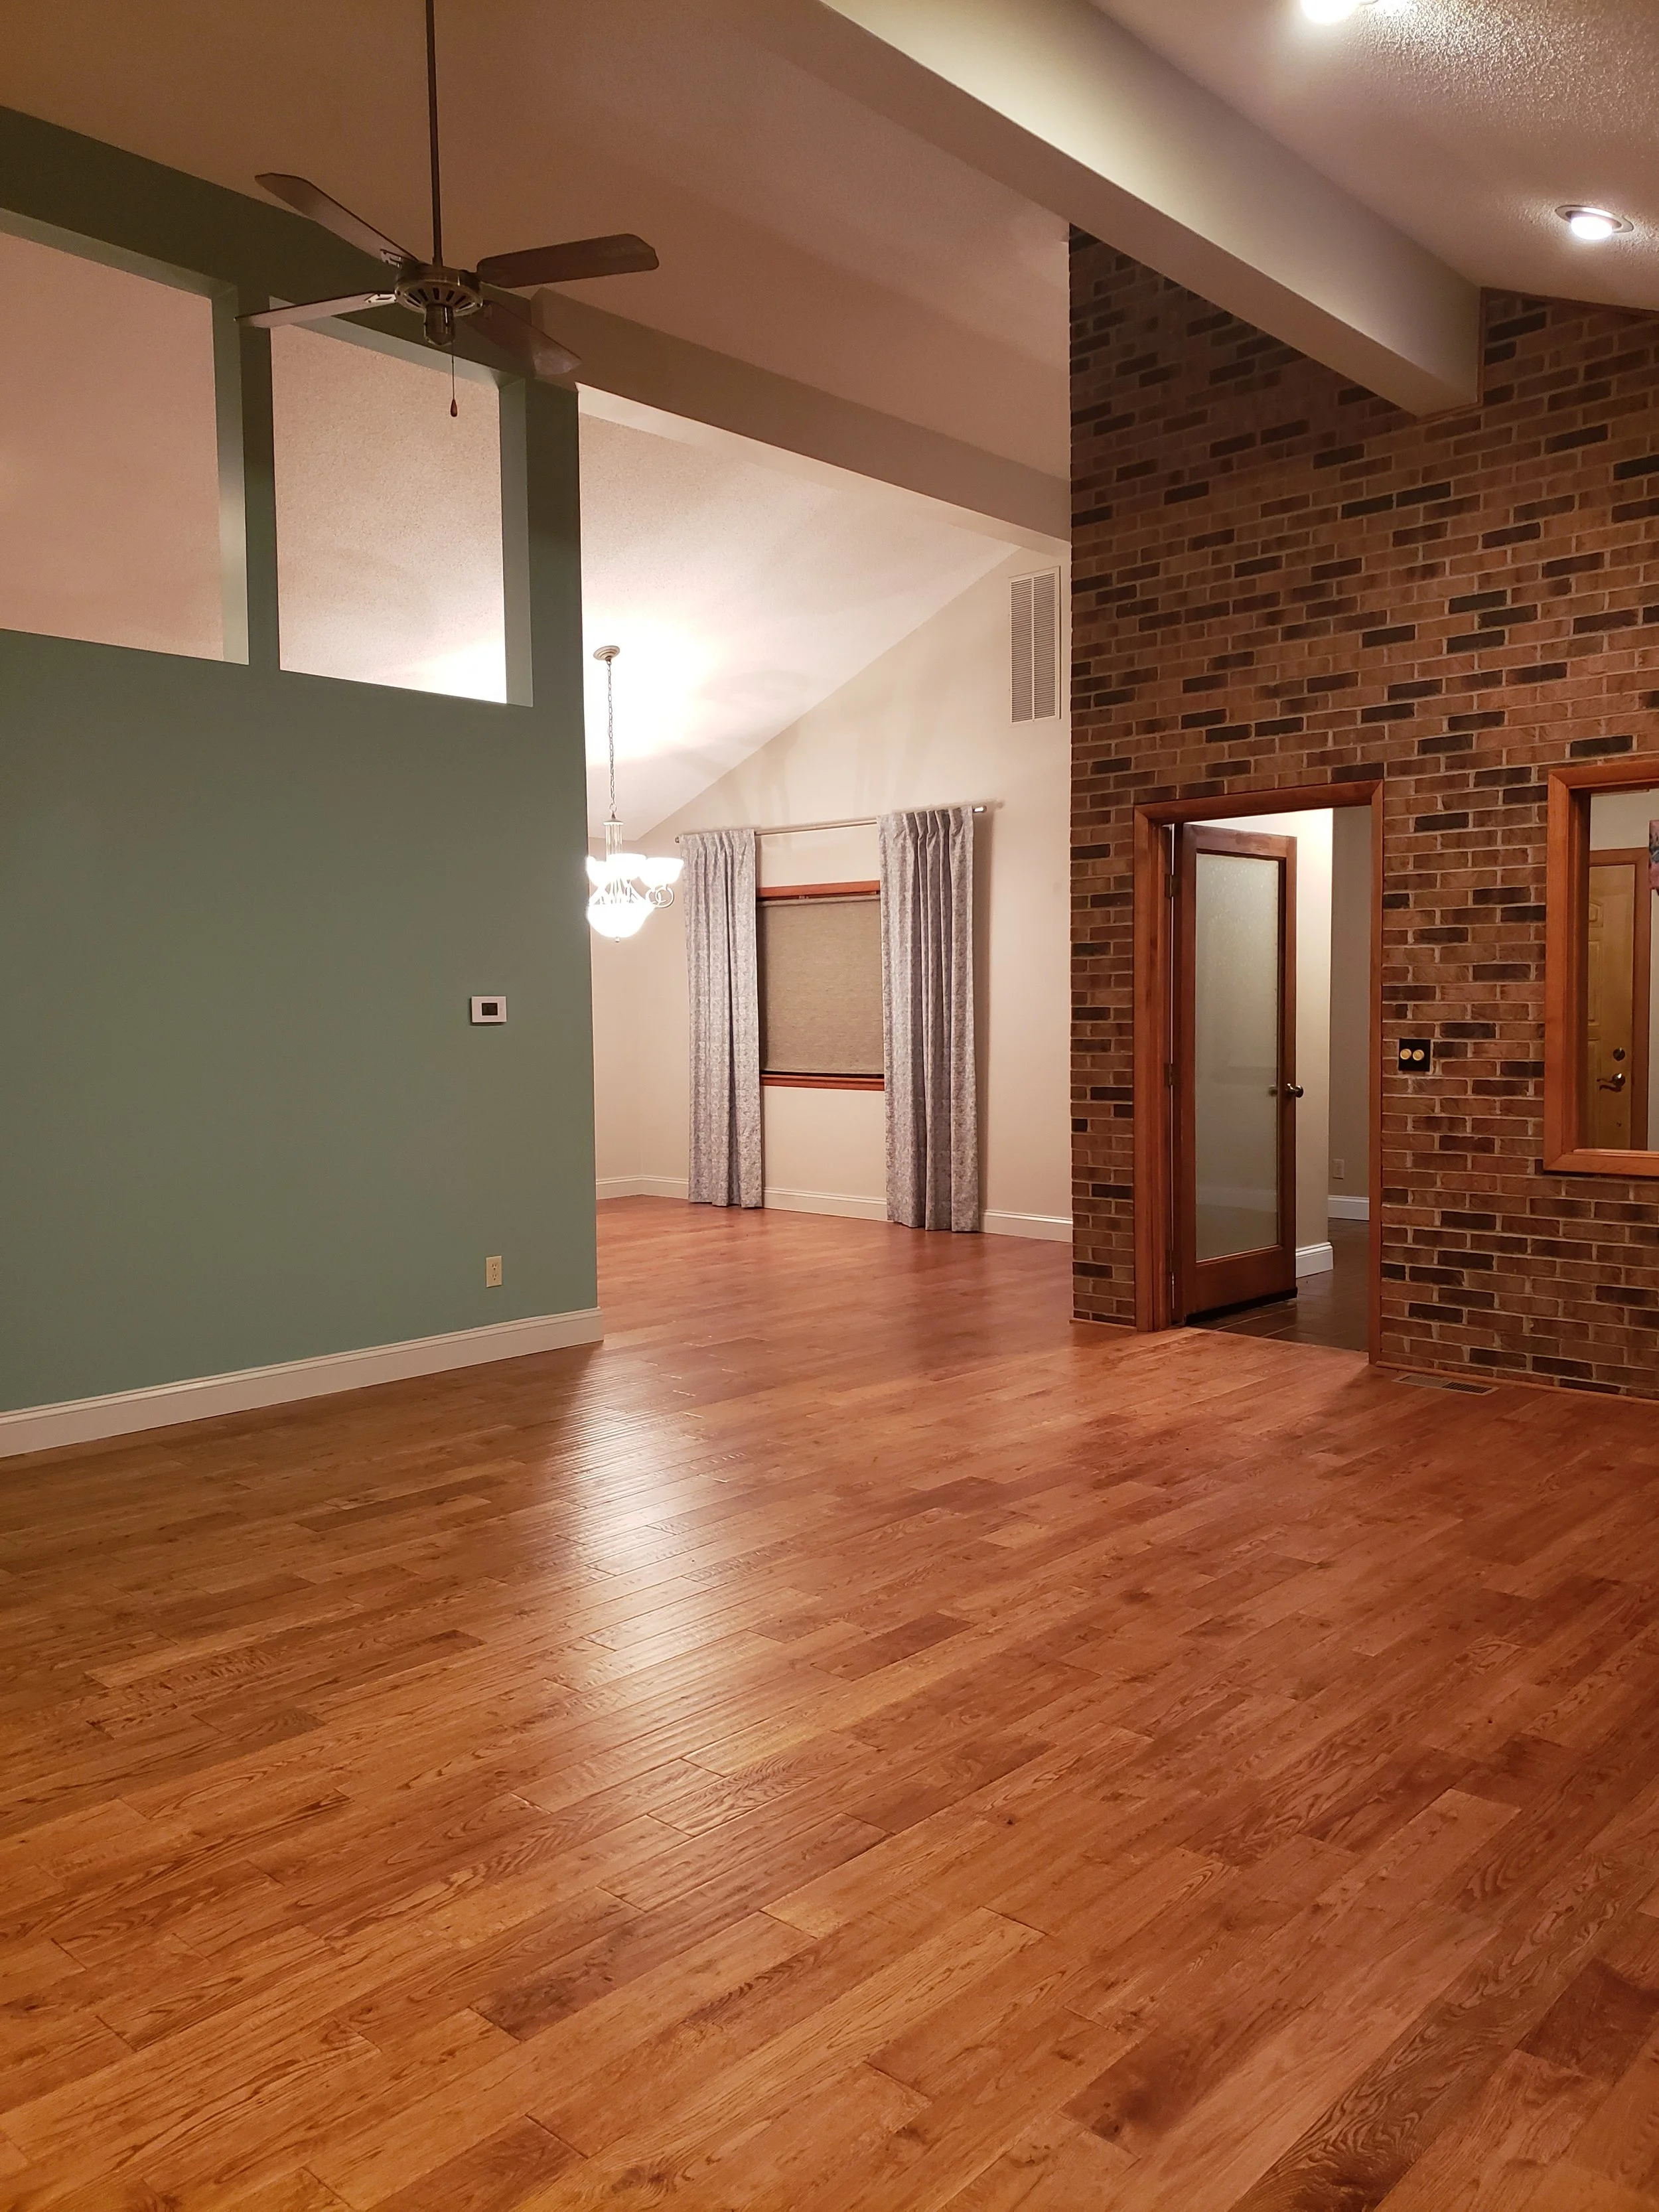
From the living room looking towards the dining room

From the doorway of the kitchen into the laundry room

Partial view of the sunroom
Creating a Floor Plan
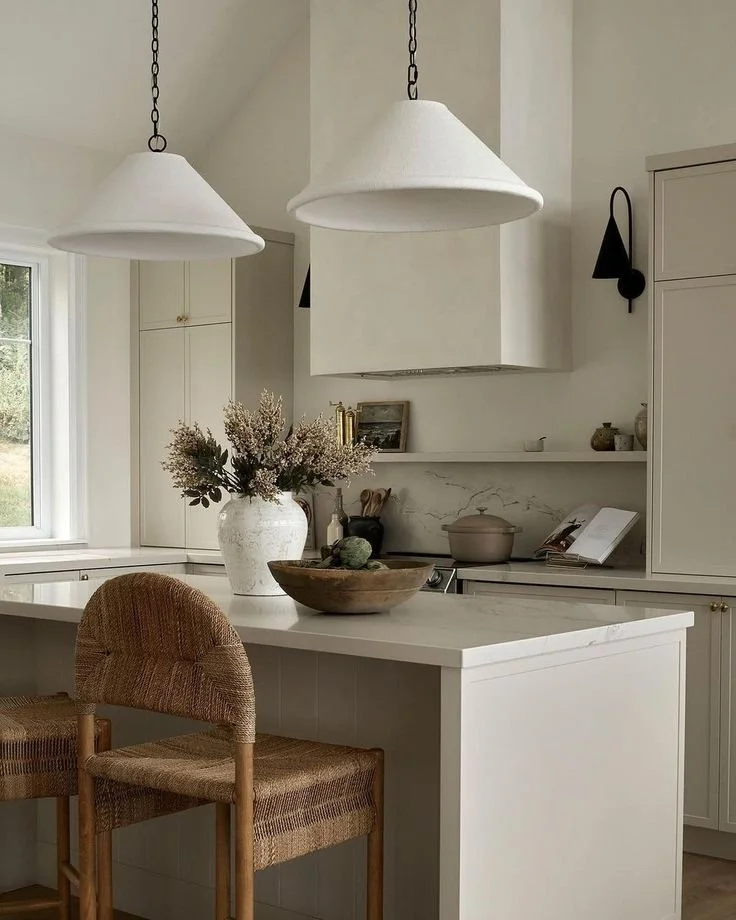
The most significant part of this renovation is ultimately the kitchen - the heart of any home! As a busy mom, I spend a lot of time in my kitchen in order to serve my family, but it’s not strictly out of necessity. I personally love to cook and bake and am always experimenting and learning new things in the kitchen. I also love involving my kids in these practices too, so I really do mean it when I say it is the heart of our home. When we purchased this house, it had a really unique kitchen and I know it was well-loved by the previous owners. It was clean and functional and served its purpose, but in the limited use we had of it, I easily noted some pain points for the way our family prefers to use a kitchen space.
First of all, for a home that has soaring ceilings and a connected main living space, the kitchen was pretty dark and tucked into a small corner that was awkward to navigate. It had a large peninsula with upper cabinetry stretching above it, and while this offered some great display storage, it cut off any sense of connection, communication, and flow with the dining space. The entrance from the laundry room into the kitchen was also directly beside the entrance from the garage, making for a really congested overflow into the kitchen. I immediately envisioned a different layout that felt like a more intuitive flow between all the connected spaces, which I hope will also better serve our family values and priorities.

Armed with a few basic measurements and some ideas in my head, I got to work drawing up sketches of different floor plan options. Some of them felt like instant fails, but some of them blossomed into firmer ideas that I tested out in a more concrete way.
The kitchen and laundry room are the only spaces I actually envisioned shifting the floor plan for and the living room, dining room, and sunroom would maintain the existing footprint. I personally had never planned a kitchen before so I didn’t even know the standard sizes of cabinetry to use in planning. I don’t have access to any interior design programs so I went to the next best available option - IKEA. At this point, I wasn’t even sure if we would go the customizable IKEA route for our kitchen (spoiler: we didn’t), but at least the kitchen planner offered the opportunity to get a basic plan in place that would help me visualize what was possible and what could fit with the space we had available. It was the next step in working towards a more concrete plan.

My main goals with the adapted floor plan was to absorb the space from an existing closet right outside of the laundry room into the main laundry room footprint and to change the access from the laundry room into the kitchen to a new location. My intention was to create a better walking and access flow of the main living space around the central wall that separates the living room from the kitchen. The shift of one doorway also gave us way more room to build the kitchen footprint, as it allowed us to stretch cabinetry down the longest wall in the space and into the existing dining area, growing our kitchen size and helping the two spaces feel more connected.

Kitchen layout using the IKEA Kitchen Planner
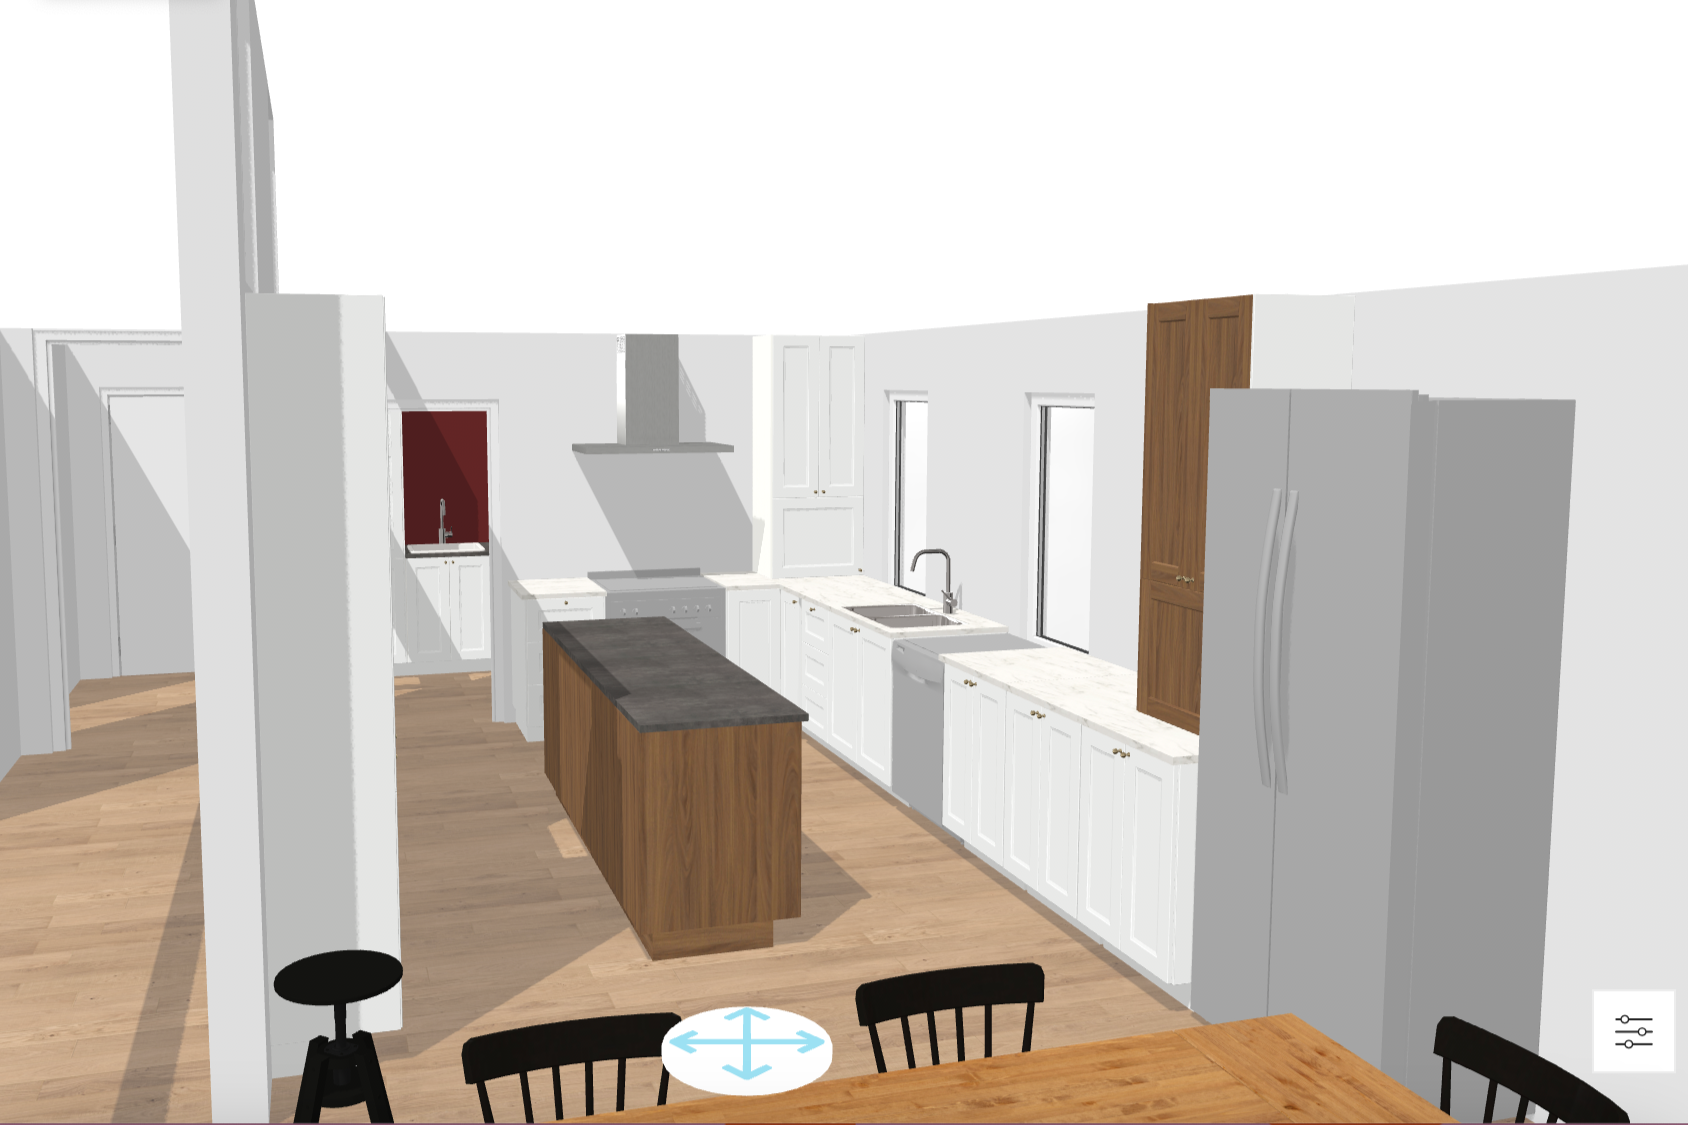
Kitchen layout using the IKEA Kitchen Planner
The entire planning process was a little hodge-podge, but I wanted to show you the process I took to come to the finished design product as someone who is visual and knows what I want, but also who is not a professional designer. I tried to use what I have available to me to be able to visualize what our space could be. Once I had the basic layout figured out using the IKEA Kitchen Planner, I transferred the screenshot images to my iPad and drew on top of them to bring some of the design ideas to life. This allowed me to play with some colour and finish options in order to really visualize how the space could feel with the layout changes. Would a bank of full-height cabinets feel too heavy? Could we mix a painted finish with stained wood without it feeling to chaotic? With these visuals established, I generally had a plan in place that I could show to the professionals so they would get a sense of exactly what I was envisioning, even if some of the details would still change as we got further into the project.
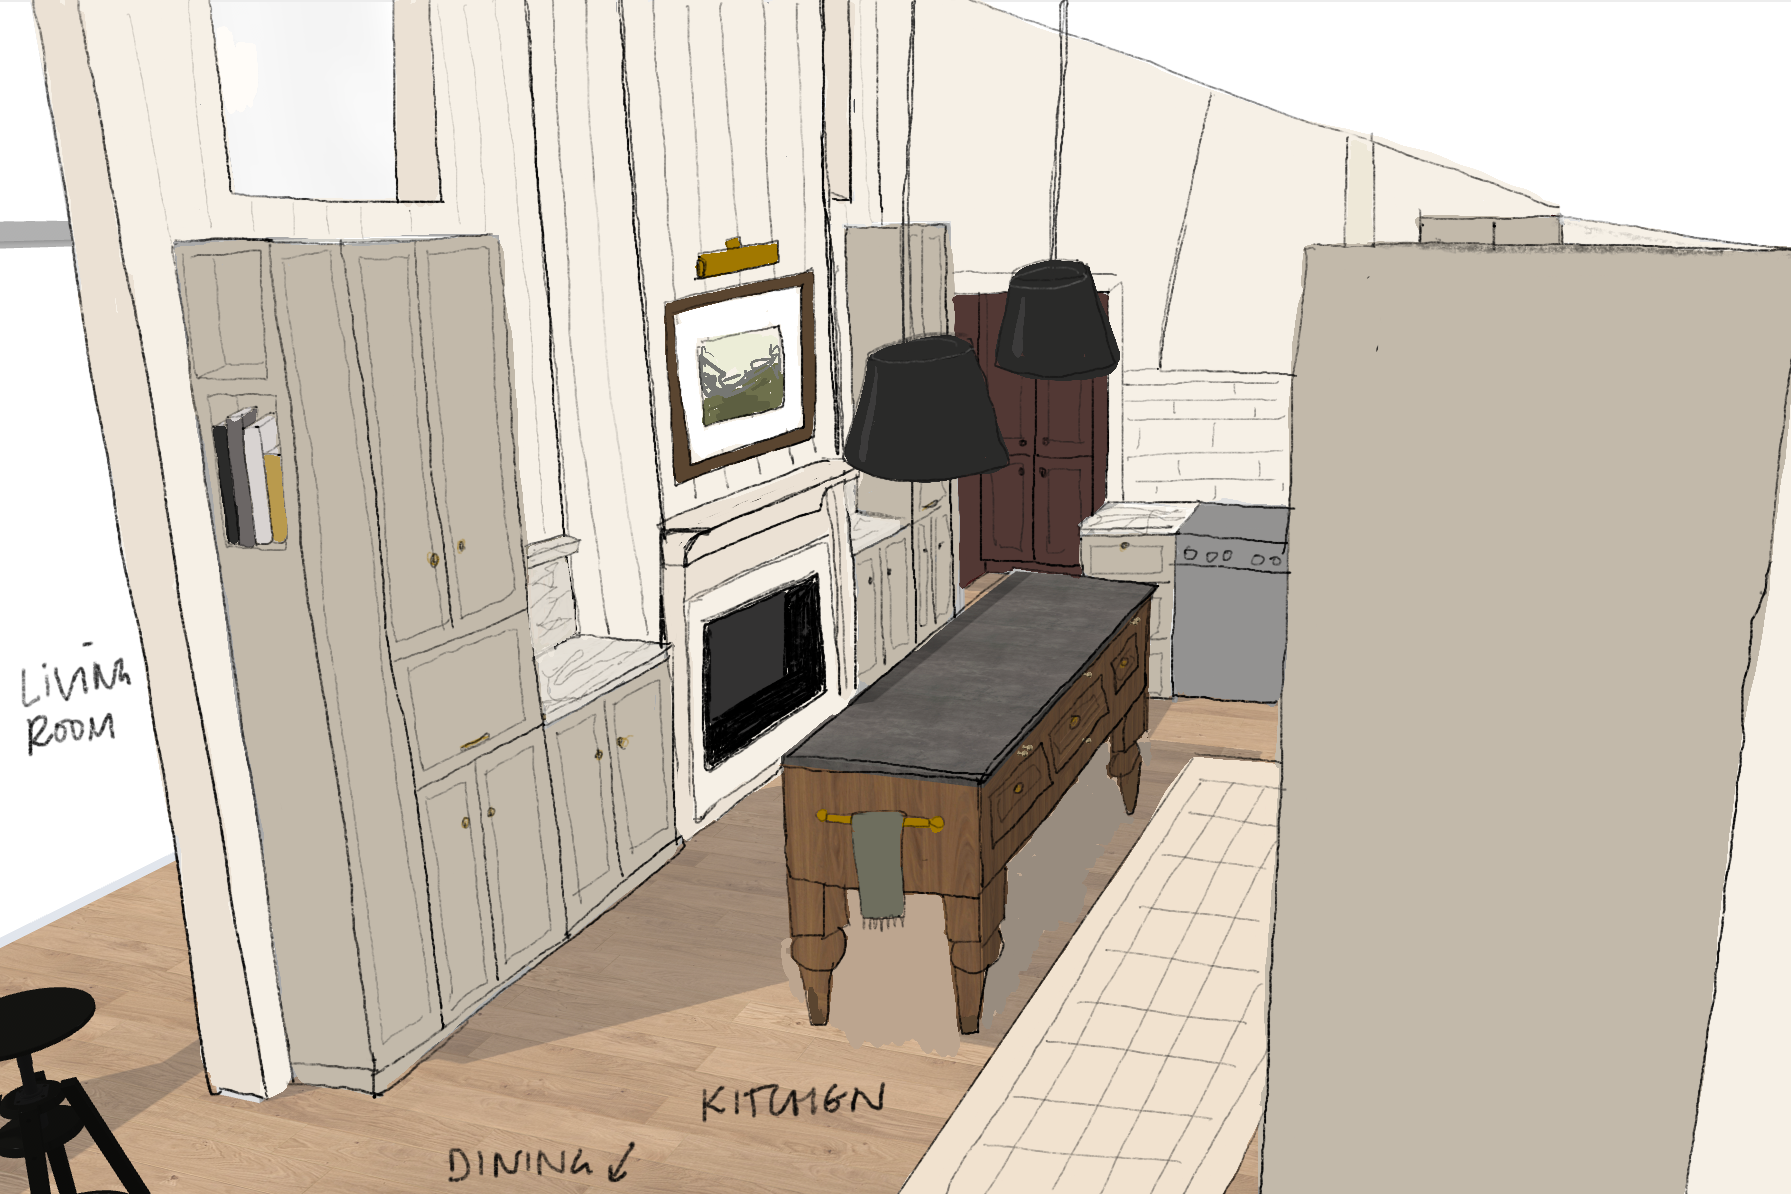
Rough digital drawing of the kitchen plan

Rough digital drawing of the kitchen plan
Planning the Design
In tandem with planning out the layout, I also started thinking about some of the design finishes and what I’d like the space to feel like. This was where it was helpful to reference back to my original whole house mood board and also spend time gathering inspiration from other sources. At this point in the process, I had the wild idea of potentially incorporating a double-sided fireplace between our living room and kitchen, so much of my brainstorming explored whether or not that would be possible. Eventually we decided to cut out that part of the project, but it was a good jumping off point to start to narrow in on the style I was after - a mixture of traditional, organic, and modern contemporary. I really wanted my kitchen to feel cozy and lived in, but as streamlined as possible, timeless, and focussed on natural elements. I definitely didn’t want it to be all white, but did want it to feel bright and inspiring. I wanted to mix textures. I wanted to play with some contrast. I wanted to mix some metal finishes.

Kitchen inspiration
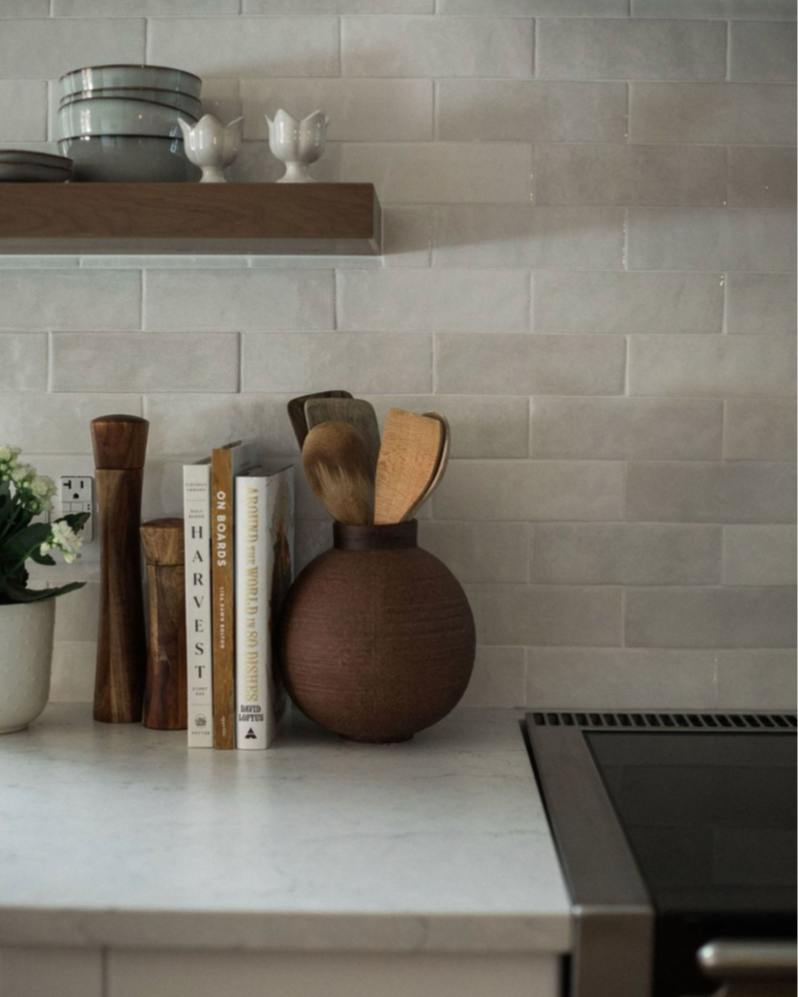
Kitchen inspiration
Kitchen inspiration
Although I was primarily planning our kitchen, I also needed to think through the connecting spaces. I love the soaring asymmetrical ceilings in our home, but they can feel a little distant and bland in the grand scheme of things. I decided I wanted to incorporate a ceiling feature that would draw your eye up and add an additional layer of warmth and connection between all the spaces. I ultimately decided on painted vertical planking to draw your eye up towards the peak and think the additional layer of lines and texture will create some subtle interest up above without feeling too heavy.

A drawing I made to visualize the ceiling finish

Ceiling feature inspiration
Although I am most excited about the kitchen, one of the rooms I was almost equally as excited about is the sunroom. The sunroom sits right off the living room and is actually the front entry space to our home. It is full of windows and flooded with natural light. In the short time we have lived at our house, it has quickly become my favourite space. Other than the laundry room, the sunroom is the only space in this project that has four walls and a doorway that makes it distinctly its own, so it felt like a great spot to have a little shining moment. It has the same peaked ceiling to match the rest of the main floor and so I decided to also apply the ceiling feature in there, but also plan on covering the drywalled walls (one of the walls is brick) with matching vertical planks. My intention is to paint the entire space (ceiling, walls, and trim) in one colour. It’s going to be so bright and airy, but cozy at the same time. I can already envision our round table in there with big comfy chairs, maybe a window bench, and lots of craft supplies, books, and games sitting around for easy access. Oh, and plants. I’m going to fill it with trailing pathos.

Wall and ceiling finish inspiration

Built-in seating and lots of soft textures
Gathering Samples and Picking Elements
Once I had a good idea about what I was looking for in the space, we reached out to a handful of local contractors to start getting some quotes and ideas about the scope of the project. When we first met with them, we laid out every single one of our ideas, but as we got further into the planning process, made decisions about areas to scale back and/or what made sense to pursue now with the bulk of what we were hoping to do anyways. We ultimately landed on working with a very reputable contractor with direct access to a kitchen company that was able to help us create a more concrete kitchen plan. For our first meeting with the kitchen designer, I took all of my amateur plans, drawings, and inspiration images with me and we managed to nail out specific selections within an hour.
The kitchen designer we worked with was able to take my plans and make them even more concrete, helping me to narrow in on exactly what type of cabinetry I’d like in what location. She balanced her knowledge in what makes a functional and successful kitchen with my own aesthetic preferences and was able to completely customize my partially-formed ideas. She created her own drawings that I will share eventually as I share more specifically about our kitchen, but in doing so, she was also able to produce some renderings that gave a pretty clear visual for the finished product. I’m so grateful for this technology! It made pulling the trigger on the investment of a new kitchen (which is not for the faint of heart) a little bit easier. In the end, our finished kitchen design looks more or less like the original plan I created using the IKEA Kitchen Planner - just with a little more fine tuning and beauty! I’ll likely create a post detailing each of the spaces individually, including my mood boards.

Picking finishes for the kitchen design
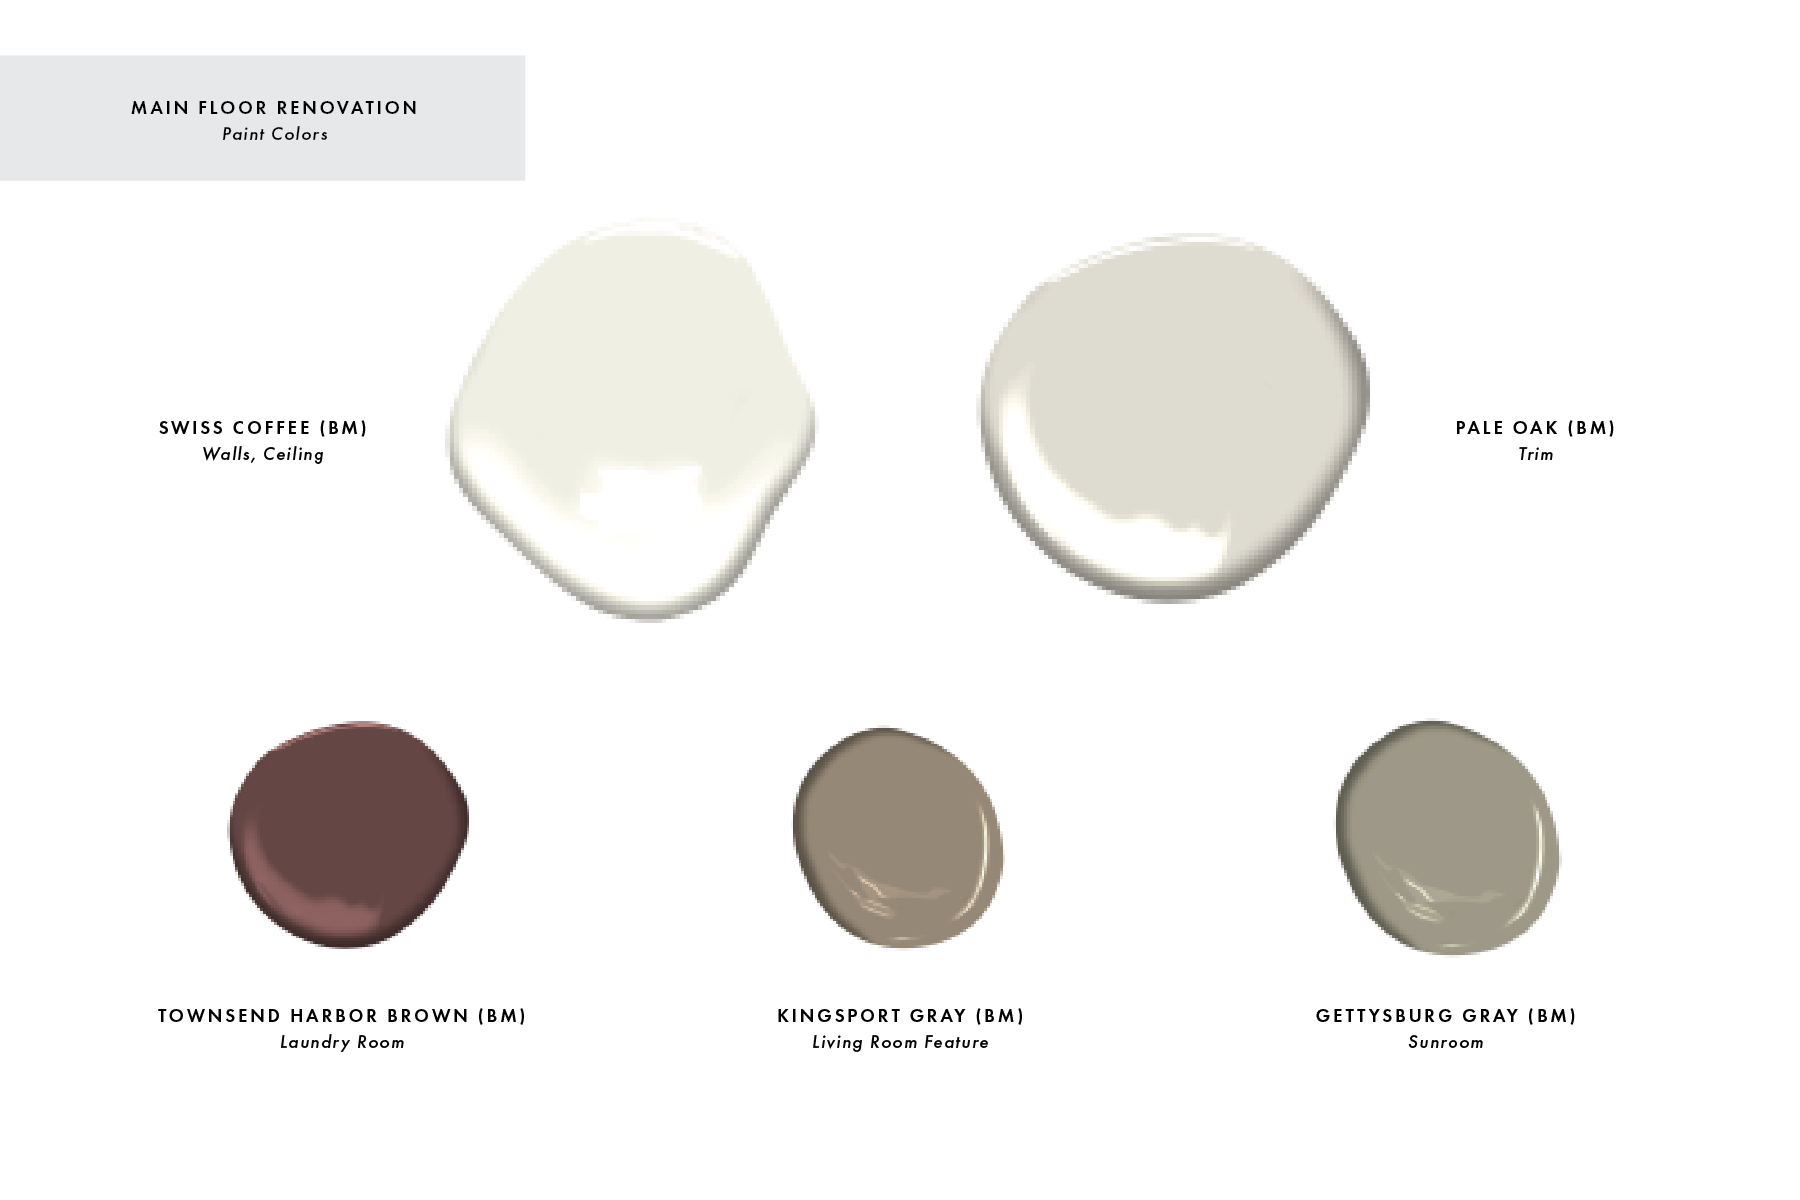
Choosing paint colours is definitely a smaller detail than some of the longer term finishes, but it was definitely something I did fairly early on in the process. The kitchen, living room, and dining room are all interconnected and need to be painted in the same colour, so I wanted to make sure it worked with all the elements we already had and everything we were hoping to use. This led to a pretty extensive process of mood boarding, which is always extremely helpful when trying to visualize how different elements work together. Whenever I was trying to choose a new element, I would bring it into my mood board and see how it interacted with the other elements in my plan. However, it was also important to look at samples in person, as the tones can be significantly different than how they appear on a screen. As a side note, I like to create my mood boards in Photoshop, but also love using Milanote too so I can directly link to products and easily access it from my phone or computer.
Where does that leave us now?
There are so many details that go into a renovation project and even though I tried to lay out my general process of planning in this post, the reality is that so much of the planning happens in a non-linear way. It has been a balance of dreaming, researching products, speaking with our contractors and getting prices and quotes, adjusting, adapting, making lists, getting new samples, and planning again. I’ll get to sharing my mood boards soon, but the reality is that they are fairly regularly evolving as I realize what is possible and what is not in the cards. There are so many elements I could talk about specifically, like choosing lighting, colors, and decor details. This post could easily become a novel.
As I write this, demo has been started and some of the trades have made their way back in to do their part. Plumbing has been adjusted and the electricians are working as I write. It sometimes feels pretty slow moving, but I know these are the tedious parts of a big project that are so important, but not very glamorous or obvious. I’ll share more about the progress as soon as some more progress is made.
