Creating an Eclectic Vintage Gallery Wall Using Art Prints


One of my favourite rooms in our home is the room I affectionally call The Cozy Room. It sits off our kitchen as a bonus family space and boasts a big red brick wood-burning fireplace in the corner. We spend many weekend afternoons during the fall and winter months in this room, curled up on our big sectional couch by the fire, reading, playing games, or napping. I named it The Cozy Room because of how we use it, but it wasn’t until a few years into living in our home that it really earned its name when I took a risk and painted the entire room black. This drama was the exact warm touch the room needed to truly live up to its function in our family.
Despite the fact that we use this space nearly every day, it has taken a while for it to evolve into the design it has now. Even still, the room is far from complete. I’ve never fully focussed on completing it, but have taken on a project here or there to give it another touch of love and attention. The gallery wall I’m going to share today is a perfect example of one of those come-and-go projects.


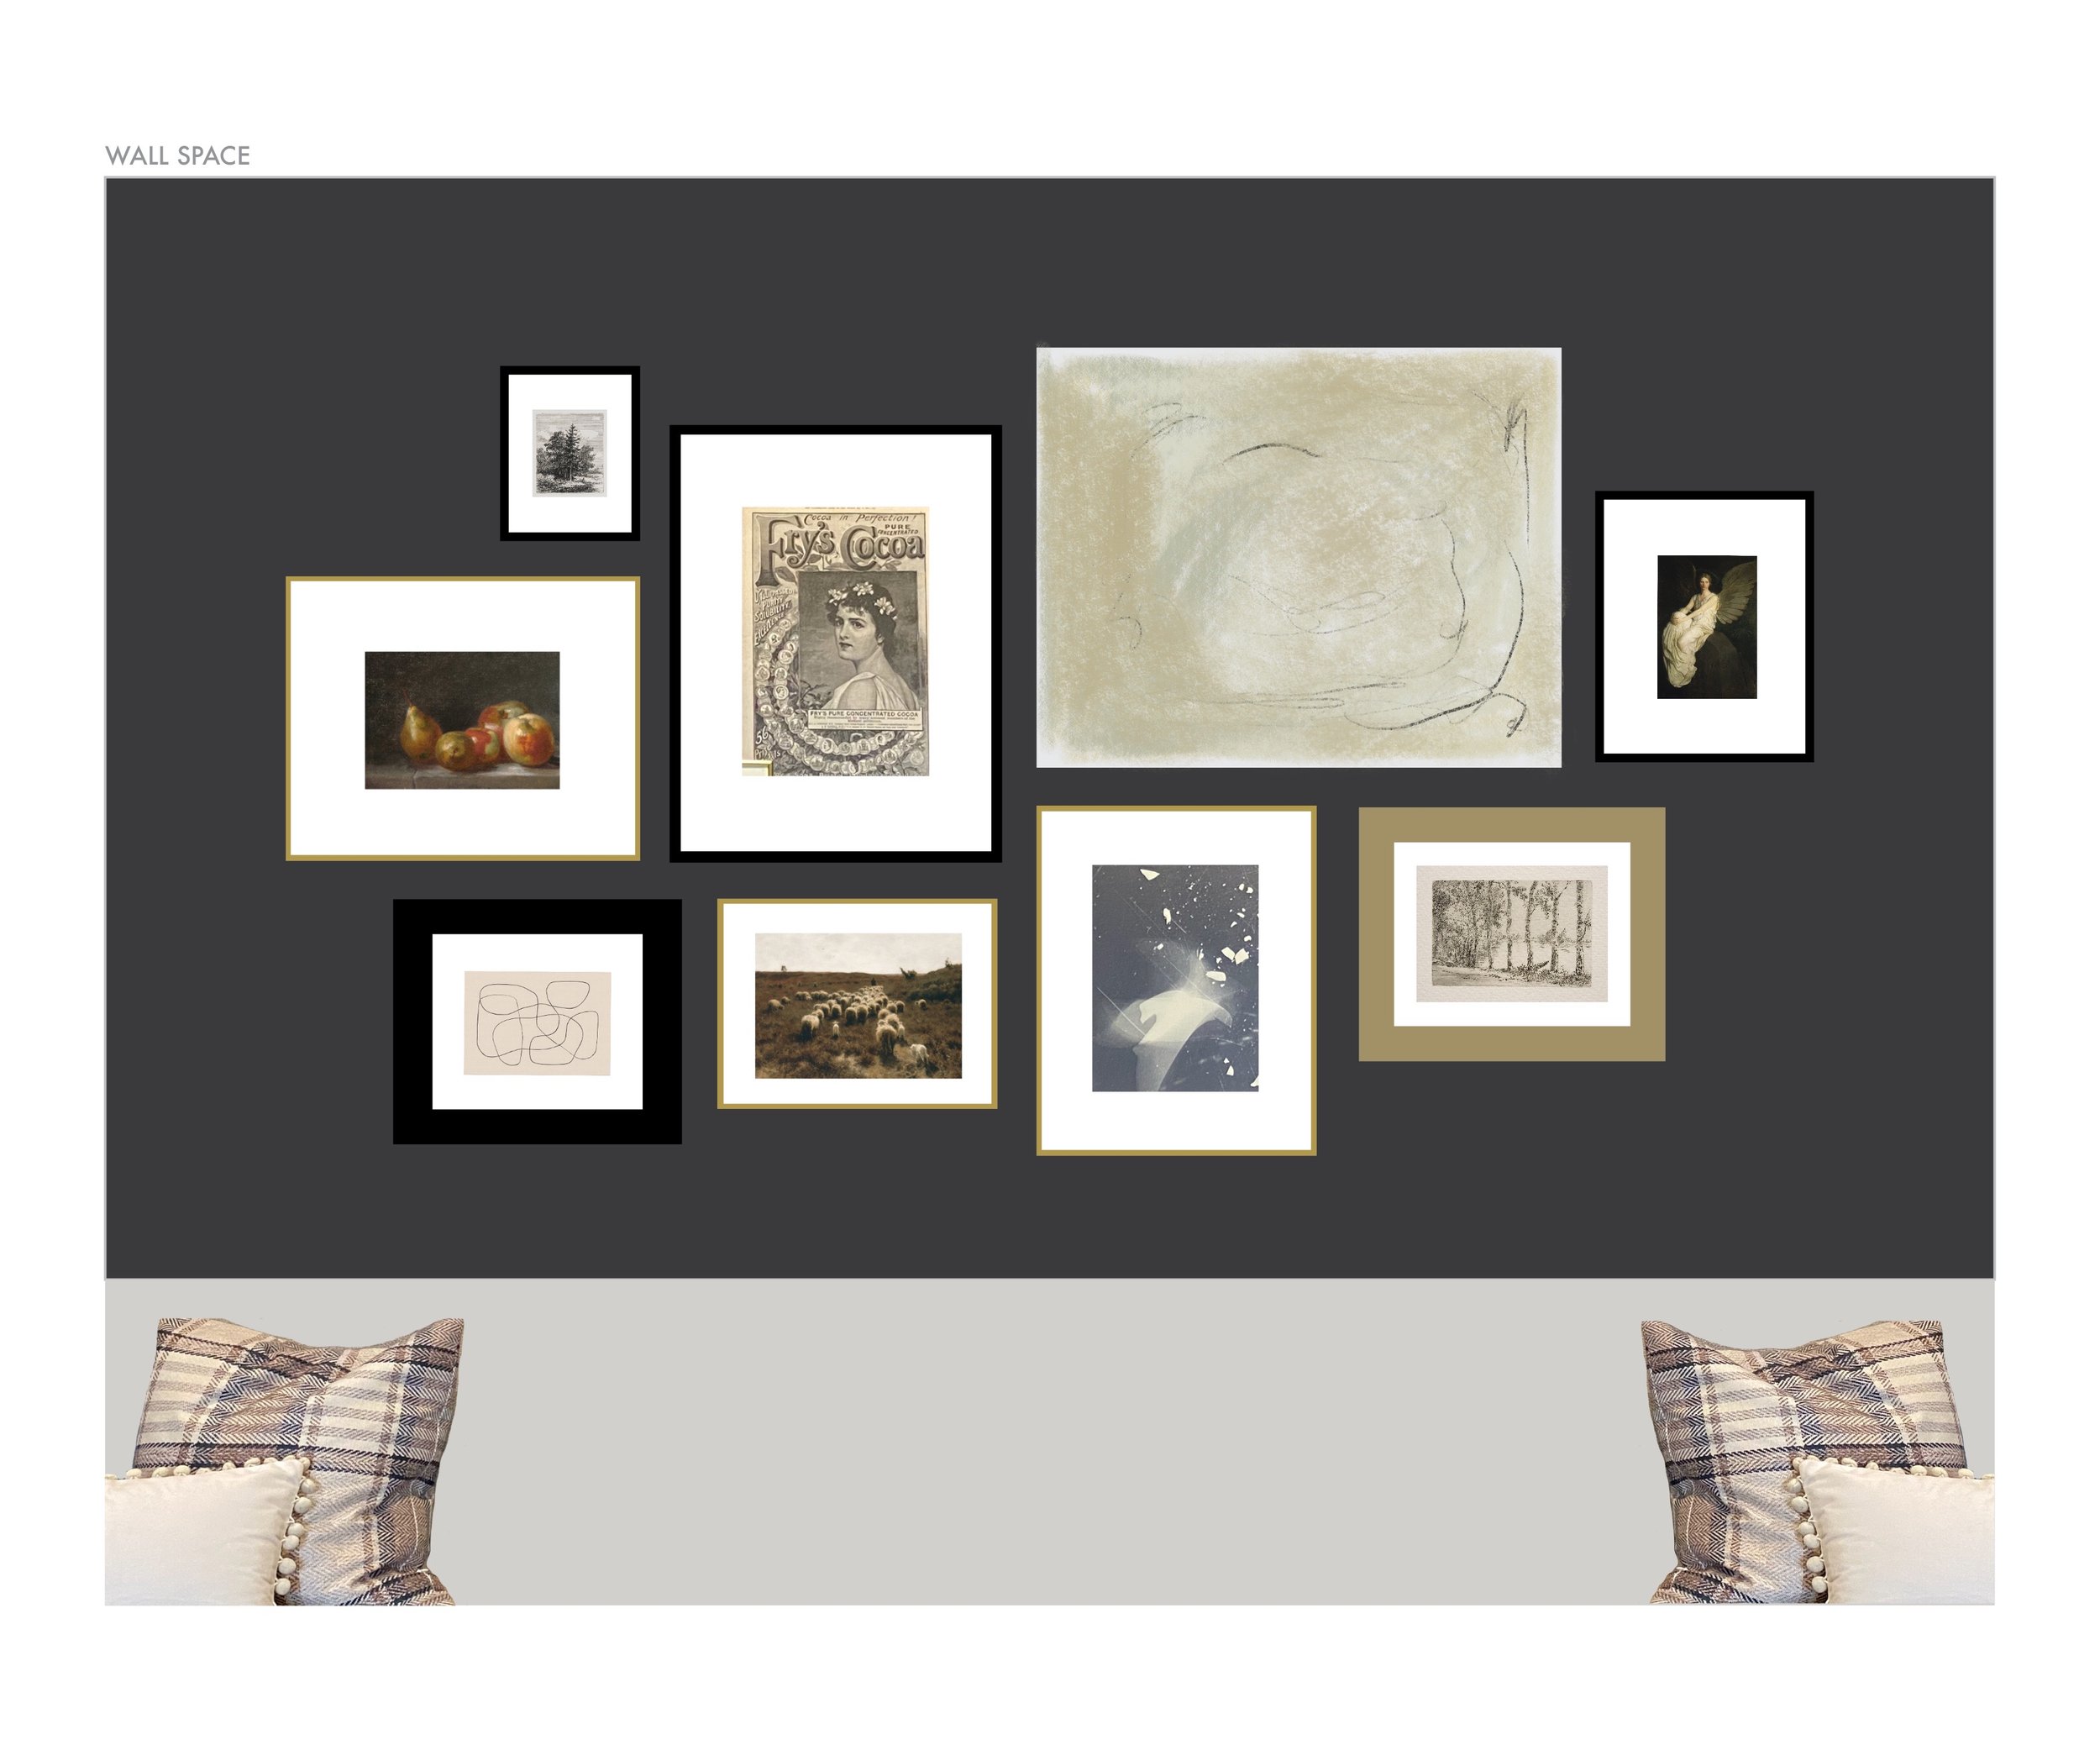
For some context, the sectional sofa sits along the longest wall in the room, opposite of the big fireplace. The room is fairly long and narrow. I’ve always felt overwhelmed with how vast this empty wall space is, but I realized that I needed to just try something if I ever wanted to break up the empty feeling it created. I’ve always been an advocate for the difference some art can make in a space, yet I was afraid to commit to anything. Should I try a single large-scale canvas (it would need to be one giant piece of art)? What about a triptych? I could always do a gallery wall, but should it be clean and structured or varied and eclectic? I didn’t know where to start, so I continued to put it off.
Until one day this spring when I just had enough. I resolved that I needed to just do something - anything! Because I wasn’t sure how committed I was to the idea, I decided I wanted to keep it pretty low risk and very low cost. I thumbed through my frame and existing art collection in our basement (serial frame collector over here) and pulled out a handful of the largest frames I had. Since I didn’t have more than two frames that matched or frames or canvases larger than a 2’x3’, I decided I’d take an eclectic approach using multiple frames and art pieces to fill the large space. And so began the process of pulling together an eclectic gallery wall.
Here’s how I did it.

Gather Frames and Art and Pick a Direction
As I mentioned, I wanted to use what I had first to pull the gallery wall together with the goal of keeping this project as low cost as possible. I went through my collection of frames and pulled out some of the larger ones I had, while also keeping in mind how they looked together. Eclectic gallery walls are really beautiful, but they do require a little bit of intention. When you starting mixing too many frame finishes and colours, it can start to look cluttered. I pulled out frames that were gold and black in a variety of thicknesses. I also pulled a few additional frames that I knew could easily be painted to fit with the direction I was going with.
I also pulled out a few pieces of art that I really liked from my own collection. What I had didn’t fill all the frames I pulled, but it gave me a good starting point to plan the rest of the gallery wall around. To fill out even more space, I also grabbed an old painting I had done as a project in art school. It was done on a beautiful wood canvas and I never intended on using it in my decor, so I decided it would be a great opportunity to DIY some big artwork for the gallery wall by reusing the canvas.
Make a Plan
I placed the frames above my couch to get a sense of the scale, but as a visual person, I decided it would be best to plan it out on my computer with accurate measurements to make sure it truly filled the space like I hoped. I know not everyone is as particular as me and you can definitely achieve a beautiful eclectic gallery wall by simply winging it, but since I needed to fill in a few additional pieces of art and wanted to achieve a particular look, I decided to create a digital rendering.
I created my plan using Adobe Illustrator, as I’m well versed with that program, but if you wanted to do something similar, you could do it just as easily in Canva or by drawing it out by hand. I used the original measurements of my frames and scaled them down by 4. I also measured the wall space above the couch and scaled that down by 4 too so that I could arrange the different frames within the space to find an arrangement I liked.
If you decide to skip the digital plan, you could also physically do this on the floor with your frames. Regardless of how far you take it, I do recommend making some sort of plan, especially if you’re using different types and sizes of frames. It ensures that you can spread the frame styles and colours out across the entire wall and will give you a more balanced finished product.
Fill in the Gaps with Additional Art
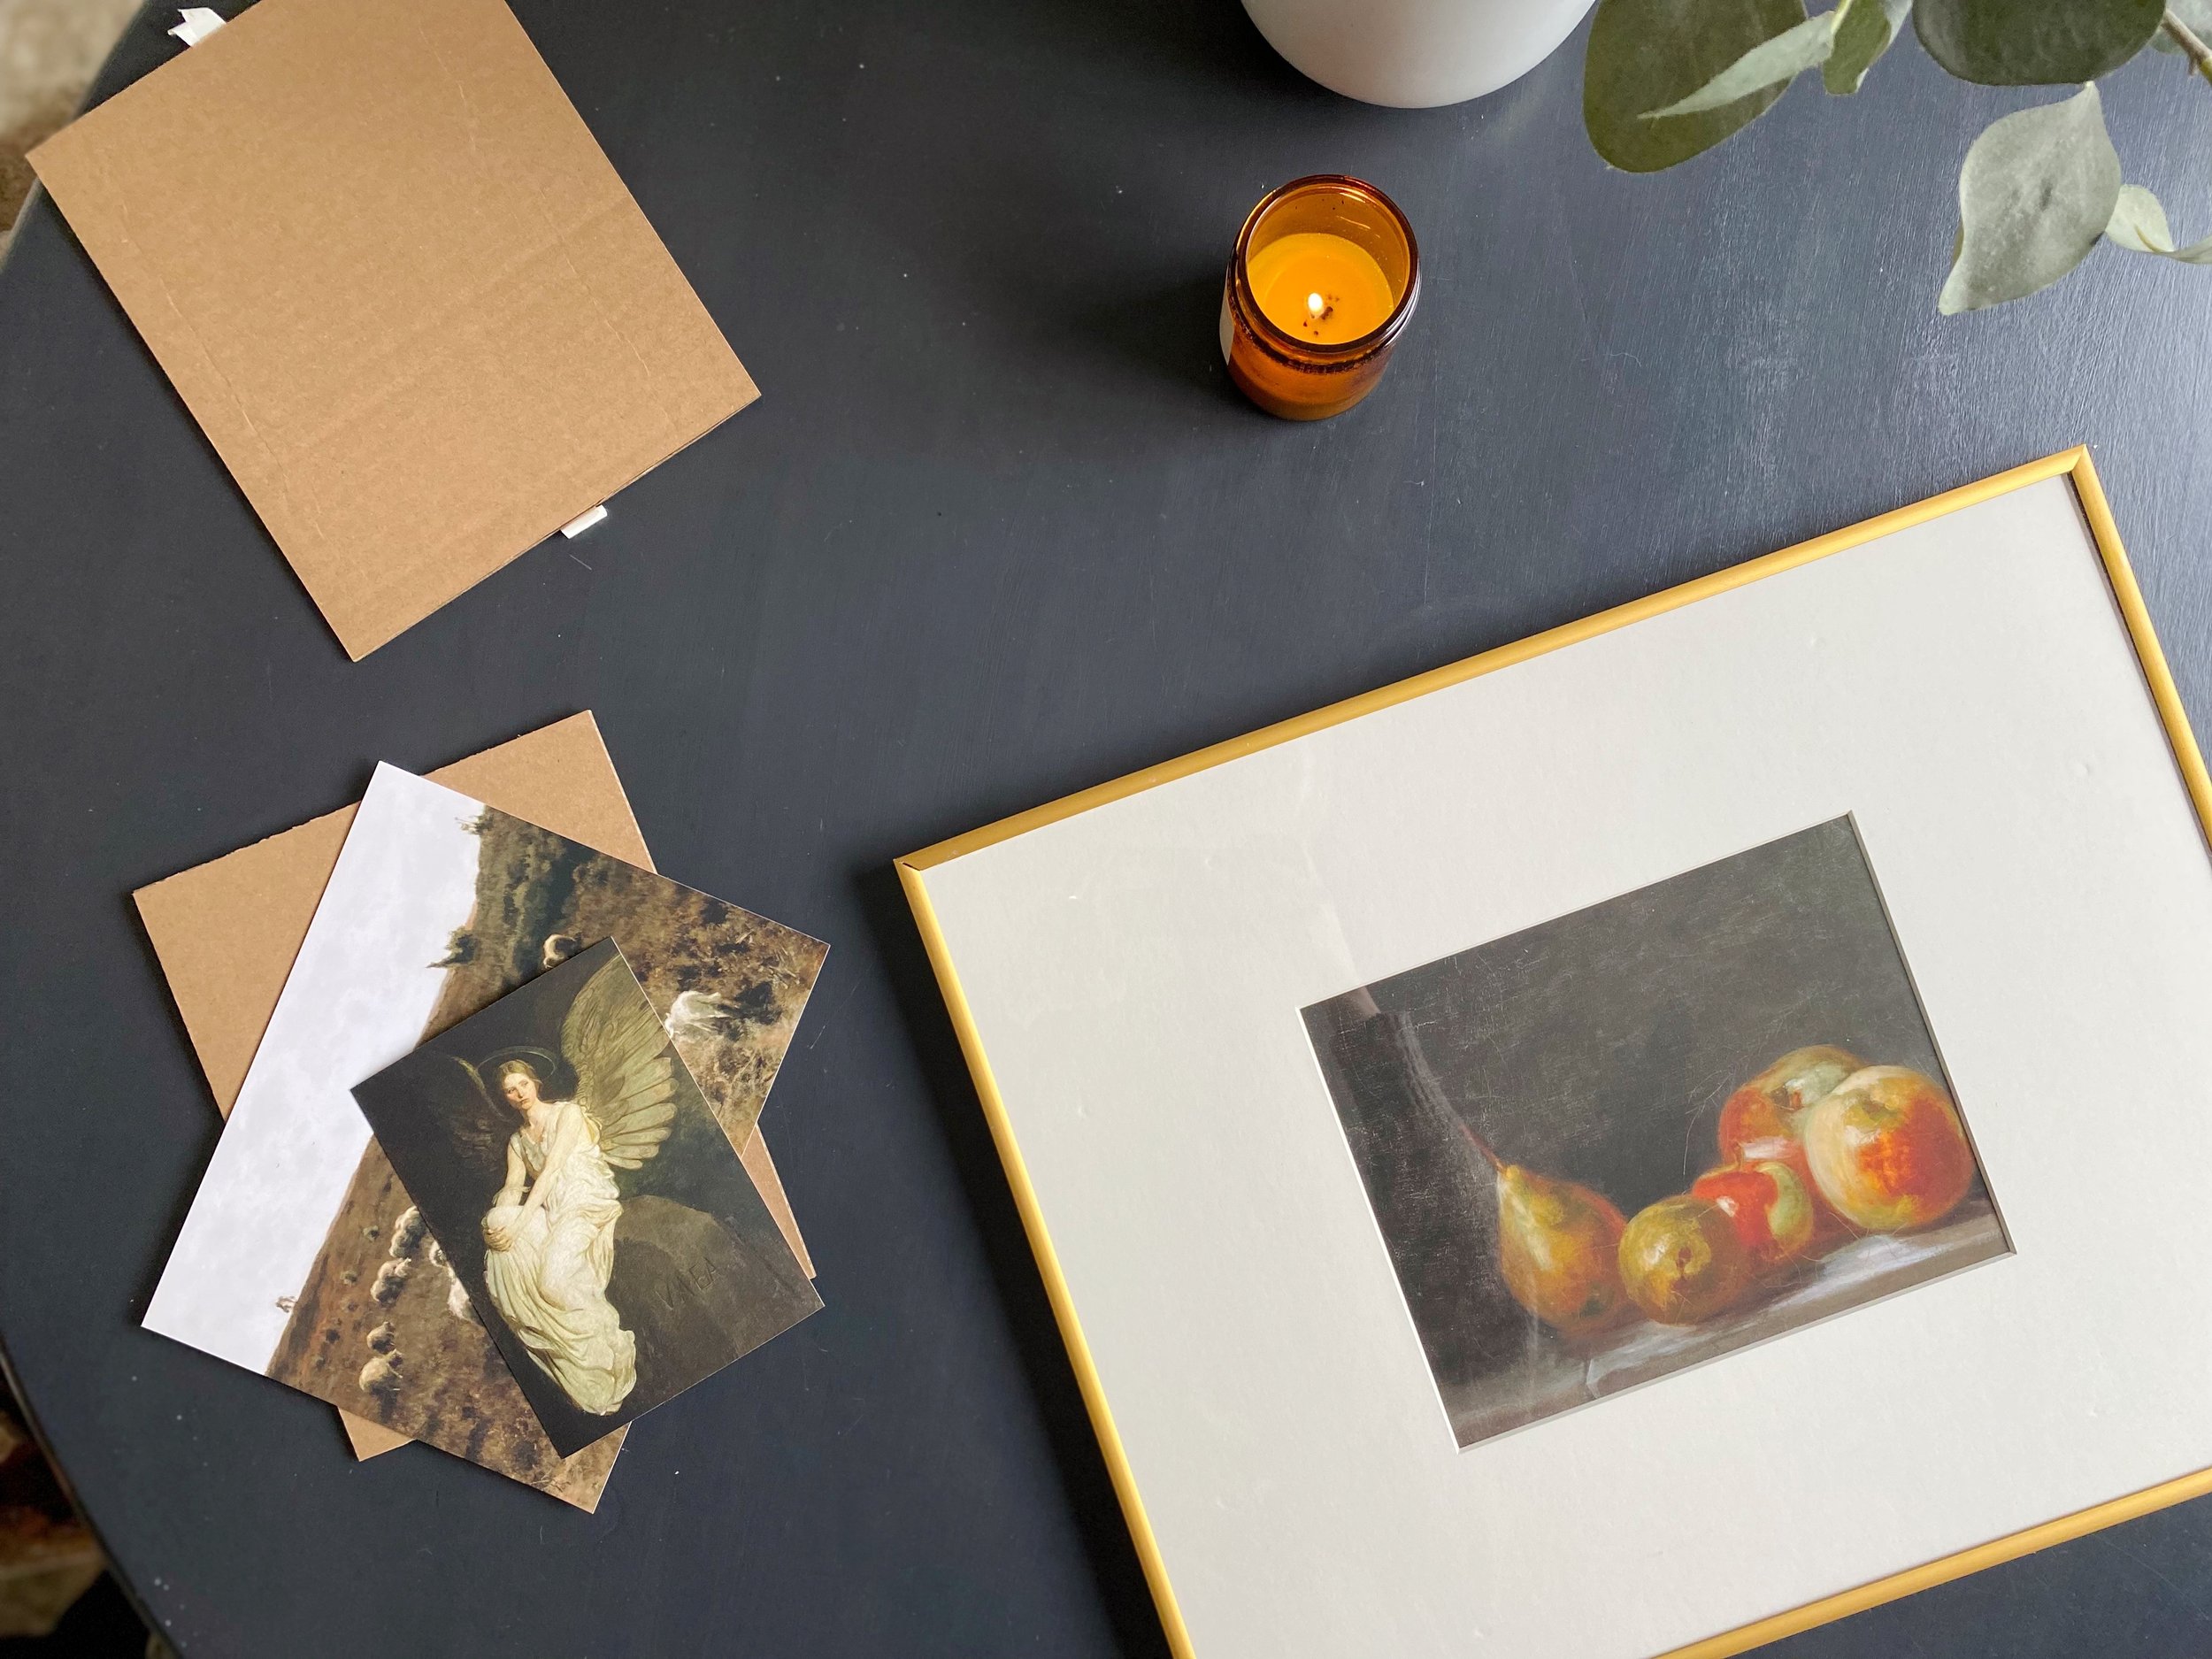
I needed a few additional art pieces to fill in the gaps on some of my frames, so after creating my plan, I was able to plug in a few different art print options to pull everything together. I found most of the additional pieces I used as downloadable art prints from Etsy, which made it really easy to purchase them and send them to a local printer. Before purchasing, I assigned them to a particular frame in my plan, which allowed me to accurately order the size I needed of each.
If you need some ideas about where to find art for your home, be sure to check out this post. If you like the artwork I picked for my gallery wall, I will link a round-up of the specific pieces I purchased at the bottom of this post.
Prep and DIY (if necessary)
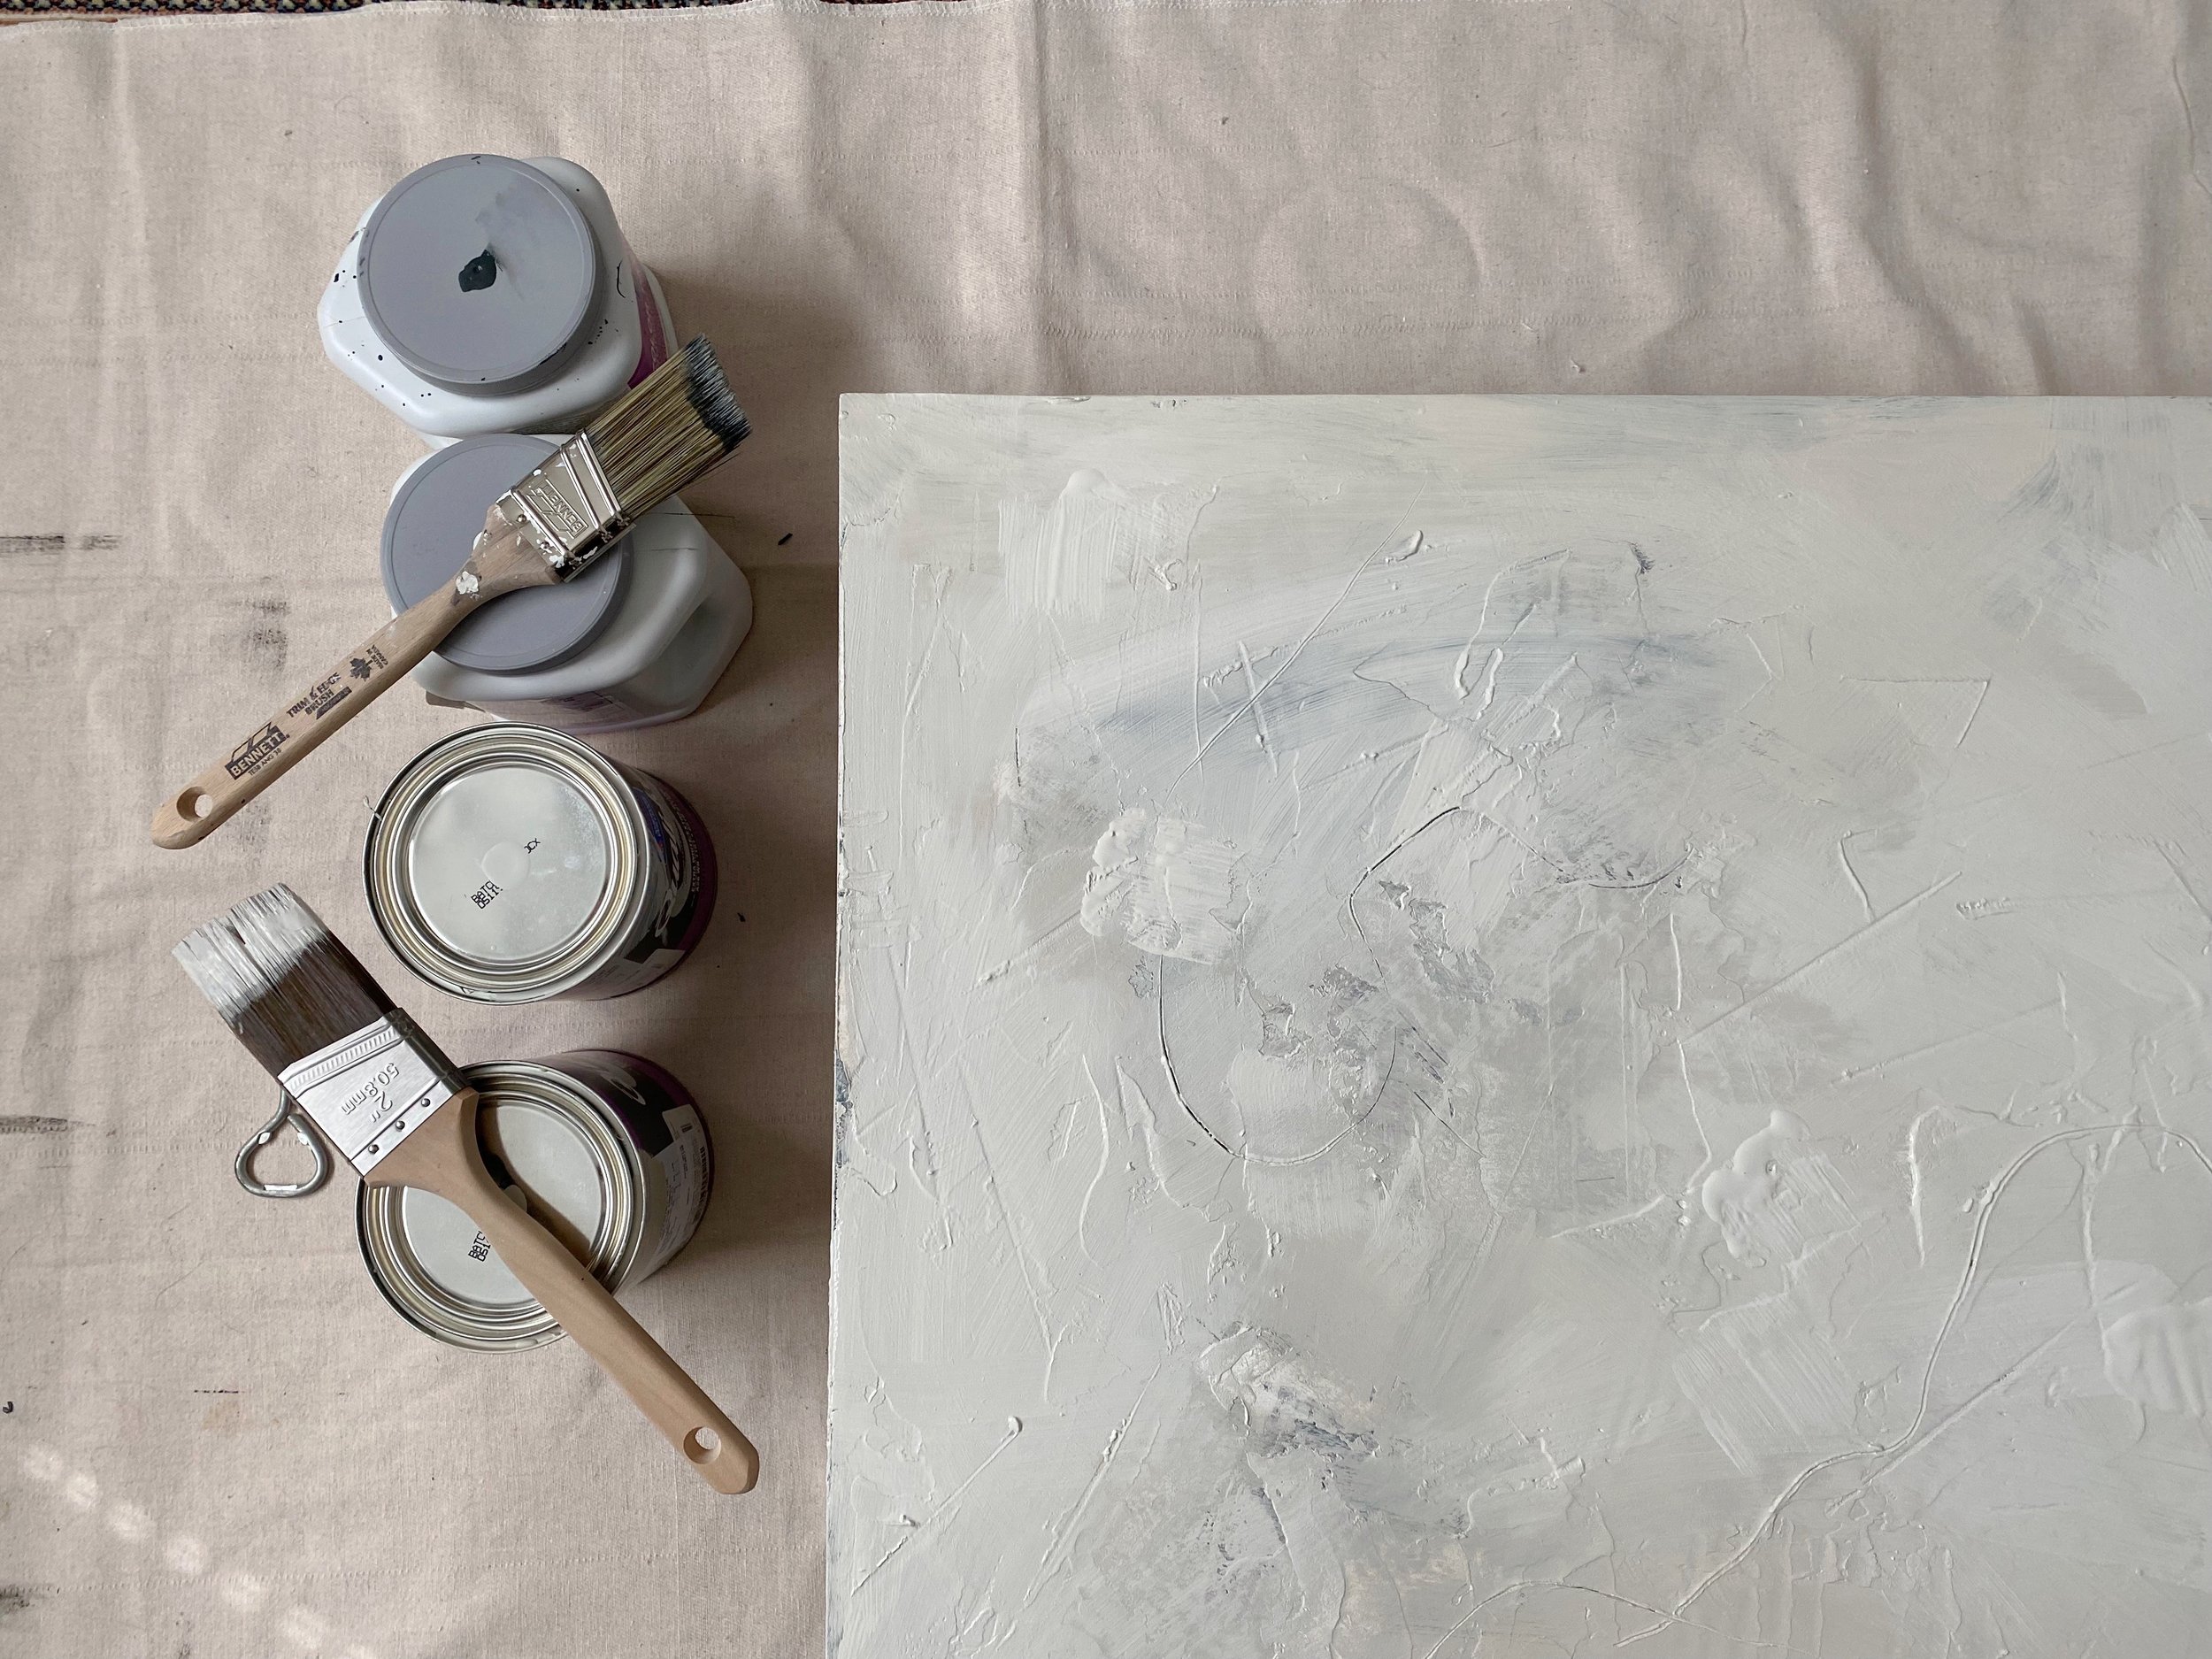
With the large canvas I was planning to reuse, I decided to create an abstract painting. Most of my gallery wall was made up of vintage art prints, so I felt some abstract pieces would be a welcomed break for the eye. I found an inspiration piece and pulled out some neutral samples of wall paint I had on hand. Because the piece would be fairly simple, I also decided to use some drywall compound to add texture to the canvas. I gave the entire thing a skim coat and once it dried, layered in areas of paint and compound using various techniques, such as drybrushing. I don’t have a detail tutorial of this process because I really just went for it, adjusting and layering, scraping and scratching as I went. It was a really fun and very forgiving project.
As for the rest of the gallery wall, I also needed to prepare some of the frames for new artwork. I had a couple of white frames that I decided to paint black. I used a matte black can of spray paint and gave each a few light coats, allowing them to dry in between.
At this point, I also realized that the mat boards in my frames were varying tones of white and cream. Since the frames and artwork were already fairly varied, I decided that by unifying the artwork mats, it would bring a sense of visual cohesion. Obviously if you were keeping this very low cost, you could skip this step or find no-spend alternatives. But after careful planning, I was able to get away with only purchasing one large cream mat board from Michaels for only $25 and I cut the mats and openings myself using a utility knife. It was a fairly low-cost solution that made a big impact.

Hang the Artwork
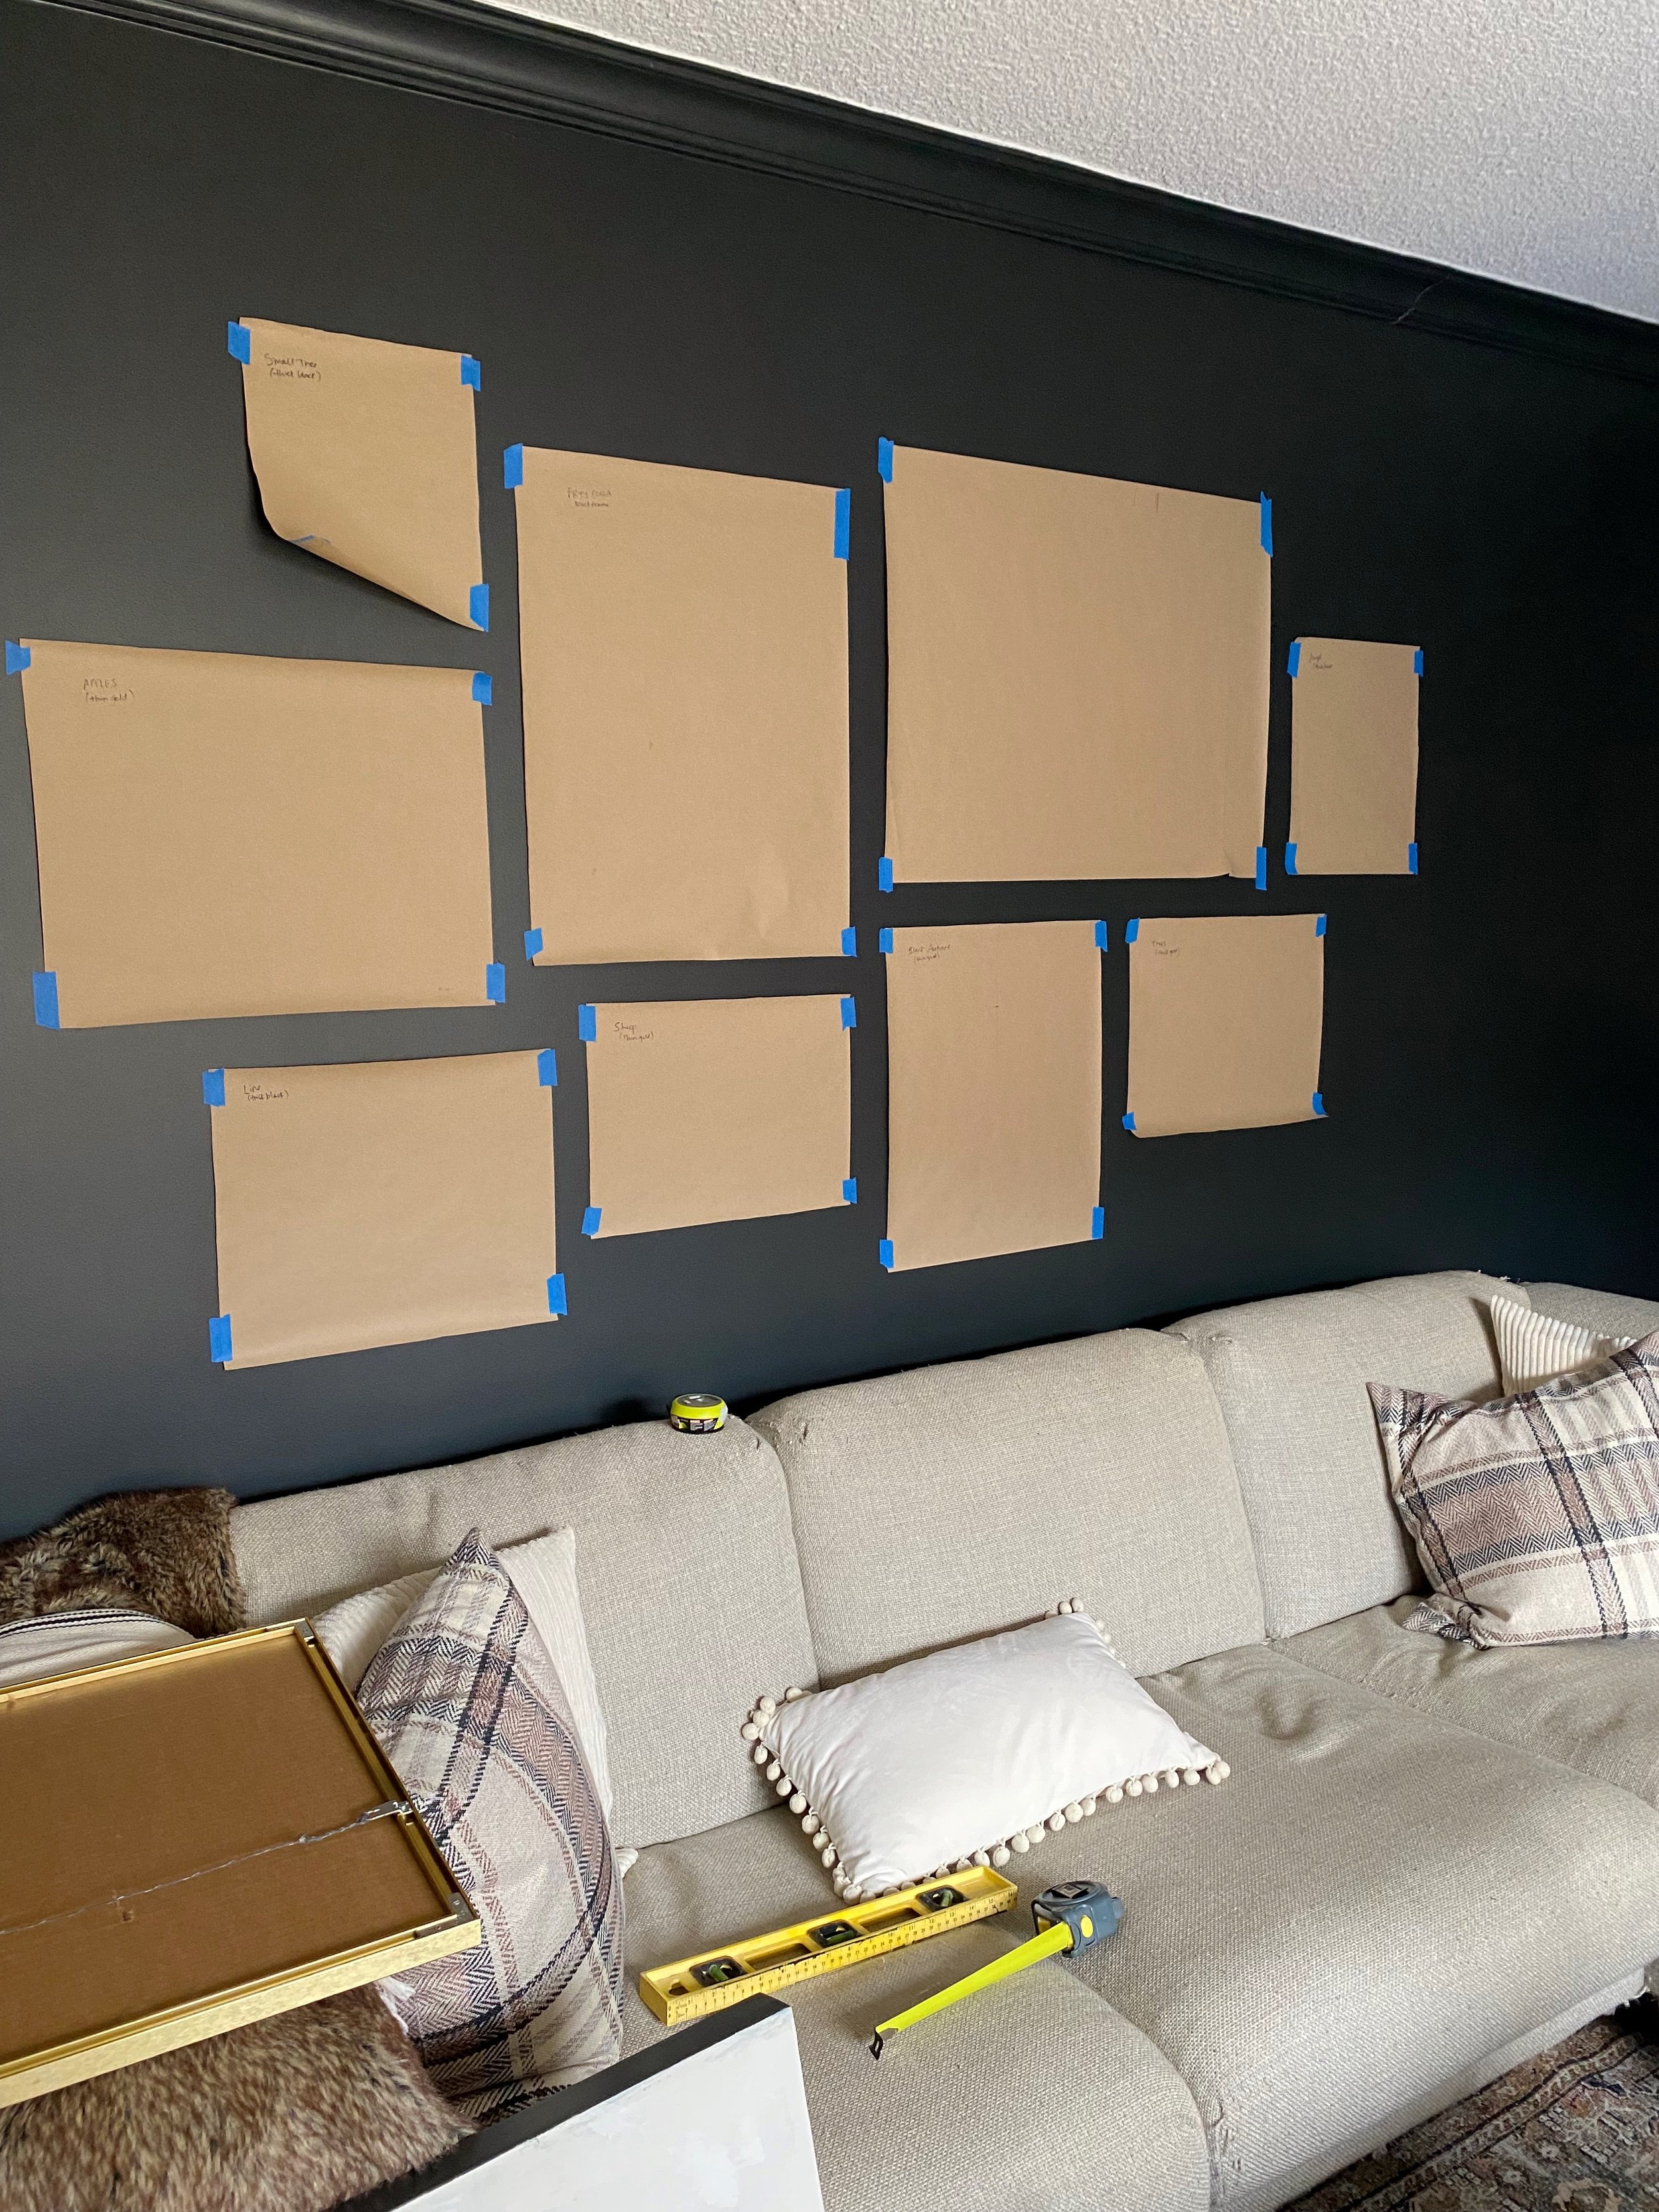
There are hundreds of tutorials out there about how to plan and hang a gallery wall. In the past, I’ve just gone for it, planning and hanging as I go. But since I had already made a specific plan for this gallery wall, I decided to use the popular paper template method. I cut out kraft paper rectangles representing the sizes of each of my frames and used painters tape to arrange them on the wall above my couch. My goal was to make as few holes in my wall as possible, so I felt this gave my perfectionist heart the opportunity to fine tune and finesse the placement before truly committing.
Another benefit to this method was that I could mark my holes on the paper before drilling or hammering into the actual wall. Since each frame was different, the hole placement(s) were different for each, so this really gave me the opportunity to get it right with very little confusion. I used a level and spaced the frames about 2.5” apart on all sides. I either drilled a hole with a drywall anchor or simply used a picture nail, depending on the weight of the frame.

Enjoy Your Artwork!
It took some time, but was worth every effort! I am so happy with the finished product and love the additional warmth it brings to our cozy space. I didn’t spend any money on frames and probably spent about $30-$40 on purchasing and printing artwork and about $25 on the mat boards, which overall is a fairly low investment for such a big visual impact. For the pieces that I DIY’ed, I used materials I already had on hand, which I consider as no additional cost to me. I love using art prints (especially download-and-print-yourself options) because the commitment is pretty low, meaning I can always switch them out if I feel like a change or DIY some other pieces to integrate in. The beauty of an eclectic gallery wall is that you can always add on to it over time too.


What’s next? I’m always thinking of ways to make this space even cozier, but for now, we’ll enjoy the impact this simple project made in our space. Would you create an eclectic gallery wall?

Disclaimer: This post contains affiliate links. Please read our full Affiliate Disclosure for more information.
Source Guide
Paint: Wall Colour
Decor: Plaid throw pillows // Textured white throw pillows // White pom-pom throw pillows // Faux fur blanket (similar)
Artwork: Tree vintage sketch // Frye’s Cocoa Ad (vintage newspaper advertisement) // Apple and pear vintage still life // Abstract line (DIY inspired by this print) // Sheep vintage landscape // Abstract canvas (DIY inspired by this artwork) // Lithograph from Bowl, or, an unlikeness series by David Scott Armstrong // Lakeside Birch Tree vintage sketch // Angel vintage portrait

Find all our product source guides on our LTK