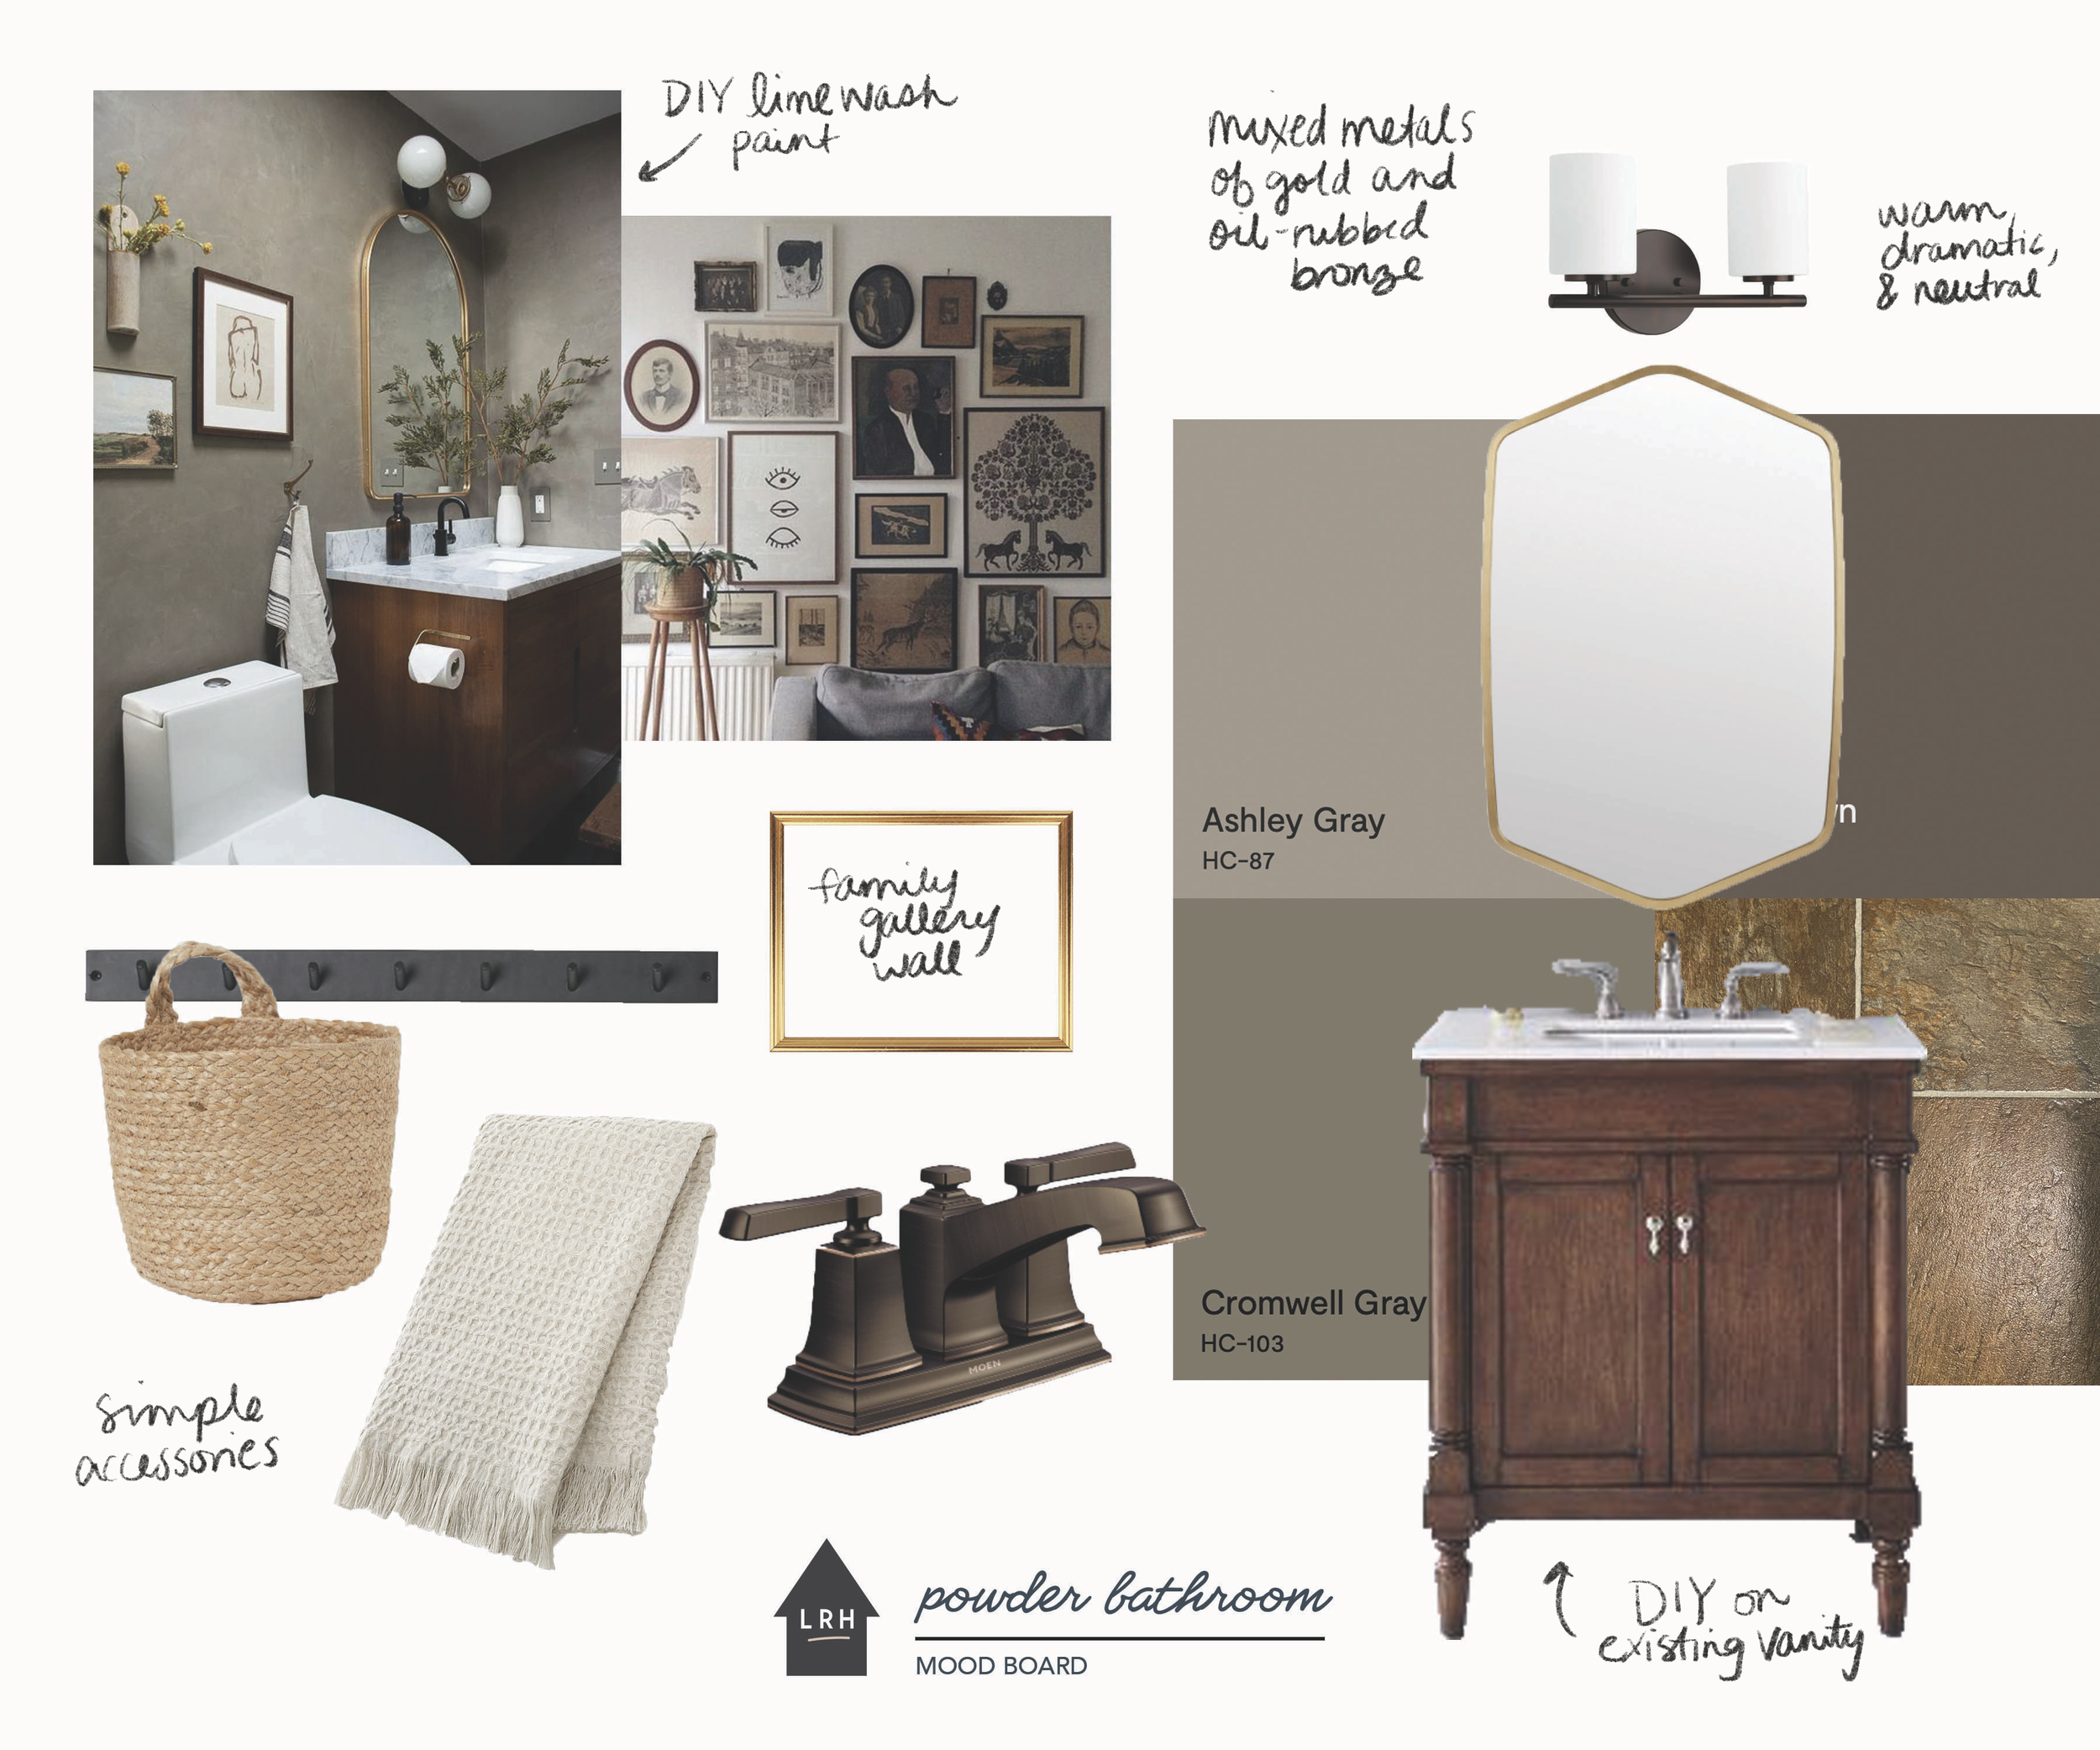
Our Powder Room Moodboard and Before Photos
I am so excited to share about this upcoming project! At the beginning of this year, my husband and I decided to put a hold on making any further updates to our home. We were hanging in the balance of some difficult decisions and changes in our family coupled with intense inflation and the cost of living soaring in our area, so we decided to take a little break from spending money on our home. It was difficult to set aside, as working on our space is something I find so much joy and fulfillment in, but it ended up being a wise decision for us. We had a bananas summer and I don’t think we would have even been able to complete any home projects if we had tried.
With all that being said, as the feeling of autumn sits in the air and a quieter season lies ahead for our family, I’ve been feeling a huge itch to work on something in our home. Anything. Maybe it’s because last year at this time I was gearing up to tackle our dining room for the One Room Challenge? But whatever the reason, we decided that we could finally manage to take on a mini project. So I introduce to you, our upcoming powder room project!
The Before Shots
When we moved into our house, there were at least three rooms painted blue and the main floor powder room was one of them. No hate to any of you who like blue, but I just don’t. My uncle was gracious enough to repaint our blue living room and bedroom for us before we officially moved in, but we left the powder room as-is. Over three years later, it is the only room in the entire house that hasn’t been painted yet. It’s time.
There isn’t much to this space. In fact, it’s hard to even photograph because it’s small, dark, and in the direct centre of our home. I truly haven’t done a thing in here: the mirror, light fixture, towel ring, glass shelf, and even the picture hooks holding any random piece of art you see were left by the previous owners. The floor is a multi-colored vinyl sheet (like our other bathrooms and kitchen). Other than a few random decorations that were haphazardly placed, like a faux plant, tissue box, and random artwork, very minimal effort has been made in here.
Yet this is the washroom we actually use most frequently since it’s directly off our main living space and even more so, this is the space that our guests use. It functions, it’s clean, and it’s a bathroom I am grateful we have (we came from a one bath house before), but I’ve also always been embarrassed by it. Tiny guest powder rooms have so much potential for big design, but ours is so underwhelming and certainly does not reflect our family or style whatsoever.
The Plan
The only condition for this makeover project is that I have a maximum budget of $400. That may seem like a lot, especially in a small space, but by the time you even just purchase paint, you’re already a quarter of the way through the budget, not to mention any hope for fixture updates. It has long been my dream to learn how to tile and I always thought this powder room would be the perfect place to try, but I definitely won’t be able to even squeeze that into the budget. So for now, the flooring will stay and this will primarily be a cosmetic update. I have been working tirelessly to crunch the numbers to find a combination of pieces that fit within it, while also considering what I can DIY or thrift to cut on costs.
My aims for the space is to make it dramatic by leaning into the cozy size and limited lighting. I want it to feel warm and interesting - a real statement for our guests when they use it. I was originally thinking I would do some vertical knotty pine panelling painted in a dramatic colour on all four walls to mimic the feature wall in our dining room, but I think the material costs alone easily cancel that idea off the list. Instead I’d like to create a dramatic feel through a technique you’ve likely seen a lot of these days - limewash paint. Authentic limewash paints are actually a little costly themselves, so I’m going to attempt a DIY version and see if I can get the effect without the high price tag. I’m leaning towards a neutral but dark warm colour, like Cromwell Gray (BM) or Ashley Gray (BM).
Inspiration image via Ethnik Living
Benjamin Moore Cromwell Gray and Ashley Gray
I definitely don’t have room in the budget to replace the vanity, so I plan to DIY the existing one a little bit too. I’d like to attempt to keep the wood look by applying a darker gel stain over top of the existing finish to tone down the orange. If it doesn’t work out, I’ll likely just paint it. But either way, with a fresh coat of something on it and some new hardware, I think it will still make an impact and completely change the dated look.
The largest chunk of my budget will likely be used to replace the mirror and the light fixture with something more modern. The only thing I have actually bought so far for this project is this mirror from Bouclair. I love that it has an interesting shape and will bring in a touch of gold to the overall design. For the light fixture, I’d love to do something in an oil-rubbed bronze finish to create a mixed-metal look. The fixture I’ve had my eye on is out of stock though, so this may become another DIY project to add to the list.
Finally, the rest of the plan simply involves decor. I have a ton of thrifted vintage gold frames in various sizes that I’d like to use to create an eclectic gallery wall, either on the wall beside or across from the toilet. I’d love to fill the frames with unique black and white photos of our ancestors, like our grandparents when they’re young. I think this will be a really fun nod to our family history while also creating something visually interesting to look at while you’re sitting on the toilet. The perfect conversation starter for guests!
I’m hoping to get started on this project in the next few weeks. I’ll likely take my time and work away at it as I can, so I don’t have a specific timeline in mind, but you can be sure that I’ll be updating you on the progress right here. If you have any ideas or suggestions to add, feel free to leave a comment down below.
Until the next update -


