Our Modern Traditional Bedside Tables | Furniture Flip
I am so excited to finally be writing this post! When we were setting up our first home after getting married nearly seven years ago, we had a pretty tight budget that didn’t allow us to splurge on all new furniture. (In fact, we still don’t have a budget that allows for that!) In a lot of ways, it felt like we were college kids gathering a lot of makeshift furniture pieces as we needed them. Neither Curt or I had a bed to bring to our marriage, let alone a set of bedside tables. To make do, we set up a pair of wooden crates on each side of the bed (that were actually decor at our wedding) and called it a day. Well, er, six and a half years.
I’ve been thinking for some time that we really needed to update the bedside crate situation. We both pile books beside our bed and like to have our phone within an arms reach, not to mention baby monitors, alarm clocks, water glasses and all the other things. I wanted to find an option that offered drawer storage and a large surface area for each of us, but I also didn’t want to spend an arm and a leg. I plan to upgrade a lot of the furniture in our bedroom over the coming years, so I would rather save our pennies to use on some of the big ticket items and find a way to save on the bedside tables.


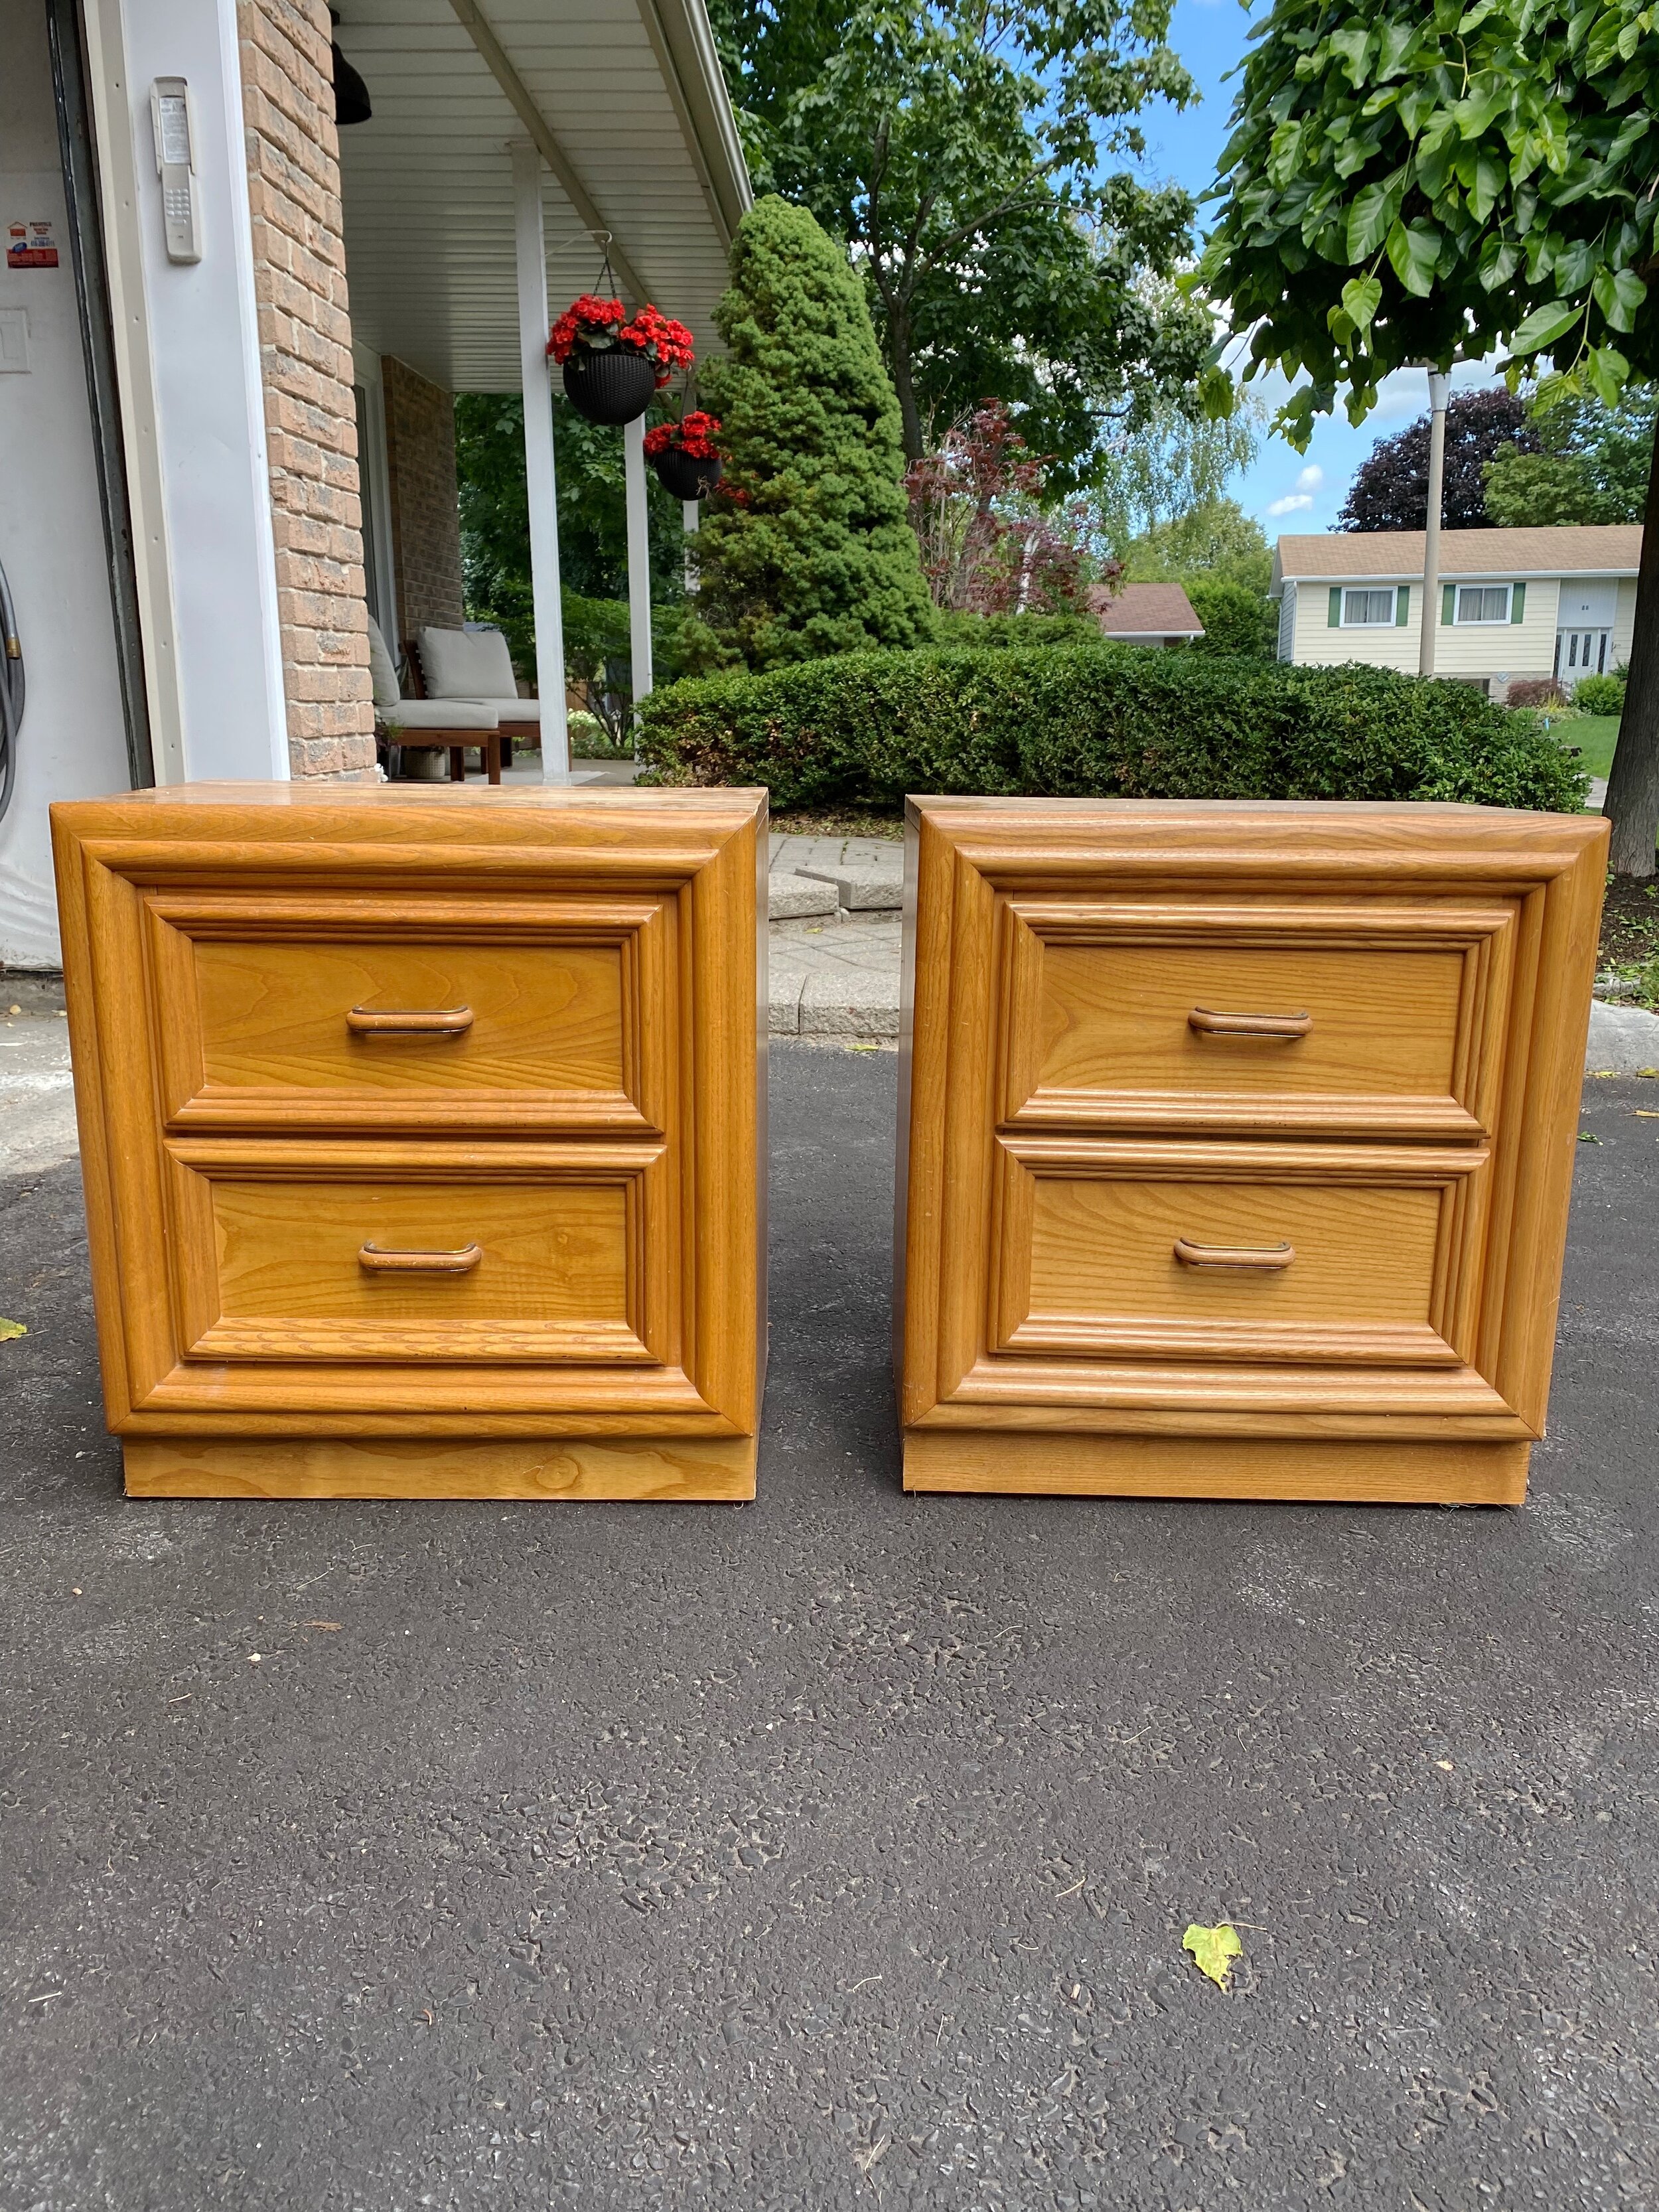
When I saw a set of matching bedside tables on our local buy-and-sell site last Fall, I couldn’t resist the potential. The pair was definitely dated, worn, and not the finest craftsmanship, but I immediately had a vision for them. First and foremost, they each had two drawers, which offered more storage than we could dream of! And secondly, they had great bones. I loved that they had an overall square shape and a lot of beautiful trim work on the fronts. I could instantly imagine them being transformed into a pair of modern traditional bedside tables that perfectly fit the direction I wanted to take our bedroom design moving forward. But potentially the best part of all: they only cost $15 CAD for the pair. Sold!
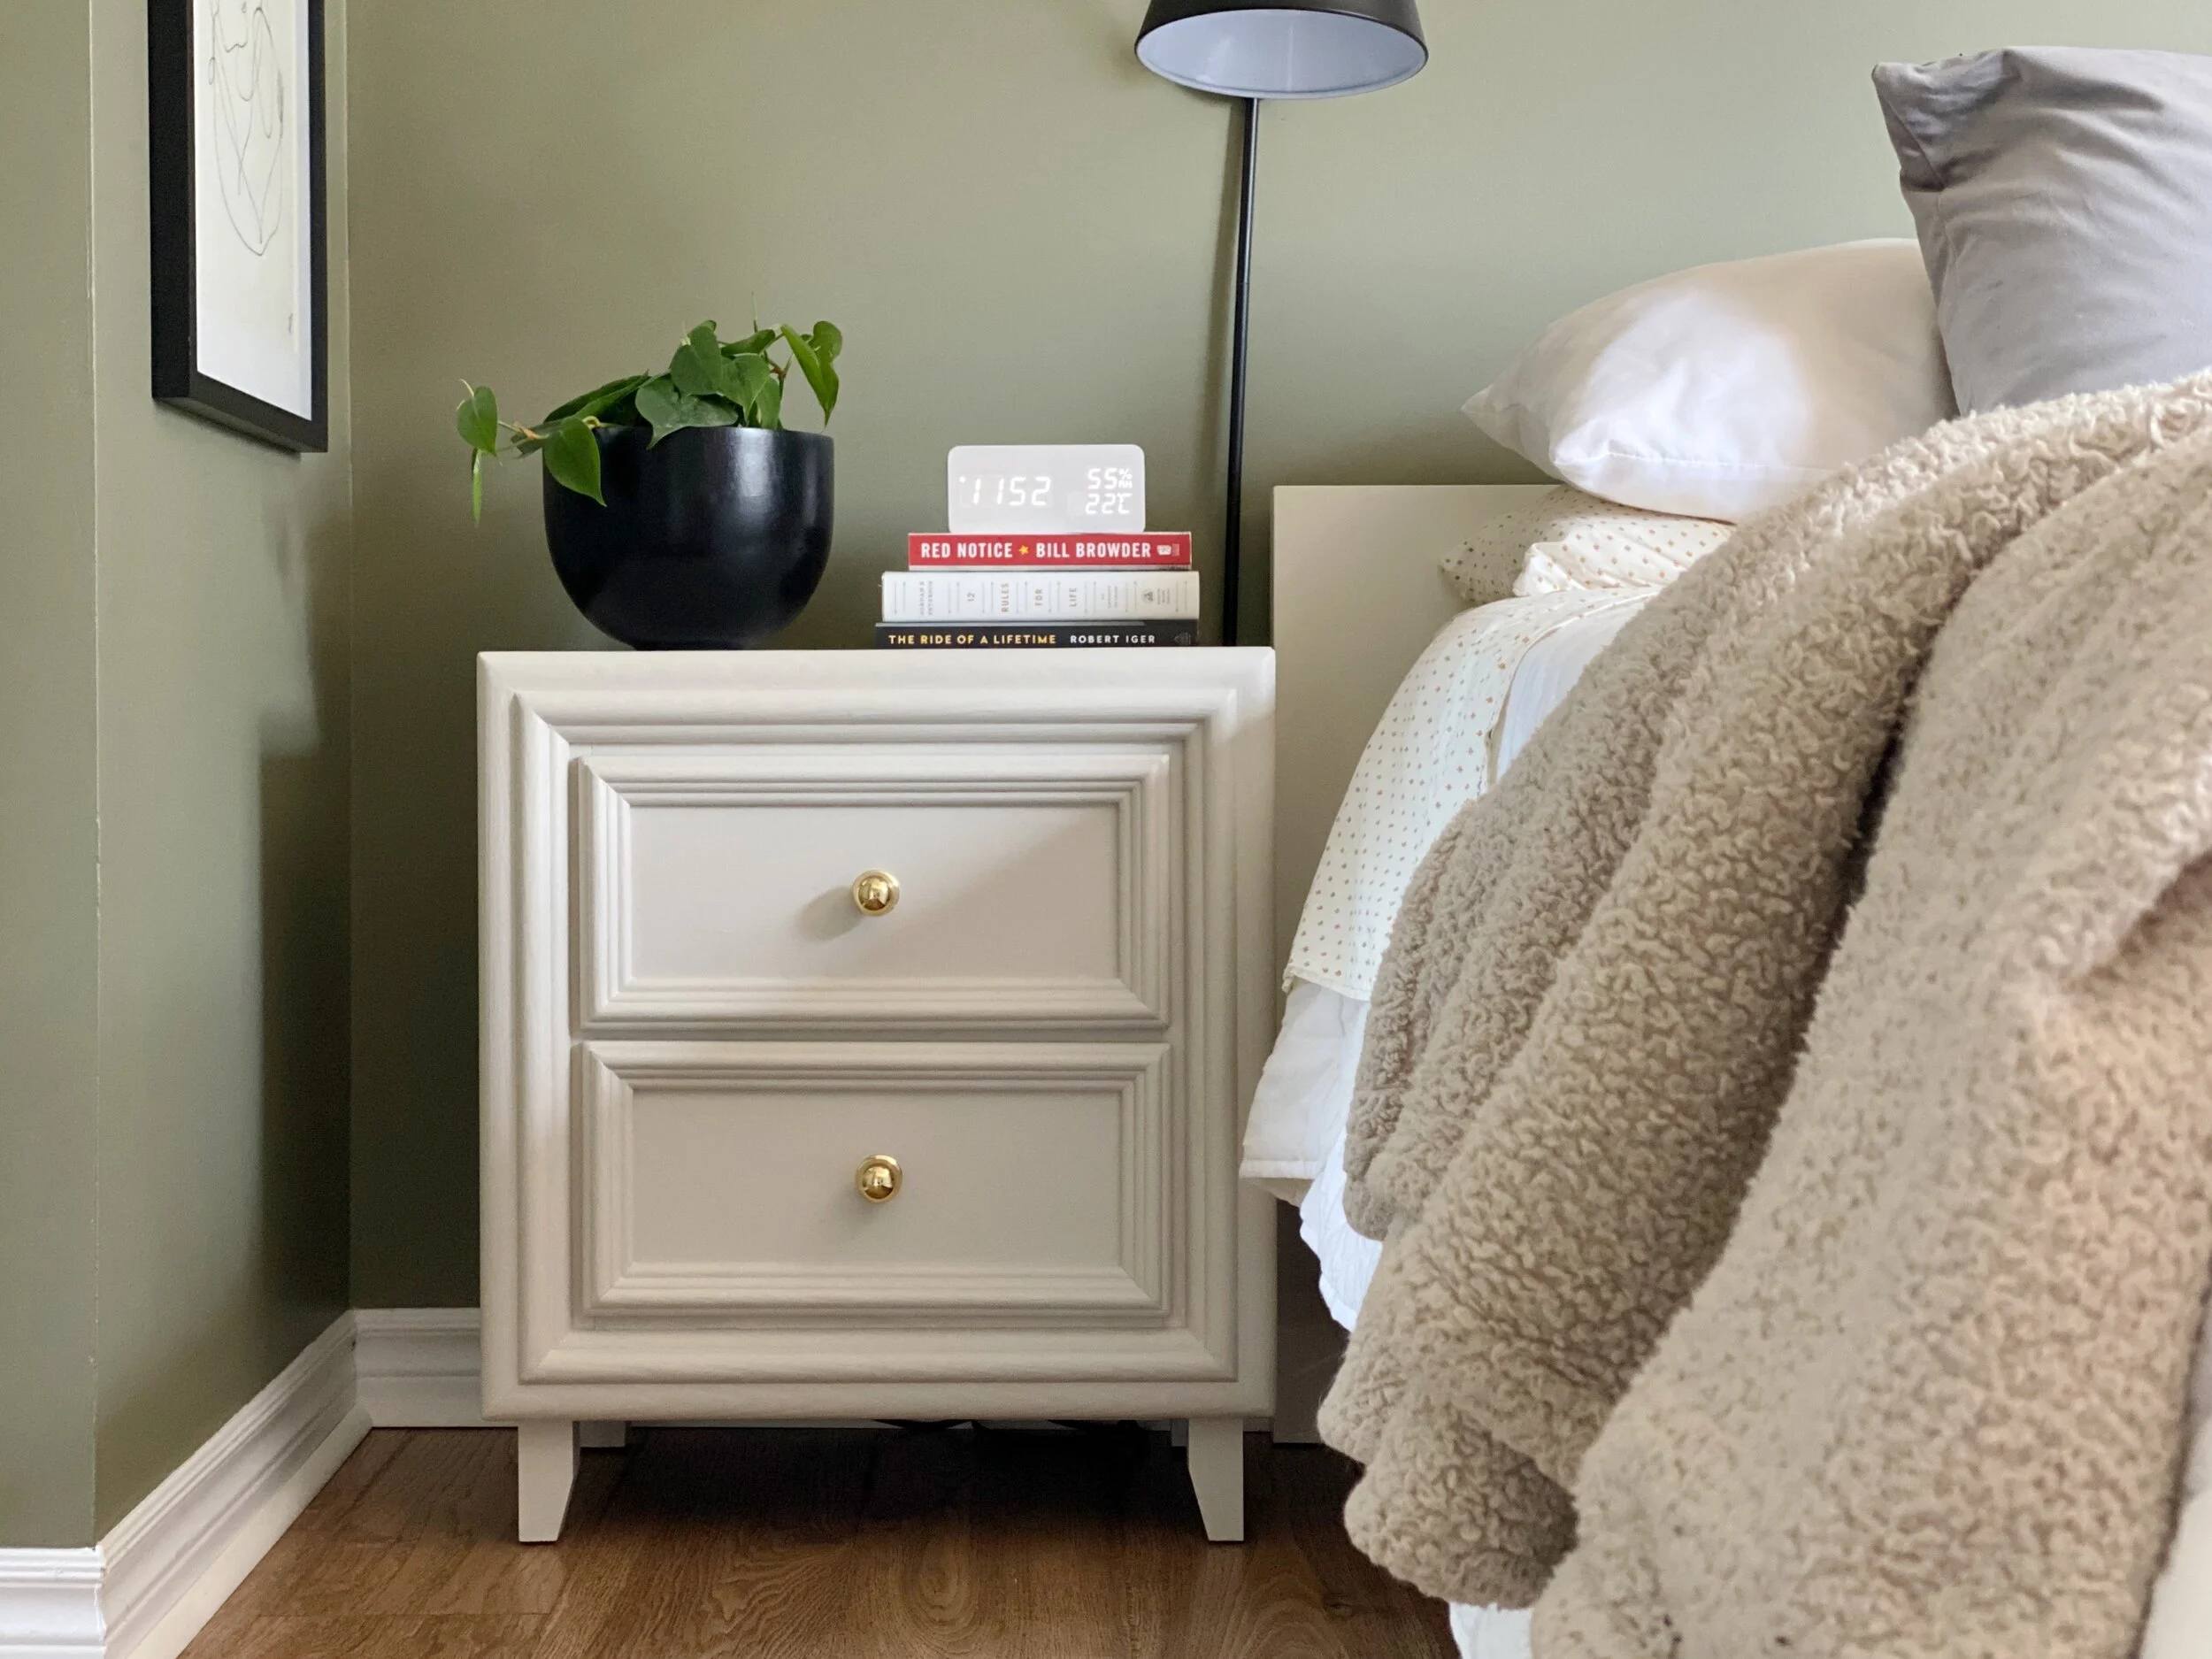
Since the day I picked them up last Fall, this little duo has been sitting in my garage patiently waiting for me to transform them. Life got busy and the winter came, which prevented me from working in the cold garage. In the Spring, I vowed to start, but once again, they sat. I had a clear vision of where I wanted to take them, but the path to get them there was a little unclear at first. But like all creative projects, I realized that I really just had to make myself start and the journey would take care of itself. I spent a few weeks (with long breaks in between steps) chipping away at these babies and - finally - they are complete. I am thrilled with the result and love the sophistication they already bring to our bedroom. One day this room will be a cozy oasis and these bedside tables were a lovely first step towards that dream.

Before

After
The process to transform these tables really wasn’t as intimidating as I imagined it to be once I actually got going. But I thought I would share that process here in case you ever want to tackle a furniture painting and refinishing project too. I spend a lot of time watching furniture refinishing videos on YouTube, so it helped to have that understanding of how other DIYers tackle their projects to help inspire my own. I hope this tutorial inspires you to give it a try! It really isn’t very hard at all.
Step 1: Make a Plan
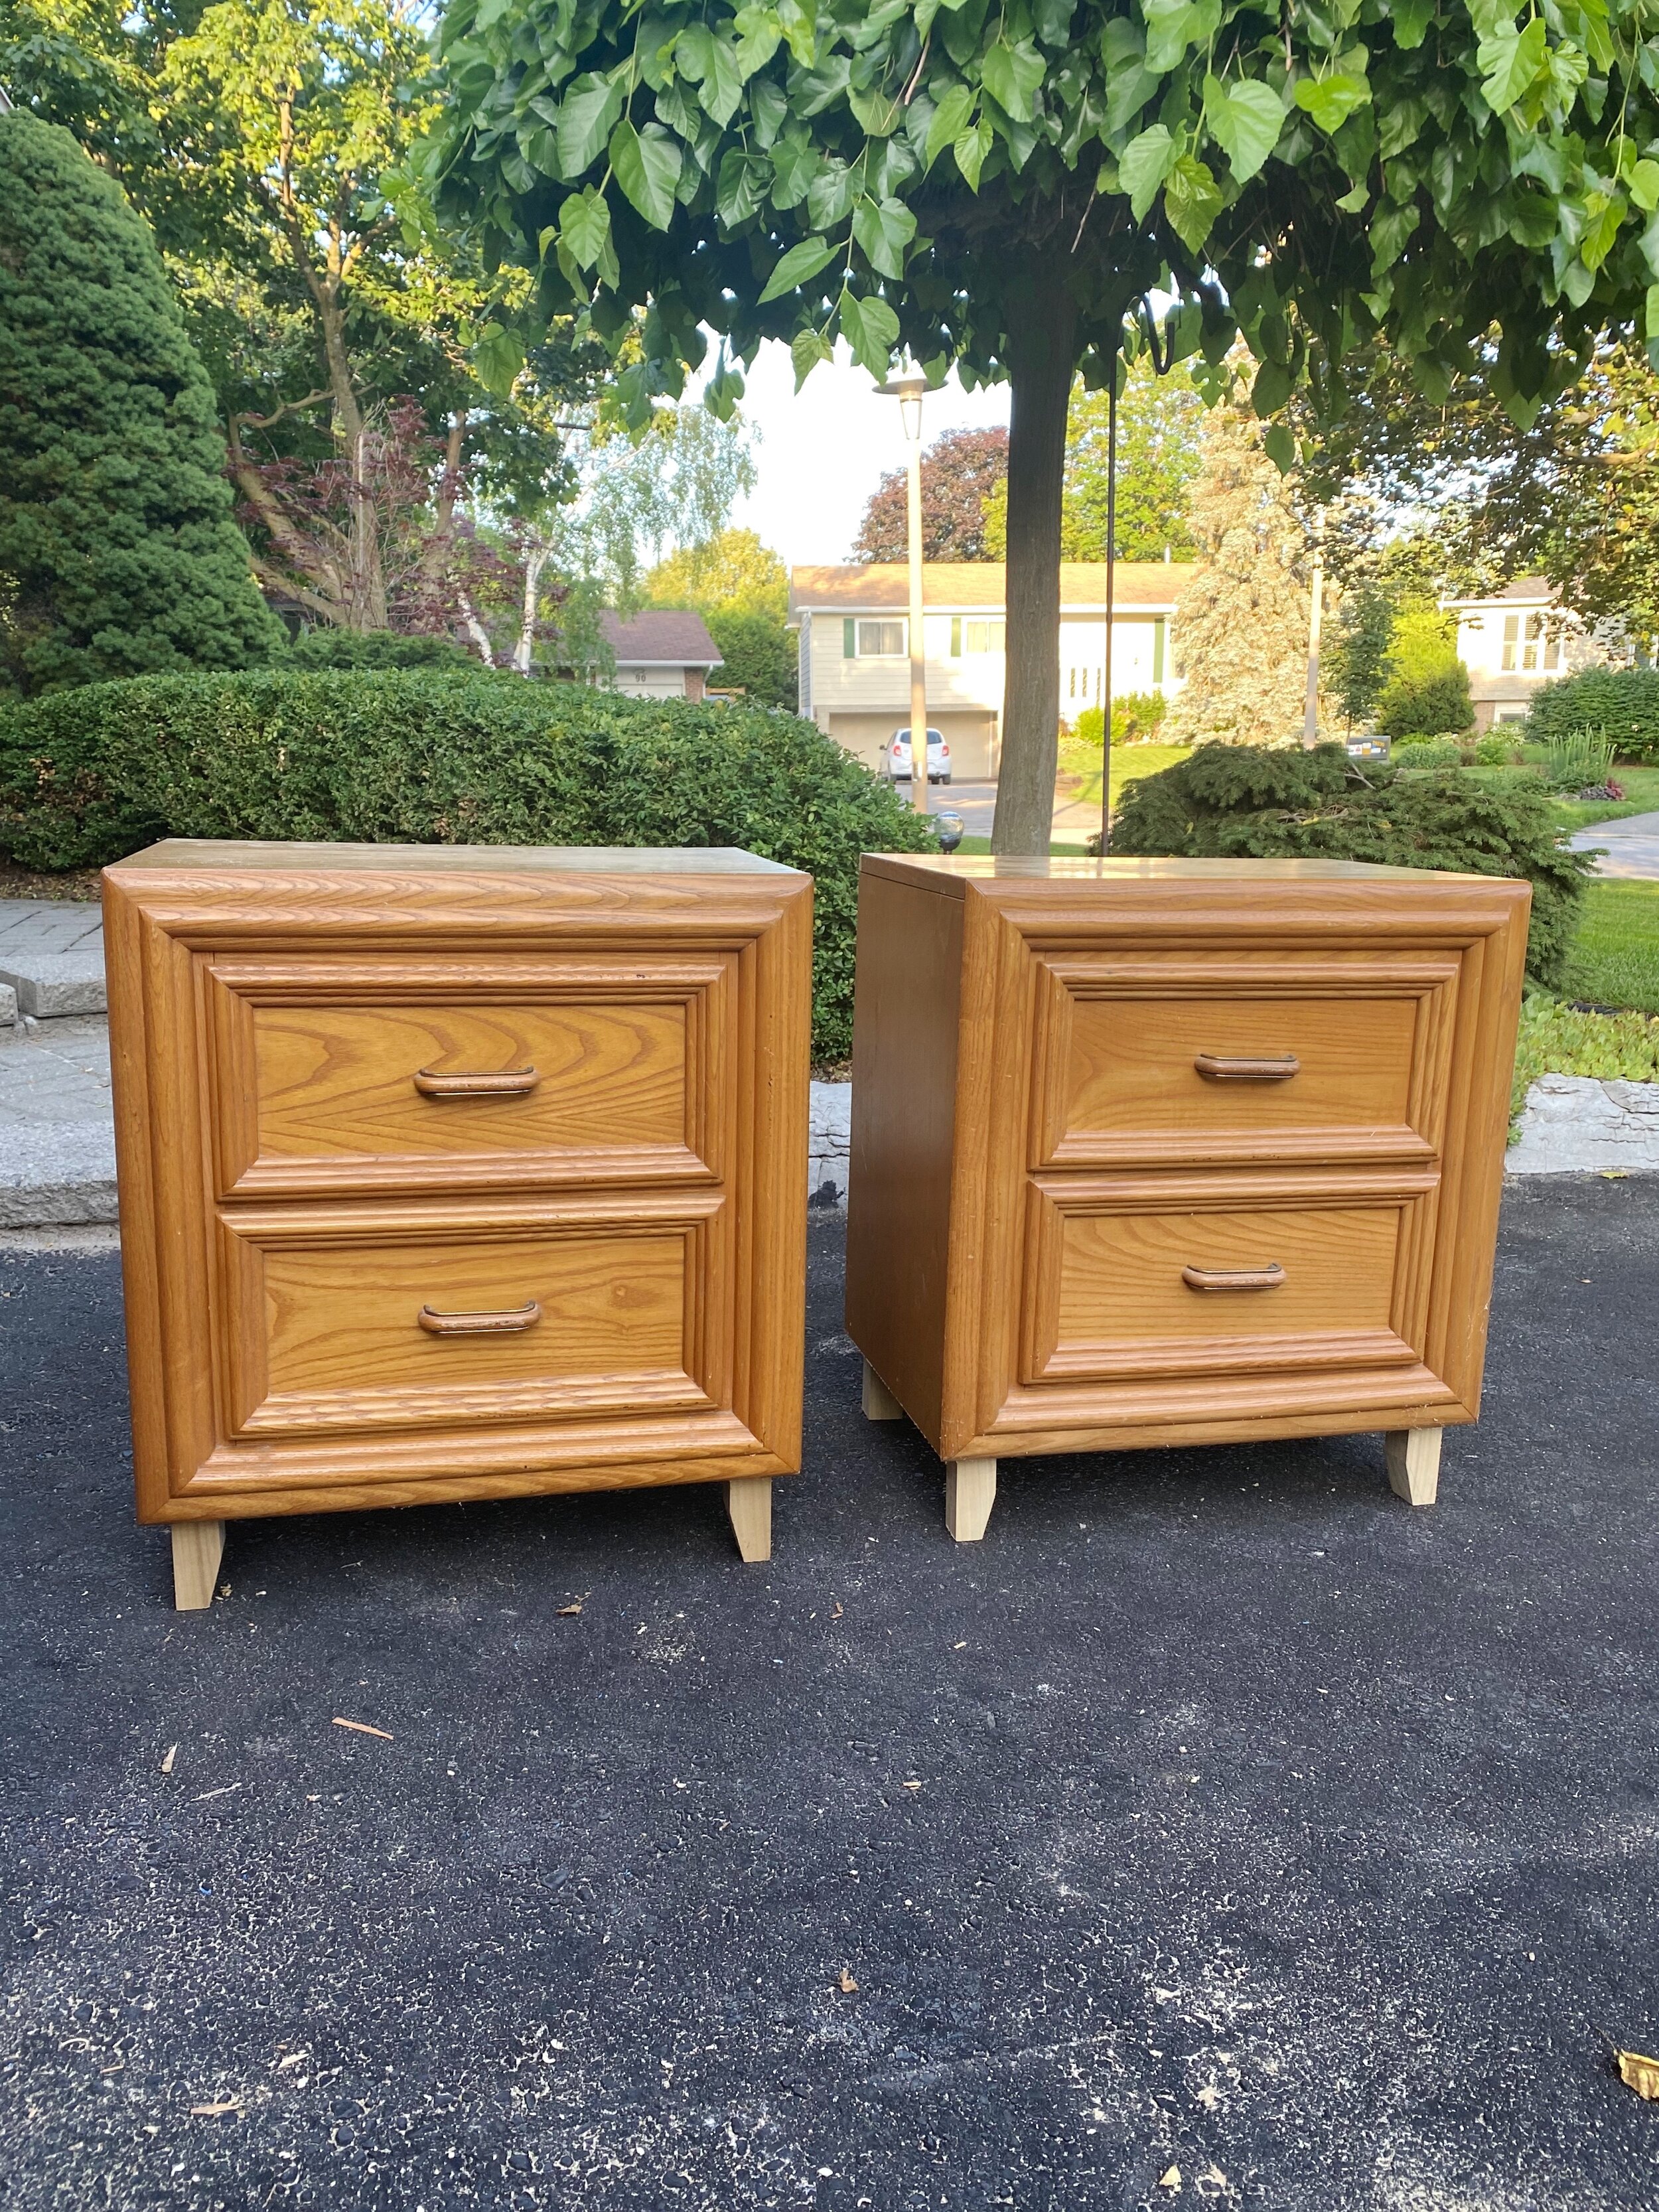
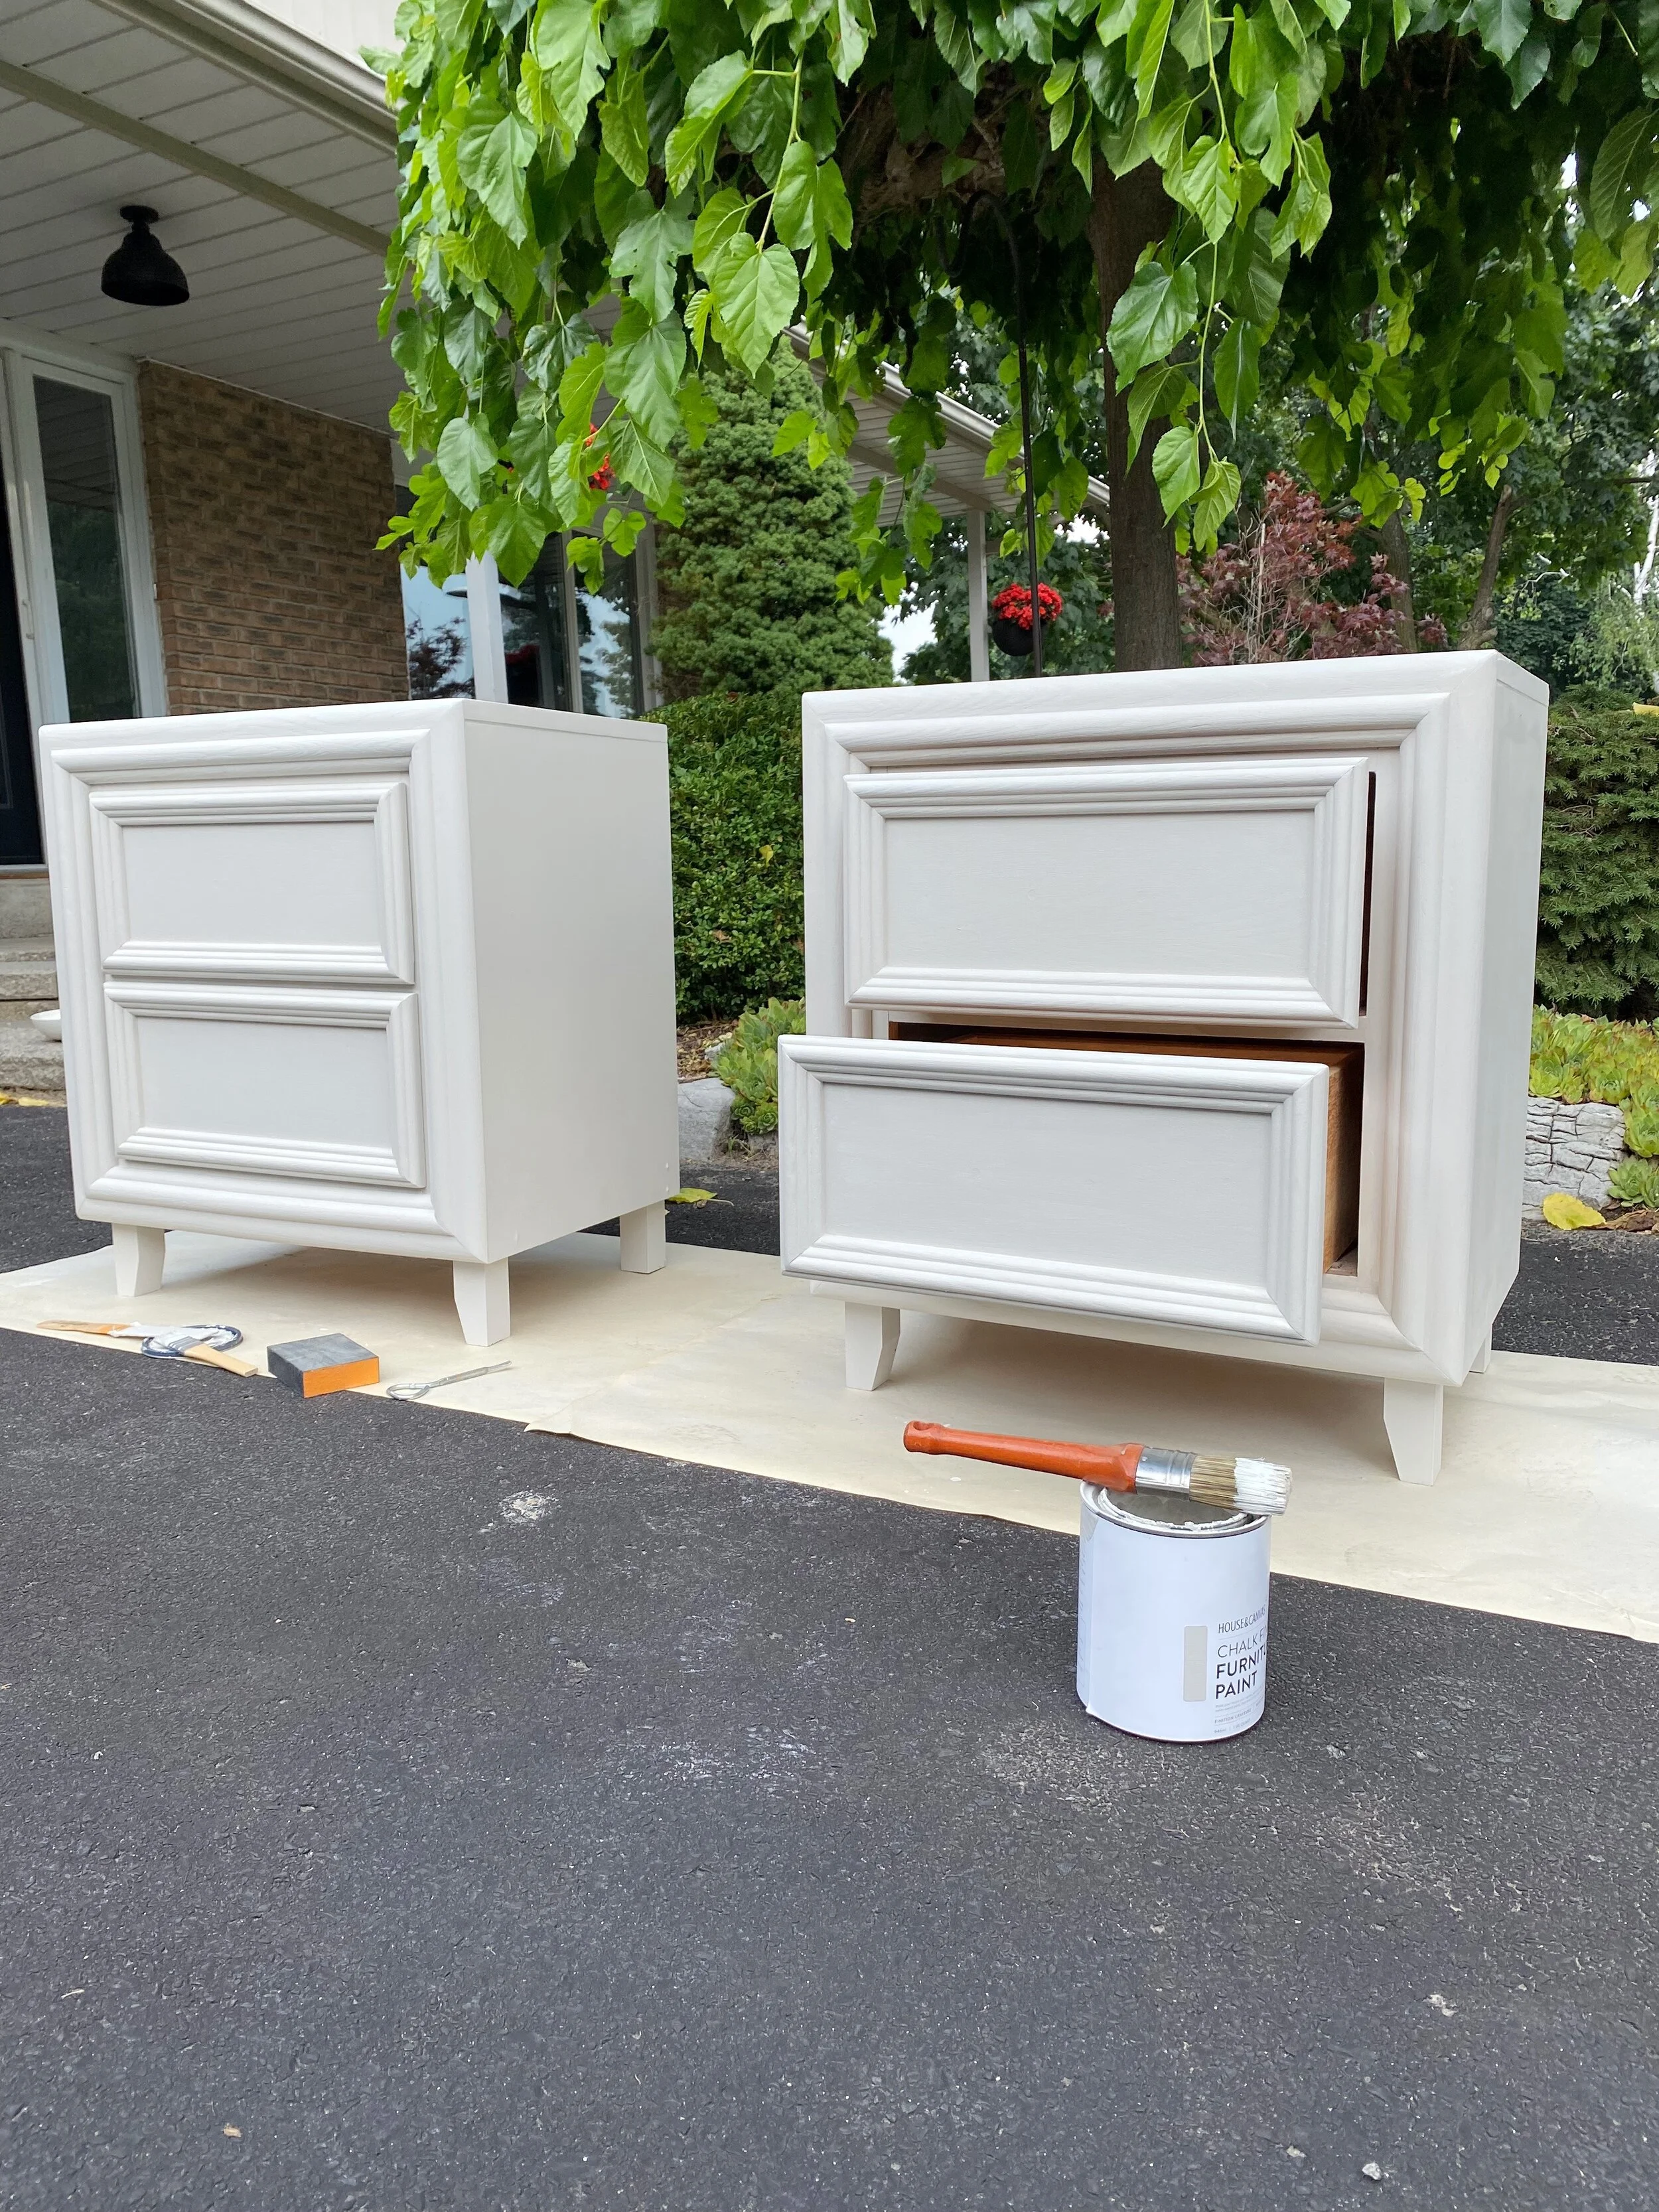
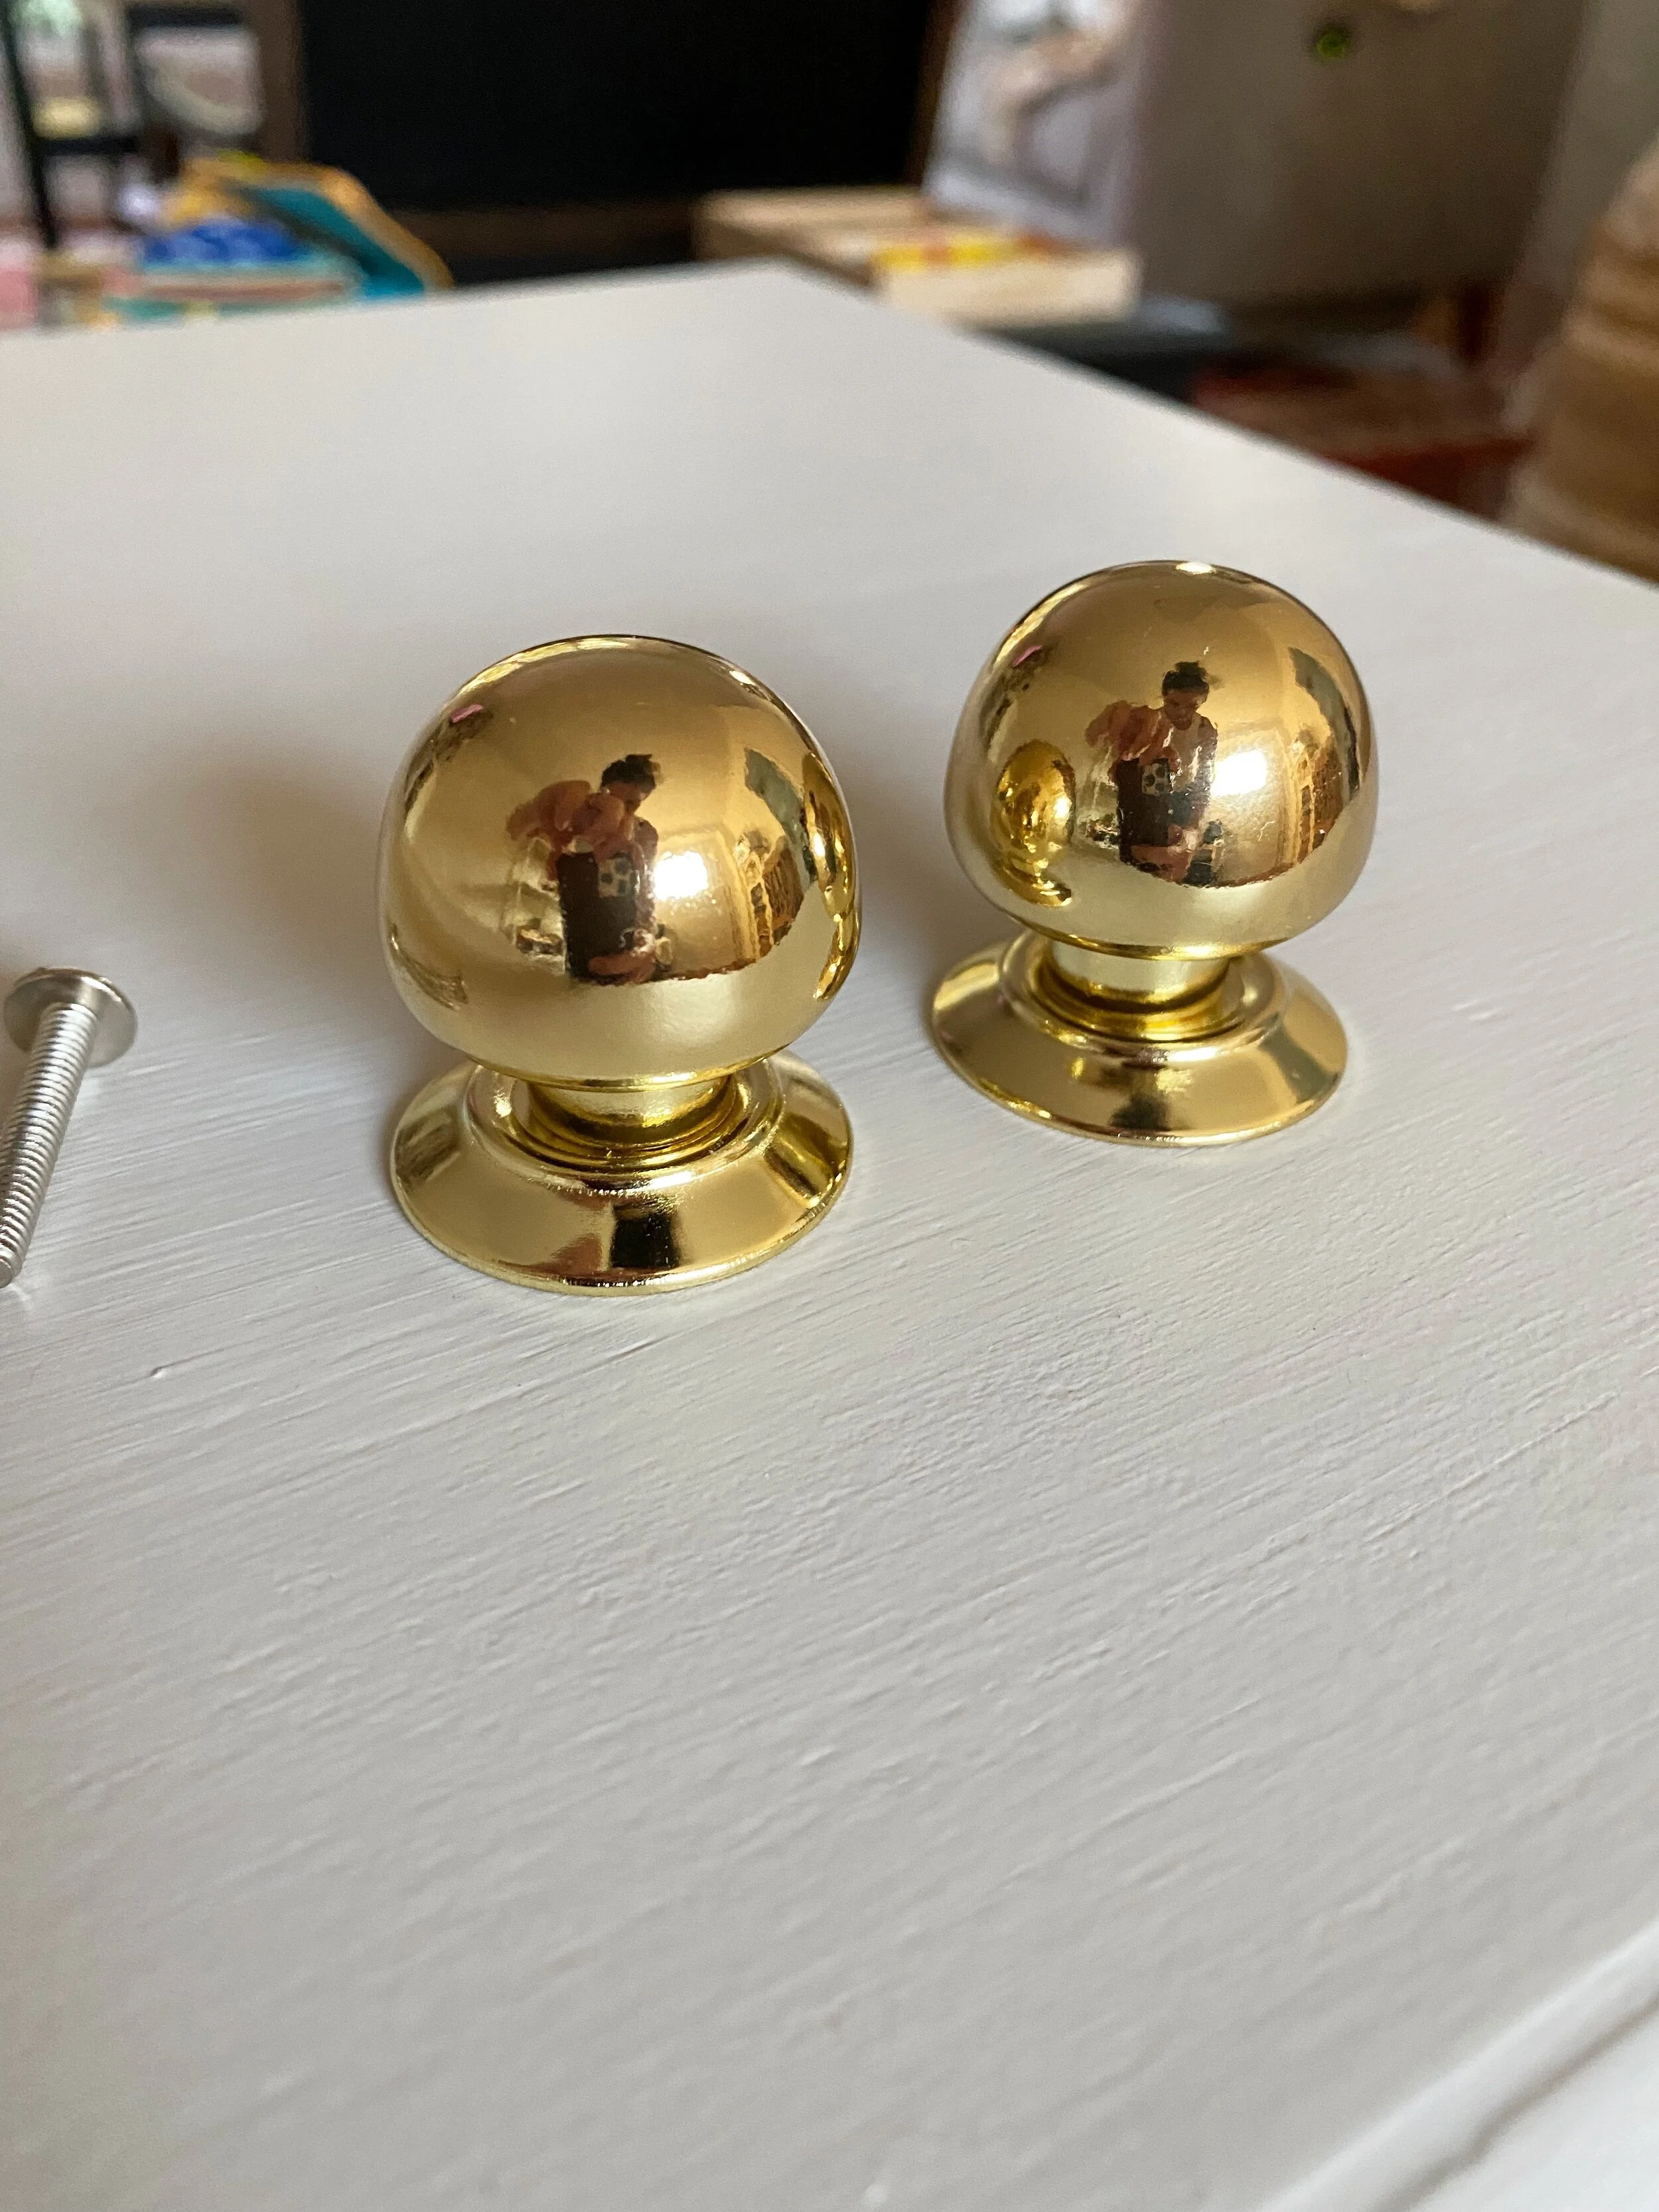
The original bedside tables felt clunky and heavy because they sat directly on the floor. I felt that the best way to elevate their design was to literally elevate their presence. I decided that I wanted to remove the skirting at the bottom (that extra few inches of wood) and prop them up on some pretty squared-off legs. This part of the transformation felt the most intimidating to me, but I knew that once I got that covered, I could move on to the exciting and fun changes like paint and hardware. Other than the legs, I decided I would paint the entire unit (including the new legs) in one solid colour to really highlight the trim details and make them feel more modern. And of course, the hardware makes all the difference, so I decided I would remove the existing drawer pulls and swap in some classy gold knobs instead.
Step 2: Execute The Legs
There are a lot of pre-made leg options out there that would make this part of the process much easier. But I had a vision for a very specific set of legs that I had seen Andrea from DIY Wife use on a few of her furniture flips, so I decided to follow her tutorial and build my own. But first, I had to prep my tables for them.
The underside of my tables had different bits and bobs of hardware, like adjustable metal feet (likely for levelling) and scratch pads. I removed anything I didn’t need and popped off the front skirting board. I then had to cut off some of the side pieces to create an even bottom. I used a straight piece of wood as a fence, fastened it down tight using a clamp, and ran my circular saw against it to create a clean straight cut. This removed a couple of inches off the height of my unit, but still left a bit of overhang so I could attach my legs to the underside and hide how they were attached underneath.
To create the legs, I used two 2’ pieces of 2x2 poplar. My bedside tables aren’t very heavy so I felt like I could get away with a softer (and less expensive) wood like poplar, but if you create legs for a heavier unit, you would probably want to use a nice hardwood like red oak. As I mentioned, I followed Andrea’s tutorial to add a little angular detail to the front legs (you won’t see the back legs so I didn’t bother with those) using my miter saw. Her tutorial covers a lot of safety tips and tricks to achieve this, so check that out if it is something you would want to try yourself. I determined how high I wanted to boost my tables off the ground (about 5” or so) and cut my leg lengths based on that measurement.

To attach the legs, I decided to try out my newest addition to my tool collection: my Kreg jig. This little jig allowed me to screw the legs to the underside of the unit without making any visible holes that I would need to fill later. If a Kreg jig isn’t an option for you, you can always counter sink a few holes and attach the legs and then fill them up before painting. The difference that a few inches of leg height made to the look of these tables was amazing! It was definitely worth the effort.
Step 3: Prep for Paint
The more projects I take on, the more I am realizing that the brunt of the work is often in the prep. These tables were no exception. There was still a lot that I needed to do before starting to paint. First and foremost, I gave them a really good cleaning. The backs of these units were fully open, so they needed a really good vacuum and wipe down after living in our garage for a few months. I used a bucket of warm water and Dawn dish soap to scrub them down before wiping off all the soap residue with a clean damp cloth. It’s so important to clean your furniture pieces before you paint, as even small bits of dirt and grime can bleed through your paint finish. I also took this opportunity to remove the old hardware.
Next I had to make a few repairs. I closed off the back of the units using some pieces of scrap 1/4” plywood. The backs obviously won’t be seen, but I did this for the practical purpose of preventing any dust from accumulating on the insides once these lived in our bedroom. I filled the old hardware holes and any damaged areas with some spackling. Some of the bigger areas required a few coats with a light sanding in between, but this worked really well to clean up the lines and make the units look more substantial and sharp.
The last step for prep was to give the entire unit a quick scuff sand. Scuff sanding requires using a high grit sandpaper to just slightly roughen up the finish so that your primer has a little bit of grit to grip onto. This ensures that your painted finish holds up well over time. Just be sure to wipe off any of the sanding dust before proceeding to the paint step.
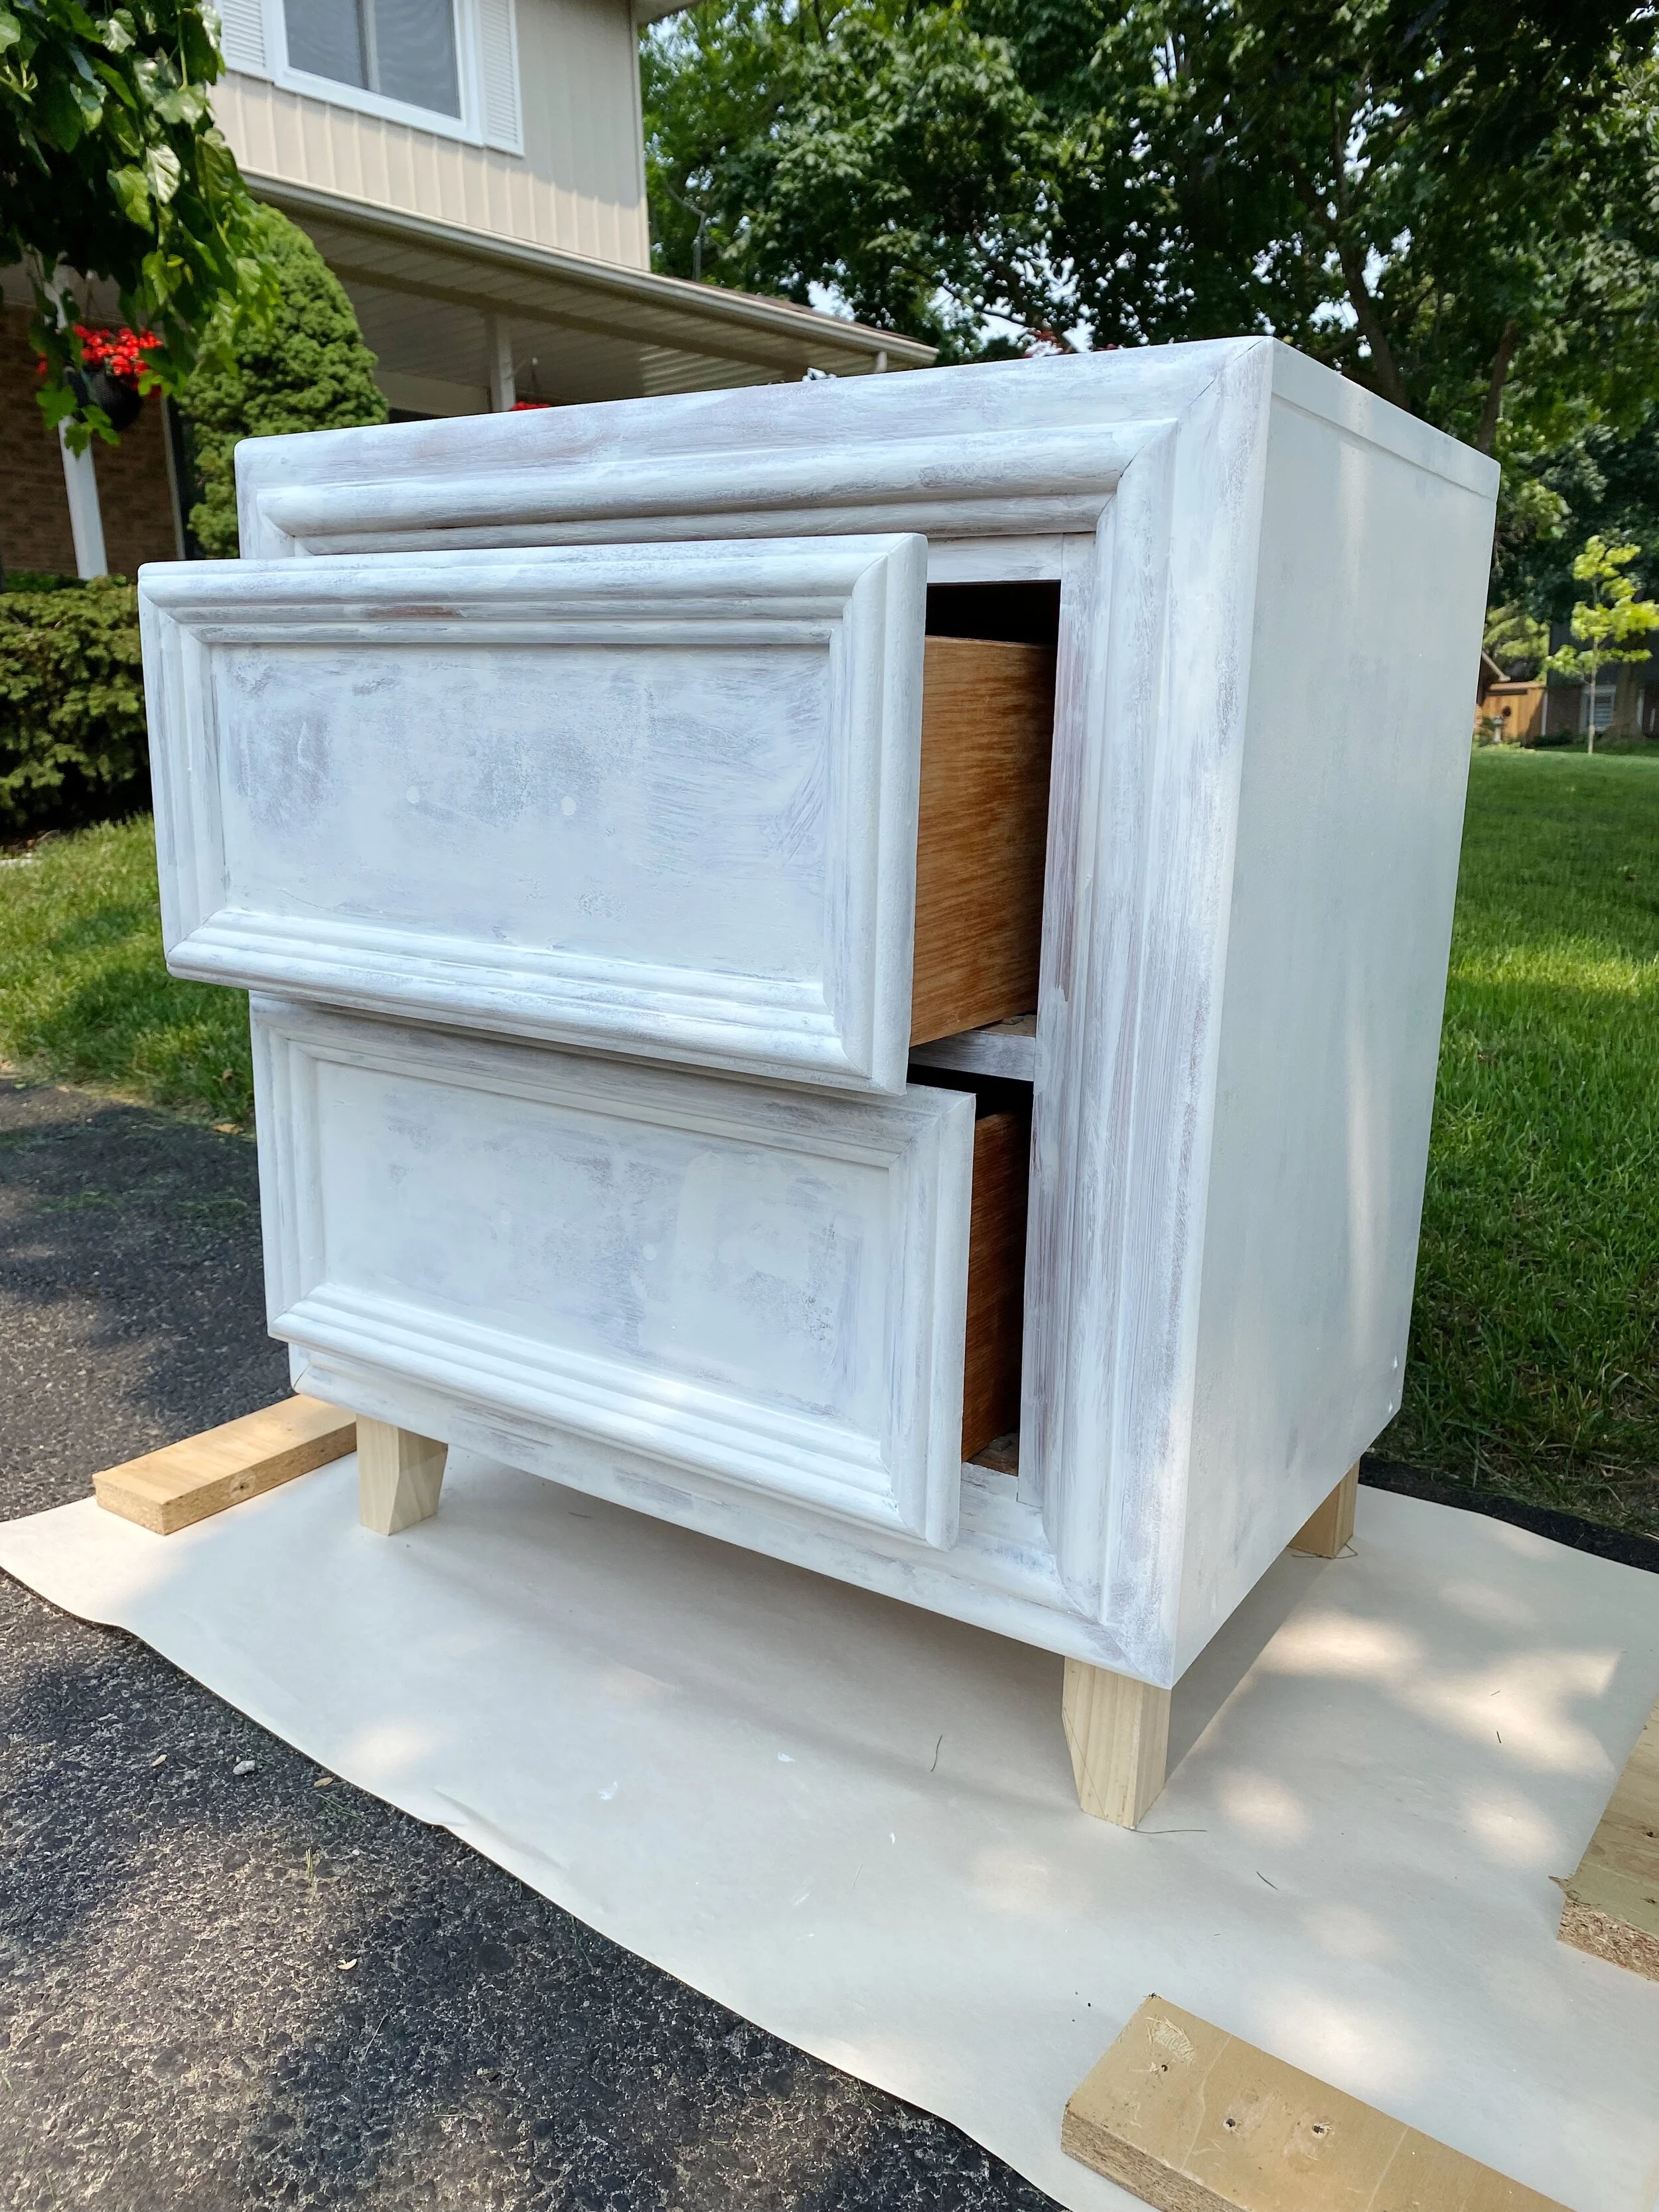
Step 4: Paint!
This is definitely the most exciting step because the entire transformation really starts to take shape. To ensure these would hold up well, I opted to prime them first using the Zinsser BIN Shellac-Base Primer. This primer is stinky and messy to clean up, but it works so well for furniture painting projects. The shellac locks in any stains on the wood surface and prevents them from bleeding through to your painted finish. Not to mention that it just gives you a really strong foundation to hold the paint. I gave both units one coat of primer and gave it ample time to dry before doing a light sand with a high grit sandpaper to smooth out any brush strokes and texture.
It was finally time to bring some life to these pieces! I opted to paint them a really beautiful light greige tone called Sandstone using the House and Canvas chalk paint. This paint is really thick and smooth, so it has great coverage and tone. I used a brush on these tables because there was so much trim work to get into, but a roller would work well on a smoother surface. I ended up giving them two full coats of paint and added a third in a few areas that needed a little more coverage. The finish was so flat and smooth.

Step 5: Finishing Touches
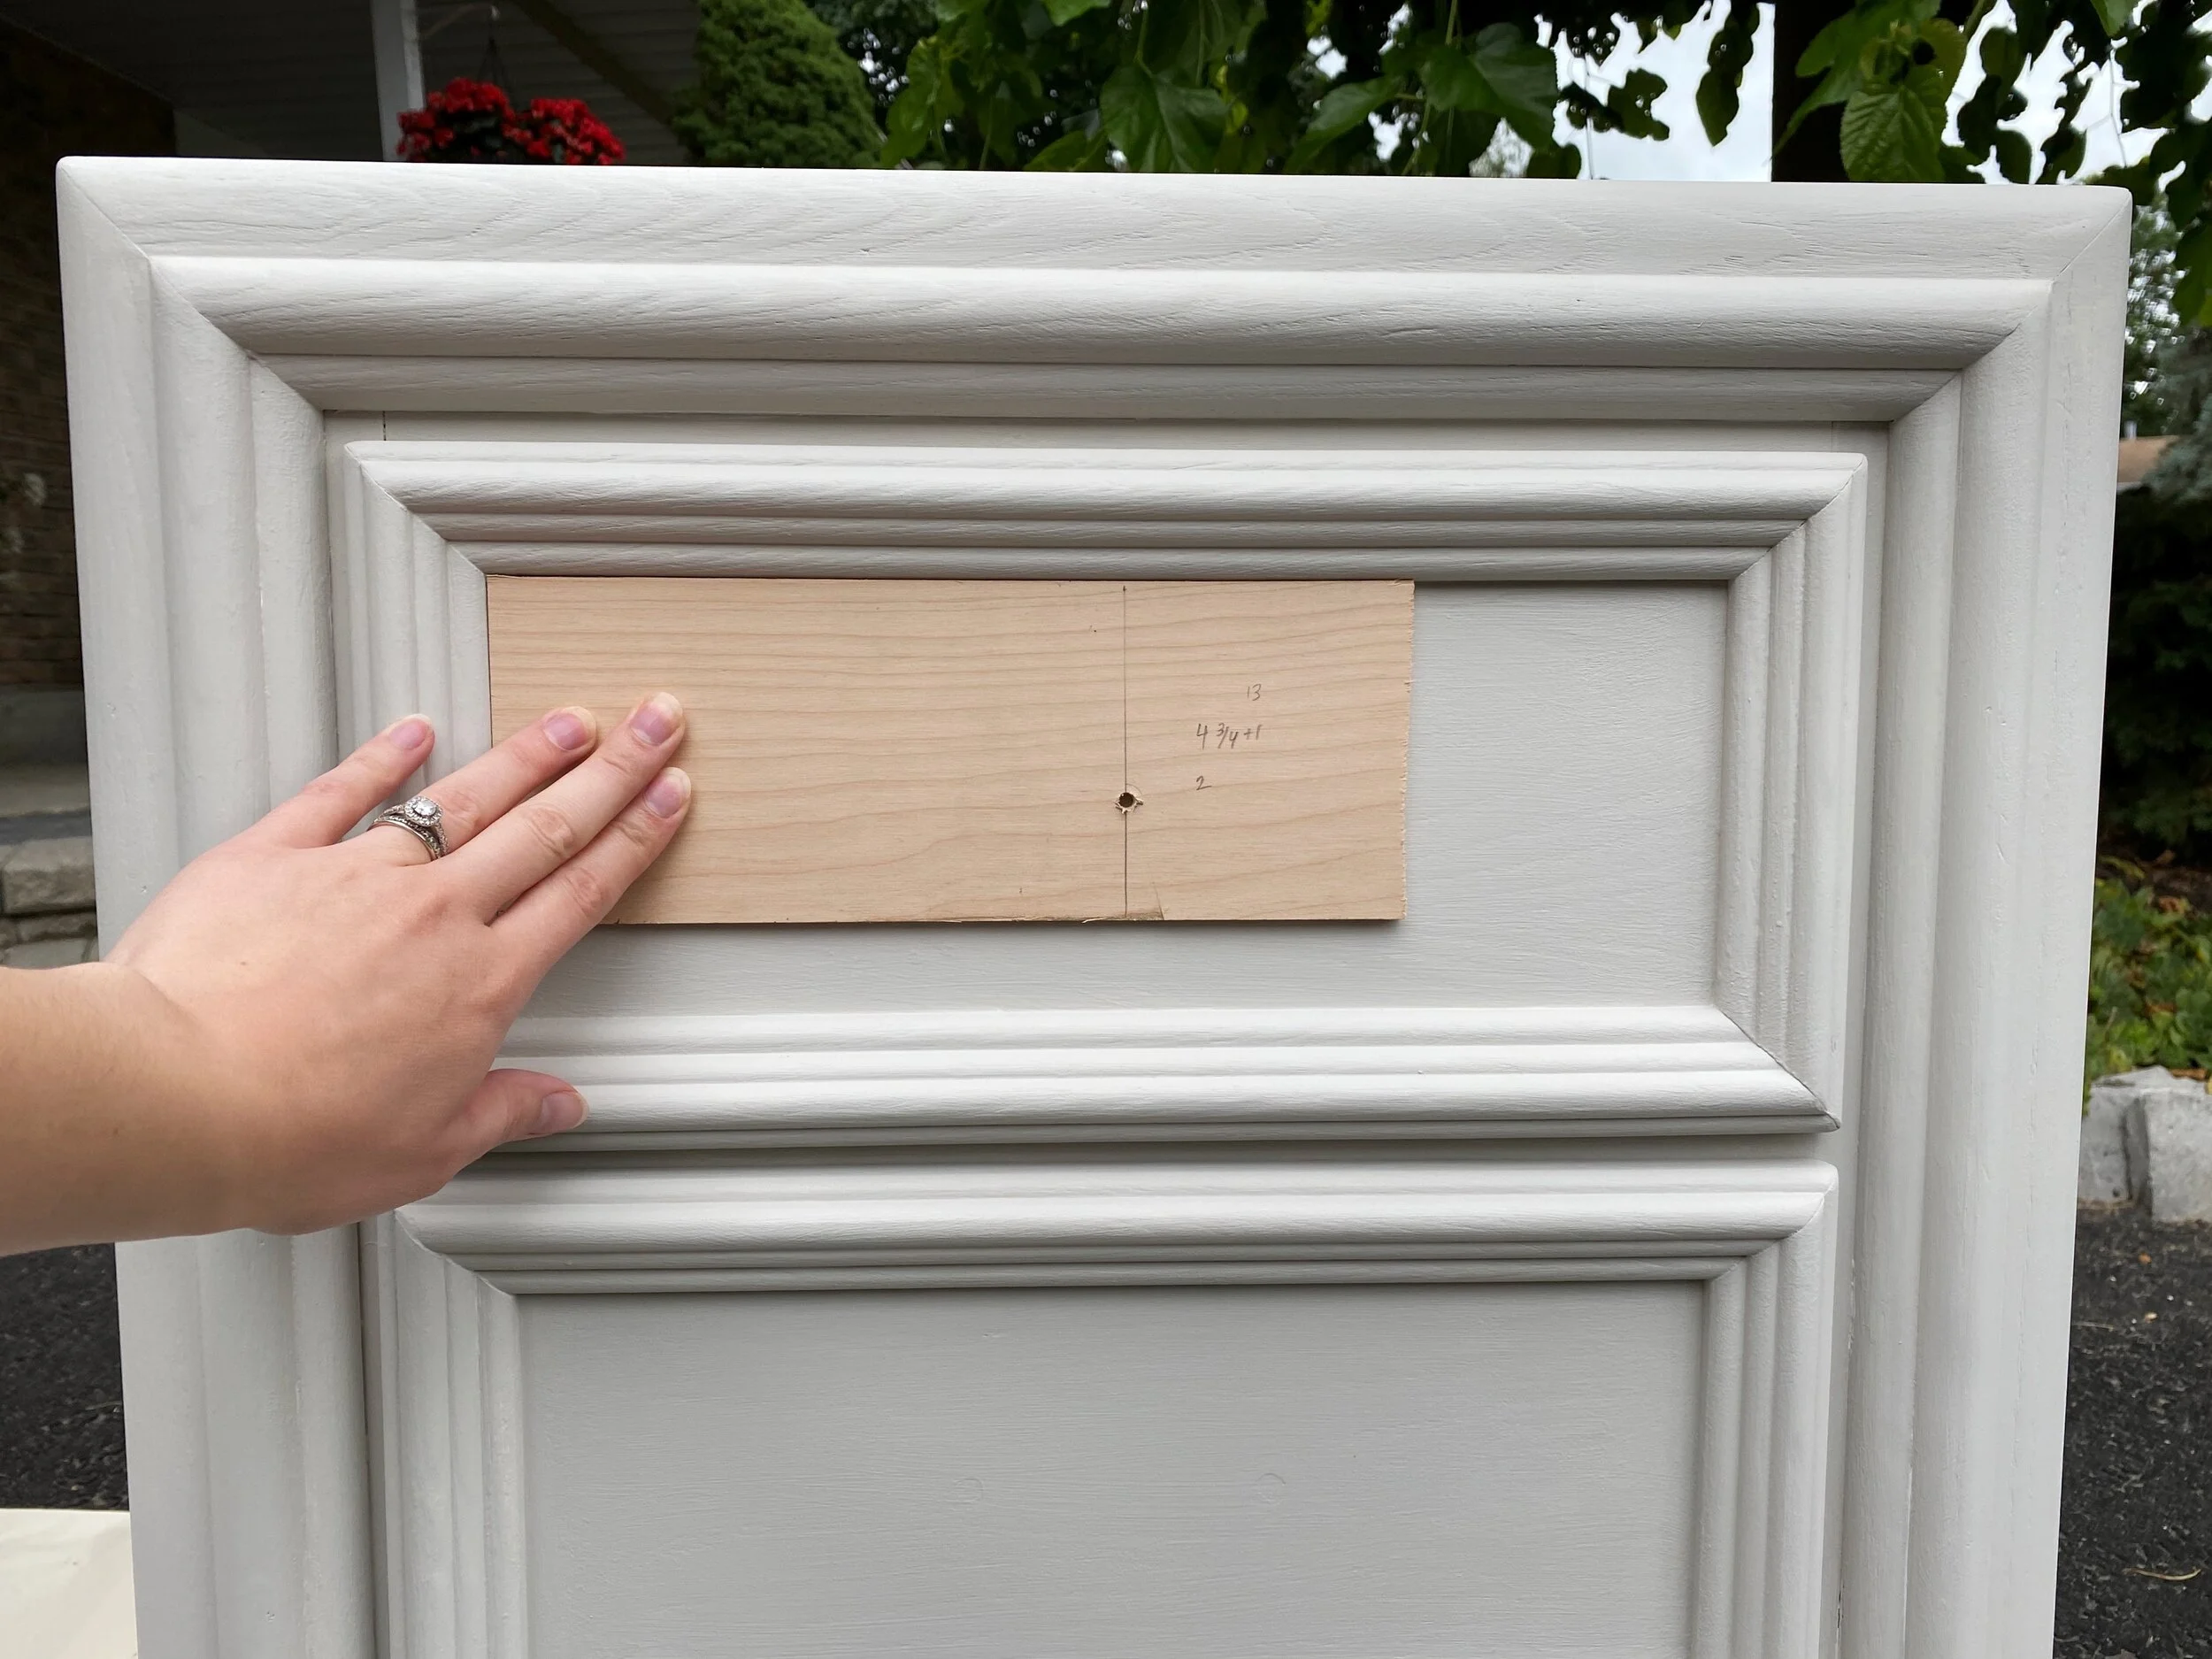
I gave the paint a couple of days to fully dry and cure before moving onto the finishing touches. The first thing I did was drill the holes for the new hardware. I created a little jig out of scrap plywood that would help me consistently line up the proper placement for the hardware on each drawer. The hardware I selected was a single knob for each drawer, so I only needed to add one hole per drawer.
By this point, I brought the pieces inside to apply the topcoat. I used the House and Canvas clear topcoat in a flat finish to seal them up. I took my time to brush it on, ensuring that I didn’t repeatedly go over my existing brush strokes. It went on really shiny, but dried to a beautiful matte finish. By this point, I added a felt furniture pad to the bottom of each leg so the tables wouldn’t scratch our floors and cut a fresh piece of anti-microbial drawer liner for each drawer. After the topcoat had fully cured, I added on the beautiful gold knobs and these pieces were finally complete!
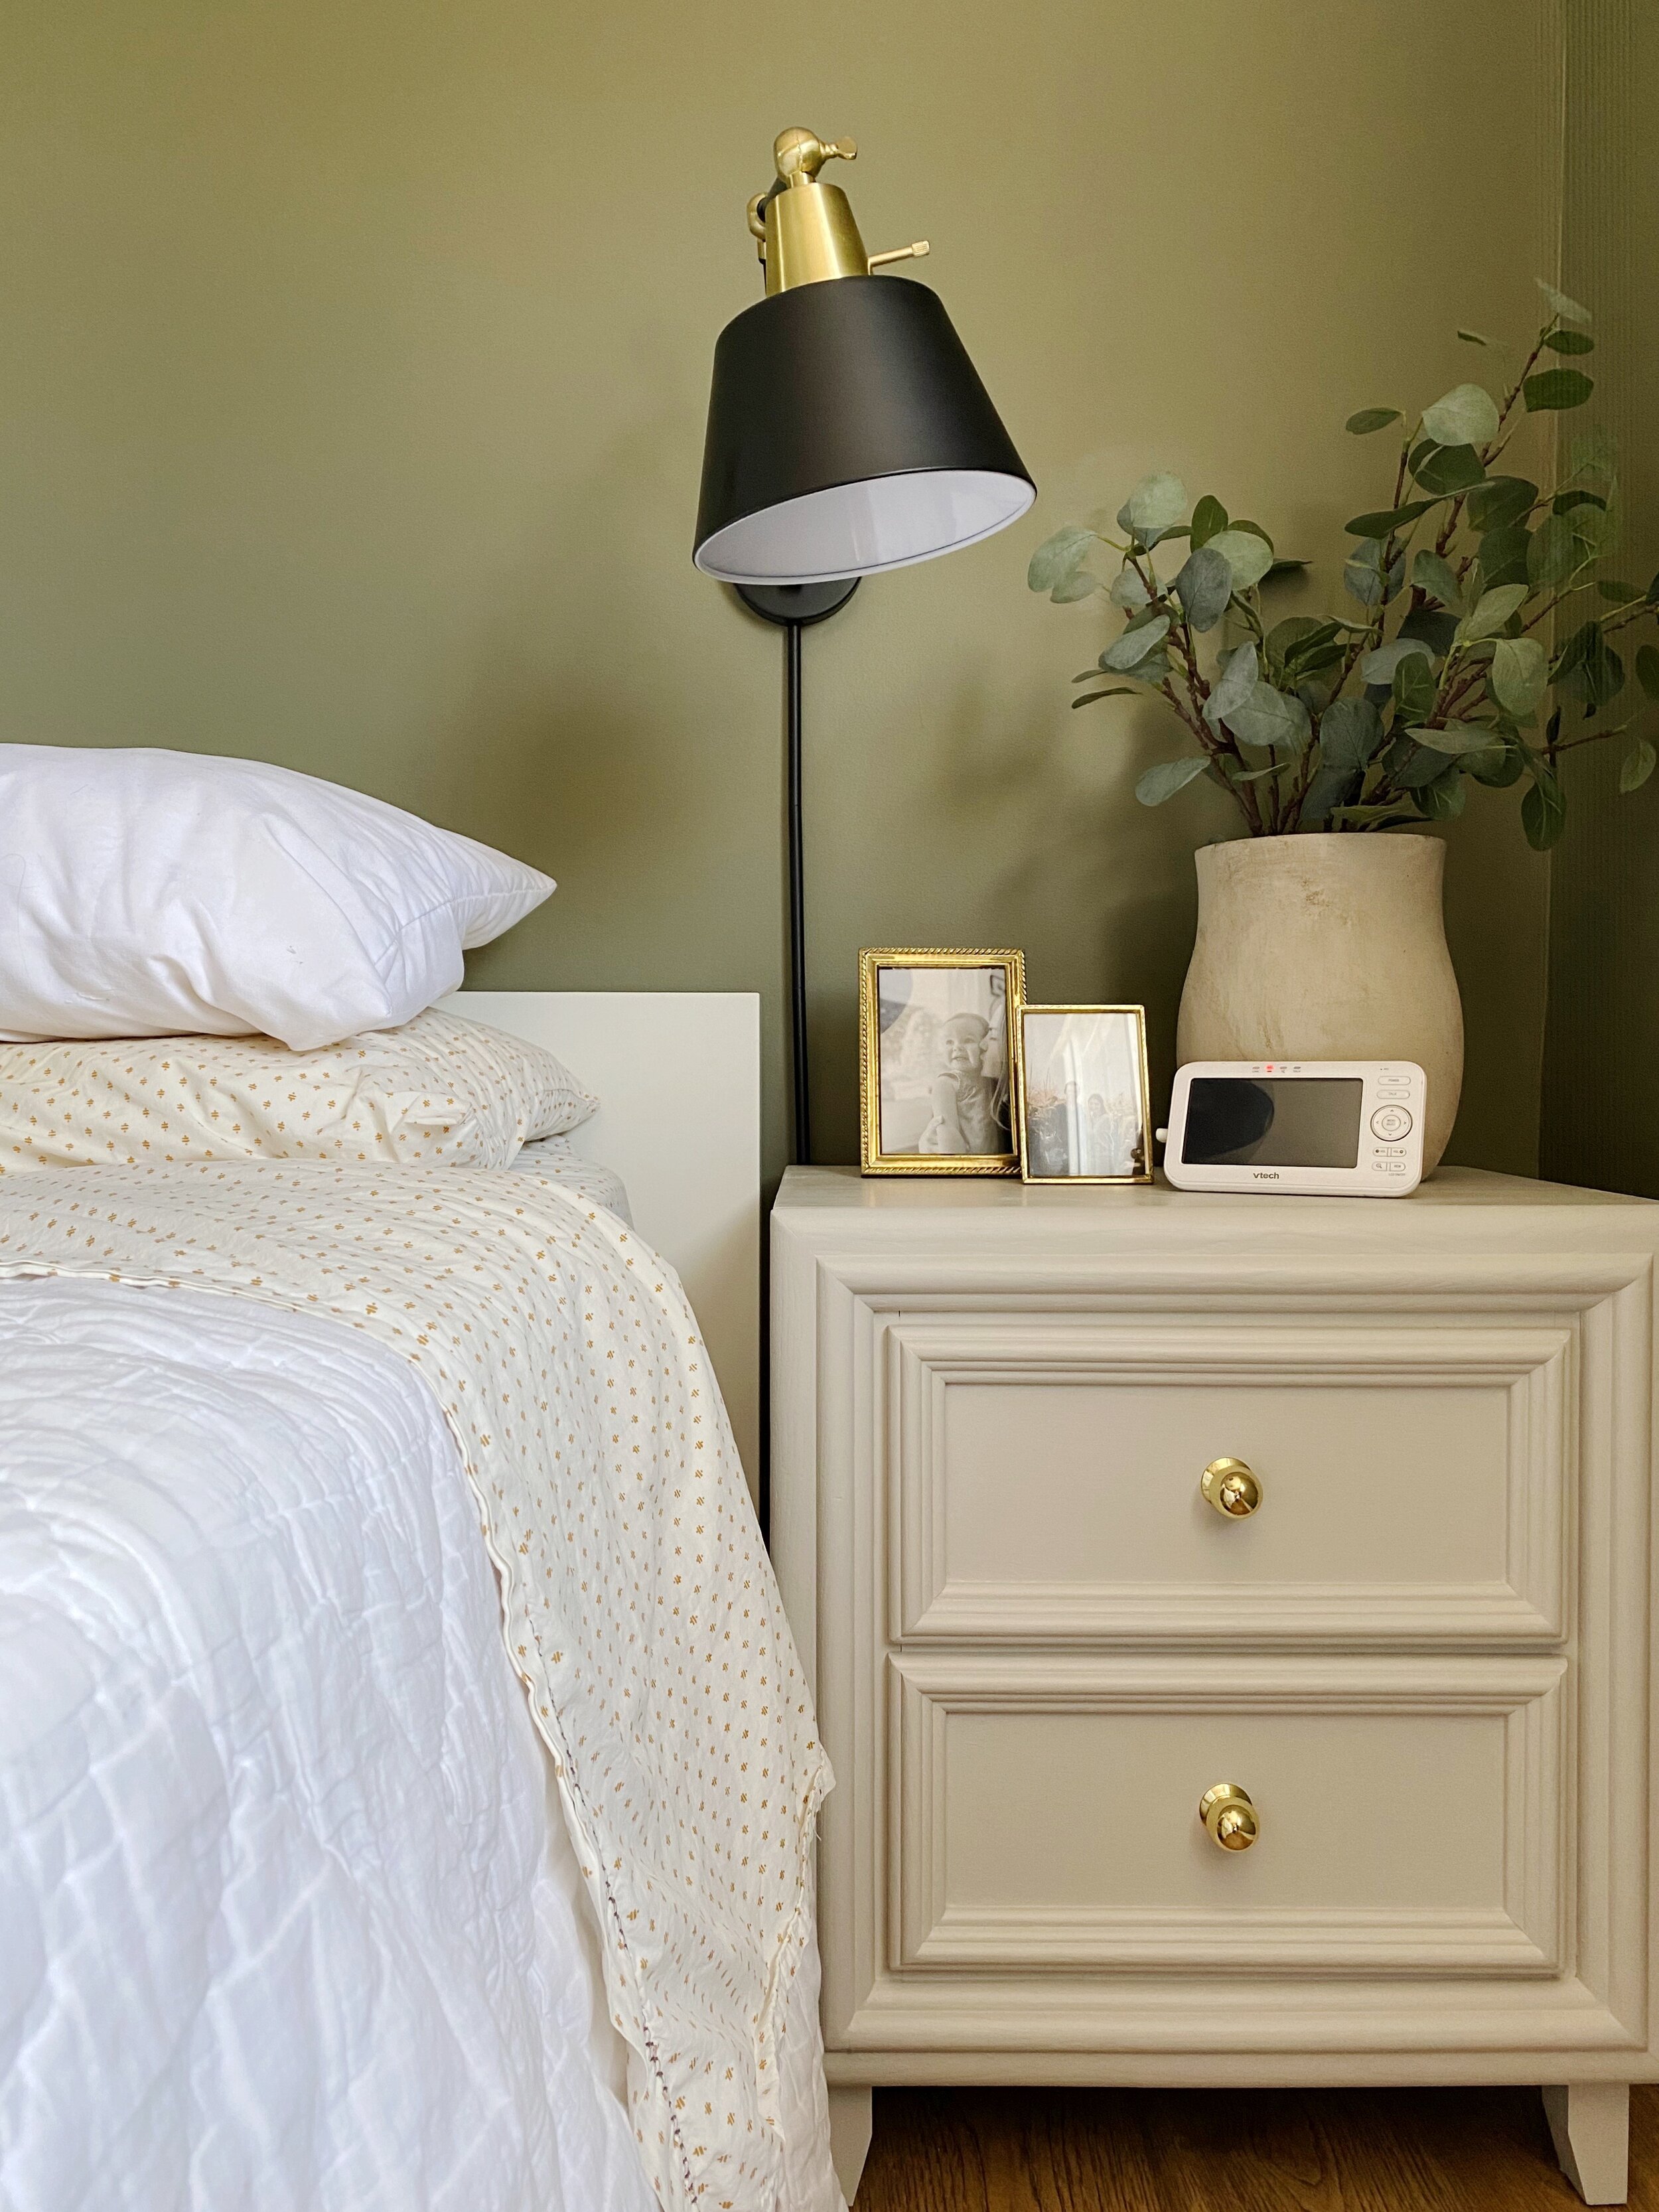
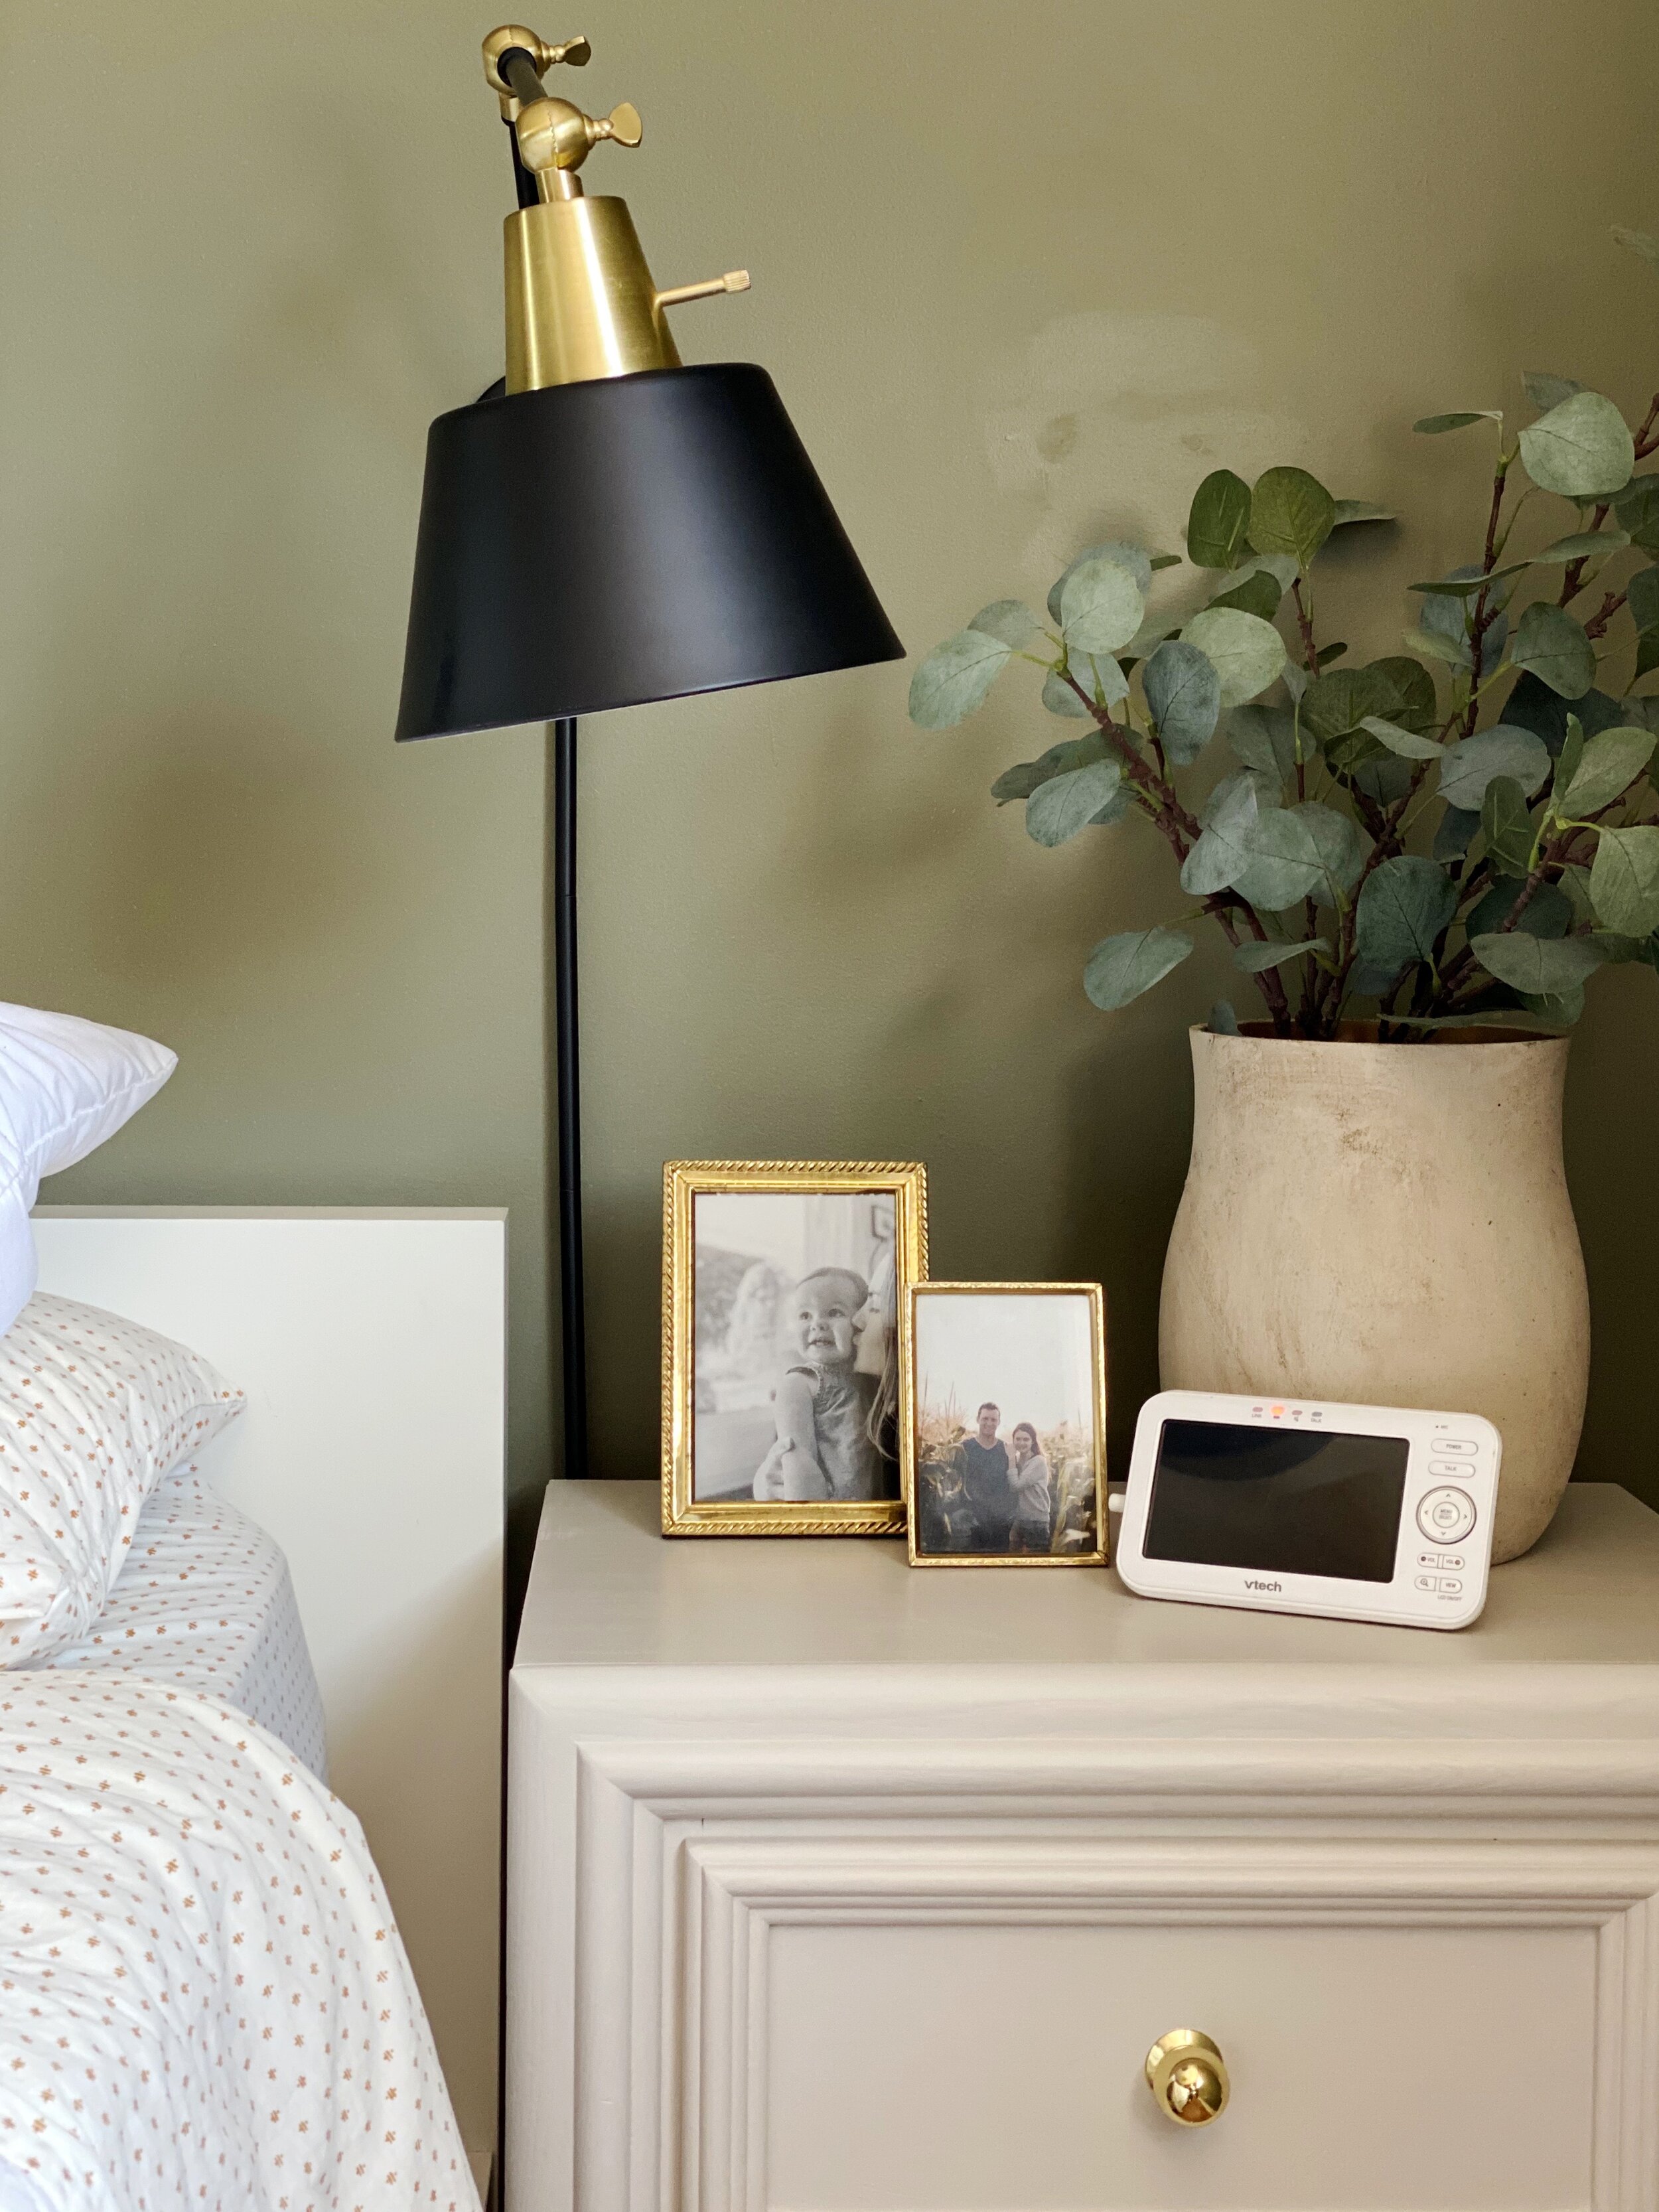
As I mentioned, the entire process took me a few weeks to complete because I was only able to work away at them during a select few nap times. But if that time were compounded, it really didn’t take much time or effort to completely transform these little side tables. I love the classic traditional style elements on these tables through the trim work and pretty ball knobs, but appreciate that they feel modern and updated with their clean shape and matte painted finish. They definitely bring a big punch of style to our otherwise drab bedroom and have left me feeling really inspired about the potential in this room. It’s amazing to see the impact that one small shift can make in a space.
What do you think - do you feel like you could tackle a little furniture flip like this? It really was so fun to see the transformation take shape and I’m already feeling inspired to tackle my next furniture flip. There’s no greater satisfaction than seeing a vision come to life - especially when it only cost you $15.

Disclaimer: This post contains some affiliate links. Learn more about our Affiliate Disclosure here.